2.5 Setting a relay server
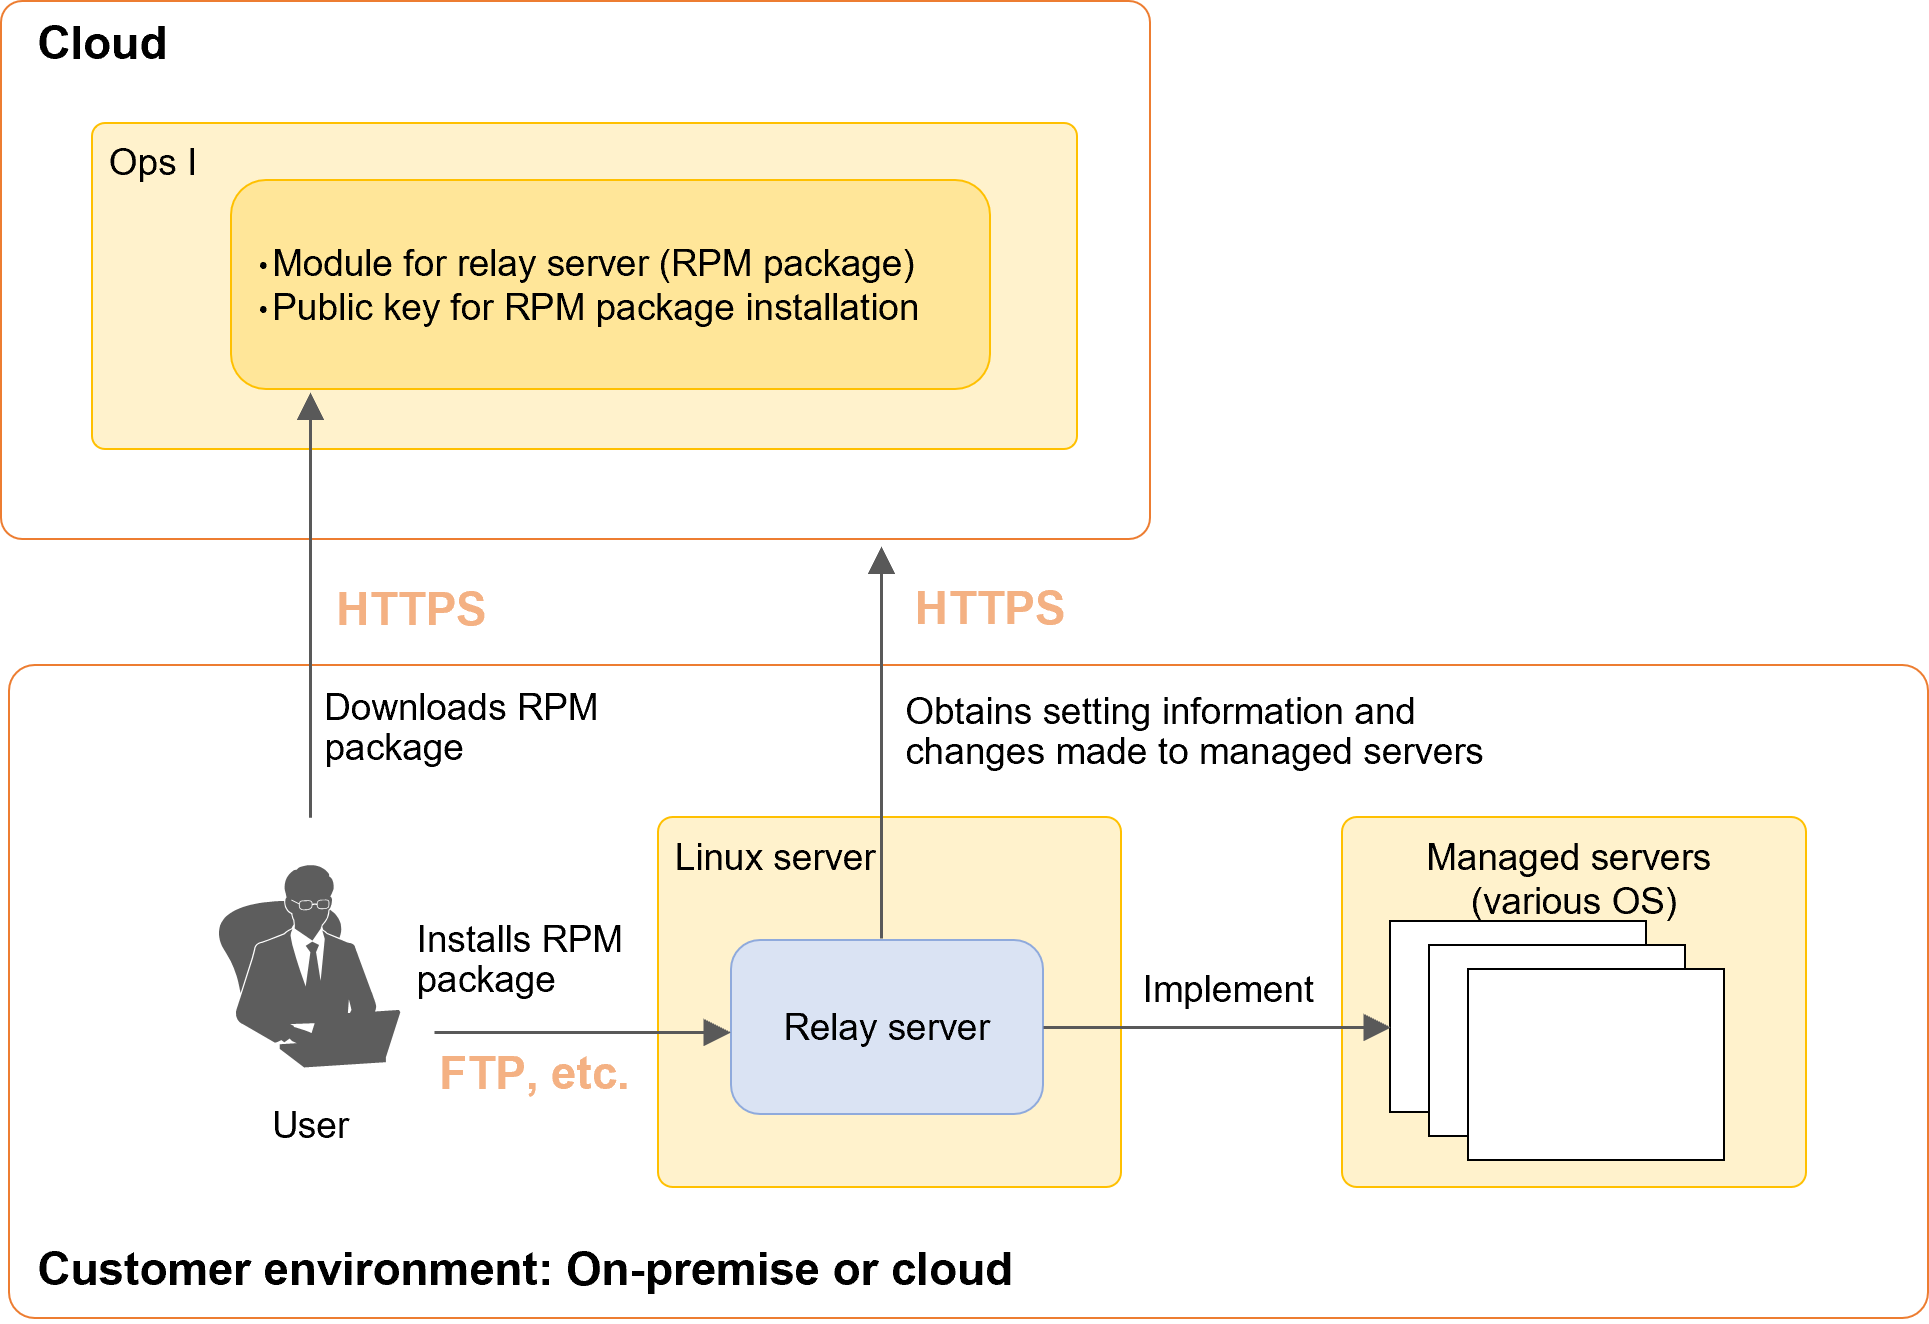
By using a relay server, Ops I operations can be performed in a hybrid cloud to leverage the advantages of cloud and on-premise environments. This section describes the procedure for setting a relay server.
Setting the relay server function “outpost” allows the automation application (AWX) jobs to be performed from an on-premise environment.
(Figure) System configuration of relay server
(1) Components of relay server function “outpost”
Outpost consists of the following components.
(Table) Configuration of outpost
| Component | Outline |
|---|---|
| Control plane |
|
| Agent |
|
| Node |
|
| Node group |
|
| IP block |
|
The following functions are used to connect Ops I (cloud) and relay servers (on-premises).
(Figure) Configuration of outpost

(2) Flow of configuring outpost
The flow consists of the following Steps ① to ⑦.
Steps ① to ④ are performed in Ops I and Steps ⑤ to ⑦ are performed in the relay server.
[Setting in Ops I]
① Setting up users and assigning roles
Use a user dedicated for the outpost configuration (recommended) or an existing user assigned the Pre-Installed role "Outpost".
The Primitive role "automation_manager" or "automation_auditor" must also be assigned to watch Ops I outpost management and download the RPM package.
For information on creating users, see "Users". For information on assigning roles, see "Roles".
② Obtaining Ops I tokens
The issued Ops I token will not be able to be viewed once you move to another window. Keep a note of the Ops I token.
For details, see "API reference overview" > "Prerequisite knowledge" > "Obtaining Ops I tokens" in "JP1 Cloud Service/Operations Integration API Reference".
③ Checking control plane information
④ Downloading RPM package
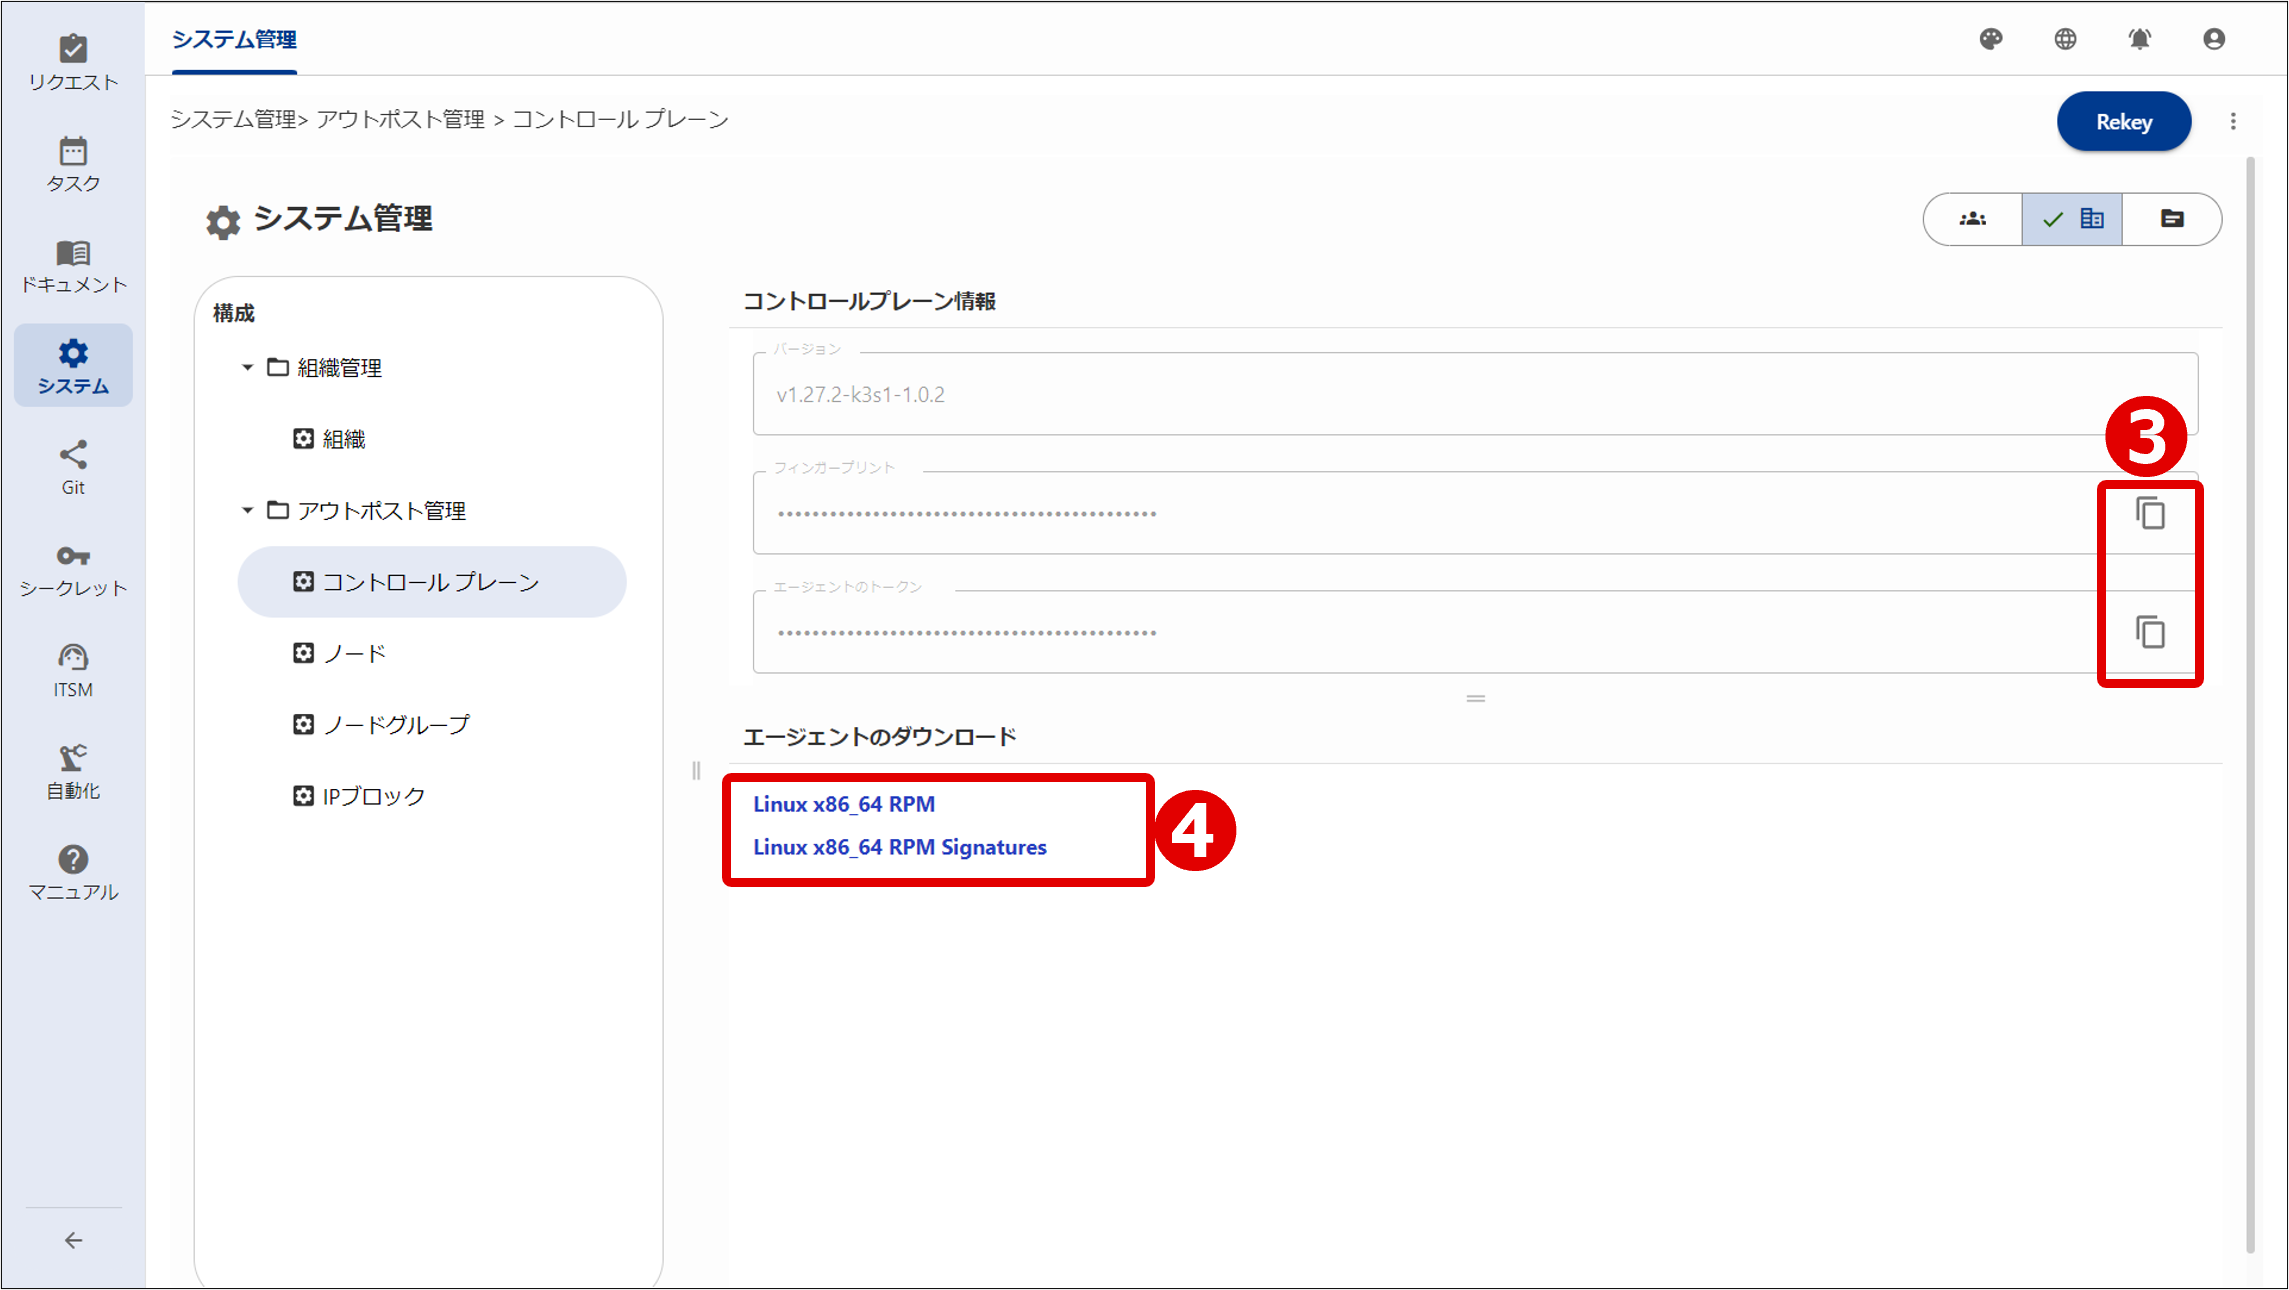
For information on the Control Plane window, see “Control plane management”.
[Setting in relay server]
⑤ Installing RPM package
# rpm -ivh opsi-outpost-RPM Package Version.x86_64.rpm
⑥ Editing user-configured file
For information on the contents of the installed RPM package, see "Contents of RPM package".
(Table) Setting items in user-configured file
| Item | Setting name* | What to set |
|---|---|---|
| Ops I domain name | OPSI_DOMAIN_NAME | - |
| HTTP proxy URL (optional) | HTTP_PROXY | HTTP proxy server URL If the environment in which the agent is deployed is required to communicate with Ops I via a proxy server, specify the proxy server. |
| Control plane fingerprint | FINGERPRINT | Fingerprint obtained in Step ③ |
| Control plane agent token | AGENT_TOKEN | Agent token obtained in Step ③ |
| Ops I token | OPSI_TOKEN | Ops I token created in Step ② |
| Node name | NODE_NAME | Set an arbitrary name. However, use one-byte lowercase letters and do not set any name duplicated within the outpost configuration. The name that you set appears on the Node window of Ops I. |
| TCP port of the agent | REGISTRATION_PORT TUNNEL_PORT1 TUNNEL_PORT2 |
TCP port used by the agent to communicate with the control plane All three ports should be specified in the actual environment. TUNNEL_PORT2 should be commented out because it is not specified in the verification environment. [Default values] REGISTRATION_PORT:21400 TUNNEL_PORT1:21401 TUNNEL_PORT2:21402 |
The contents of the template file for the user-configured file are as follows.
######################################################
# Ops I Outpost Agent Configuration
#
# This file is a template of the Outpost Agent configuration.
# You must copy this file to /etc/opsi/outpost/outpost-config.env and
# edit it to change the parameters as appropriate for your environment.
######################################################
# The domain name of your Ops I tenant.
OPSI_DOMAIN_NAME=your-tenant.ops-integration.com
# (Optional) A URL of HTTP proxy server the Outpost Agent will use for
# connecting to the Ops I tenant.
# This parameter will be encrypted and replaced with HTTP_PROXY_ENC
# when the Outpost Agent starts for the first time.
# Uncomment the next line to enable this parameter.
# HTTP_PROXY=http://username:password@proxy.example.com:8080
# The fingerprint of the Outpost Control Plane.
FINGERPRINT=your_outpost_control_planes_fingerprint
# The agent token of the Outpost Control Plane.
# This parameter will be encrypted and replaced with AGENT_TOKEN_ENC
# when the Outpost Agent starts for the first time.
AGENT_TOKEN=your_outpost_control_planes_agent_token
# An Ops I token the Outpost Agent will use for accessing the Ops I tenant.
# This parameter will be encrypted and replaced with OPSI_TOKEN_ENC
# when the Outpost Agent starts for the first time.
OPSI_TOKEN=your_opsi_token
# A name of the Outpost Node on which the Outpost Agent will run.
# The name must follow the convention of DNS domain name and
# all alphabet letters in it must be lowercase.
NODE_NAME=outpost-node
# TCP ports the Outpost Agent will open on the Outpost Node.
REGISTRATION_PORT=21400
TUNNEL_PORT1=21401
TUNNEL_PORT2=21402
⑦ Starting outpost agent
# ./opsiopctl.sh start
Are you sure to proceed? (y/n)
y
Starting Outpost Agent.
Starting chisel.service.
Starting k3s.service.
Started Outpost Agent successfully
 Notes
Notes
When installing anti-virus software on a relay server registered as a node, exclude the following directories from the monitoring target.
- /etc/rancher/k3s
- /run/k3s
- /run/flannel
- /var/lib/rancher/k3s
- /var/lib/kubelet
- /run/netns/cni-
- /var/lib/cni/
- /etc/opsi
- /opt/opsi
- /var/opt/opsi
- /etc/opt/opsi
For information on the flow of job execution using a relay server, see “Using a relay server”.
(3) Deleting nodes
To delete nodes, follow the Steps ① to ⑥ below.
Steps ① to ⑤ are performed in the relay server and Step ⑥ is performed in Ops I.
① Stopping and initializing outpost
# /opt/opsi/outpost/bin/opsiopctl.sh stop -f
# reboot
② Deleting RPM package
# rpm -e opsi-outpost-RPM Package Version.x86_64
③ Deleting systemd-related files and reflecting changes
# rm -f /etc/systemd/system/k3s.service
# rm -f /etc/systemd/system/chisel.service
# systemctl daemon-reload
④ Deleting unnecessary directories
# rm -rf /etc/rancher/k3s
# rm -rf /run/k3s
# rm -rf /run/flannel
# rm -rf /var/lib/rancher/k3s
# rm -rf /var/lib/kubelet
# rm -rf "/run/netns/cni-"
# rm -rf /var/lib/cni/
# rm -rf /etc/opsi
# rm -rf /opt/opsi
# rm -rf /var/opt/opsi
# rm -rf /etc/opt/opsi
⑤ Reboot
# reboot
⑥ Deleting nodes in the Outpost Management window
Deleting a node in the Outpost Management window allows a node with the same name to be re-registered. An attempt to register a node without deleting another registered node with the same name will time out when performing Step ⑦ in "Flow of configuring outpost".
For details on the Node window, see "Node management".
(4) Upgrade outpost agent
Upgrade the outpost agent by following steps ① through ④ below.
Operations ① and ② are performed by Ops I, and operations ③ and ④ are performed by the relay server.
①Download new RPM package
② Confirm that there are no jobs running on the outpost node
- Do not run a workflow that executes a job that runs on an outpost node.
- In the AWX GUI, confirm that there are no jobs running on the outpost node. If yes, wait until the jobs are completed.
③Upgrade RPM package
# rpm -Uvh opsi-outpost-RPM package version.x86_64.rpm
④Restart outpost agent
- Stop the outpost agent.
# /opt/opsi/outpost/bin/opsiopctl.sh stop -f
- Start the outpost agent.
# /opt/opsi/outpost/bin/opsiopctl.sh start -f
Section structure