4.3.10 Site management
For site applications, the OSS WordPress can be used to create and provide service portals for each customer or user department.
WordPress makes it possible to build websites in an intuitive way. In addition, plugins provide useful functions for site management. For information on the WordPress manuals, versions and editions, see “OSS version/edition and reference manuals” in the Appendix.
Hereafter, “service portal” will be referred to as “site” in site management.
(Table) Design items and outline of site management
| Item | Definition method | Key design points |
|---|---|---|
| Display and operation permissions based on roles | GUI | Consider the roles to be assigned to each user according to the scope of display and operation of the site administration windows. |
| Site configuration | GUI | Consider the Ops I windows to be embedded for each customer and using department, as well as the configuration of the site. |
| ACL and Statement | GUI | Consider setting up URI authorization to restrict access to the site. |
| Site publication and update | GUI | Consider the environment for exporting/importing sites in order to publish or update the site. Also, during updates and maintenance, the site will go into maintenance mode to prevent users from using the site. |
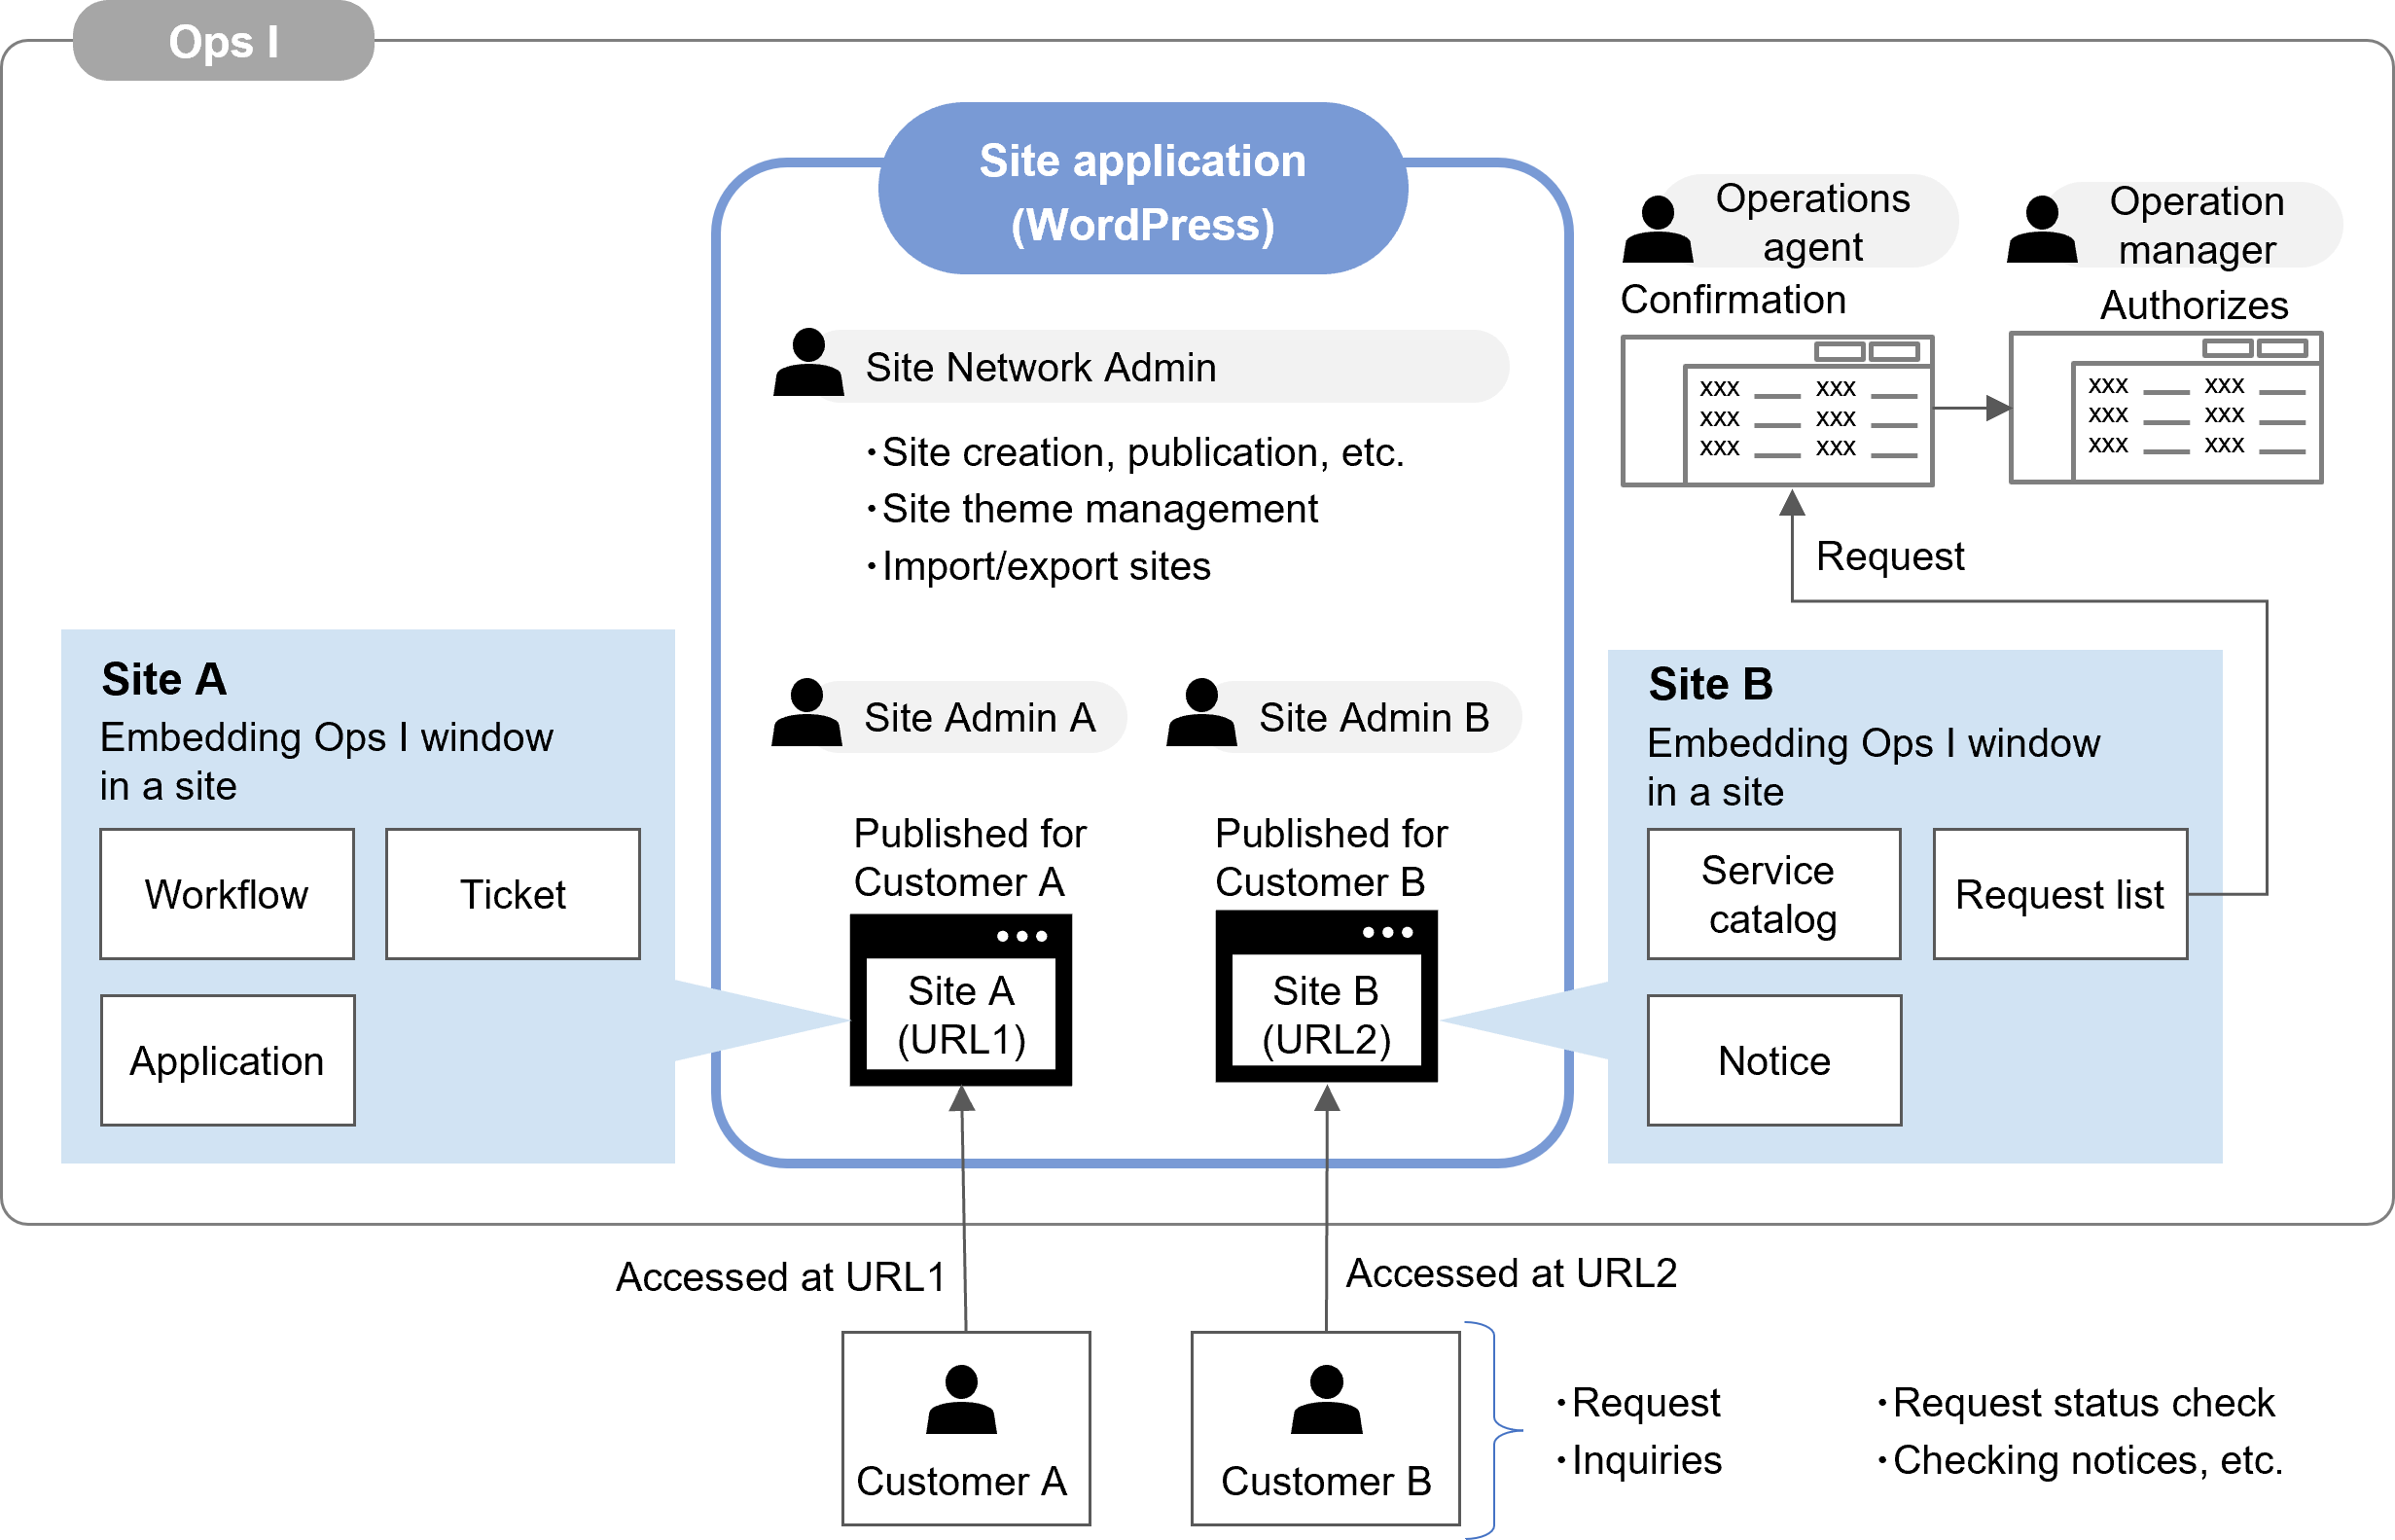
(1) Outline
The Ops I windows can be embedded in the site. For example, by embedding a window of a Service Catalog tab or a Ticket tab, customer users can apply or inquire from that site.
Multiple sites can be created, making it possible to offer a site for each customer or each department using the system.
The following is a site management outline chart.
(Figure) Site management outline chart
(2) Display and operation permissions based on roles
The Ops I role controls access to the site administration windows and operation permissions. The following is the correspondence between roles and display/operation permissions.
(Table) Correspondence between roles and operation/display permissions
| User types | Ops I roles (Primitive roles) |
Description |
|---|---|---|
| Site Network Admin | portal_network_admin | The following operations are available
|
| Site Admin | portal_site_admin | The following operations are available
|
| Author | portal_author | Can add and publish posts |
| Contributor | portal_contributor | Can add posts, but is unable to publish posts |
| Site subscriber | portal_subscriber | Can browse sites and posts and comment on posts |
Users assigned the Ops I roles in the table above (except “portal_subscriber”) can access the site administration windows (WordPress windows) from the Site Application in the menu area of the Ops I window.
Details of the Primitive role “portal_subscriber” are shown below.
- The Pre-Installed roles are the following, which apply to customer and requestor users.
- Requester User
- Requester Manager
- Customer User
- Customer Manager
- Cannot view the site administration windows
- Cannot access template sites (see "Main sites/template sites" for details on template sites)
- Users who have been assigned the Primitive role "portal_subscriber" and a role for managing the site other than "portal_subscriber" at the same time
- Users who have been assigned both the Pre-Installed role corresponding to the Primitive role "portal_subscriber" and the Site Administration role at the same time
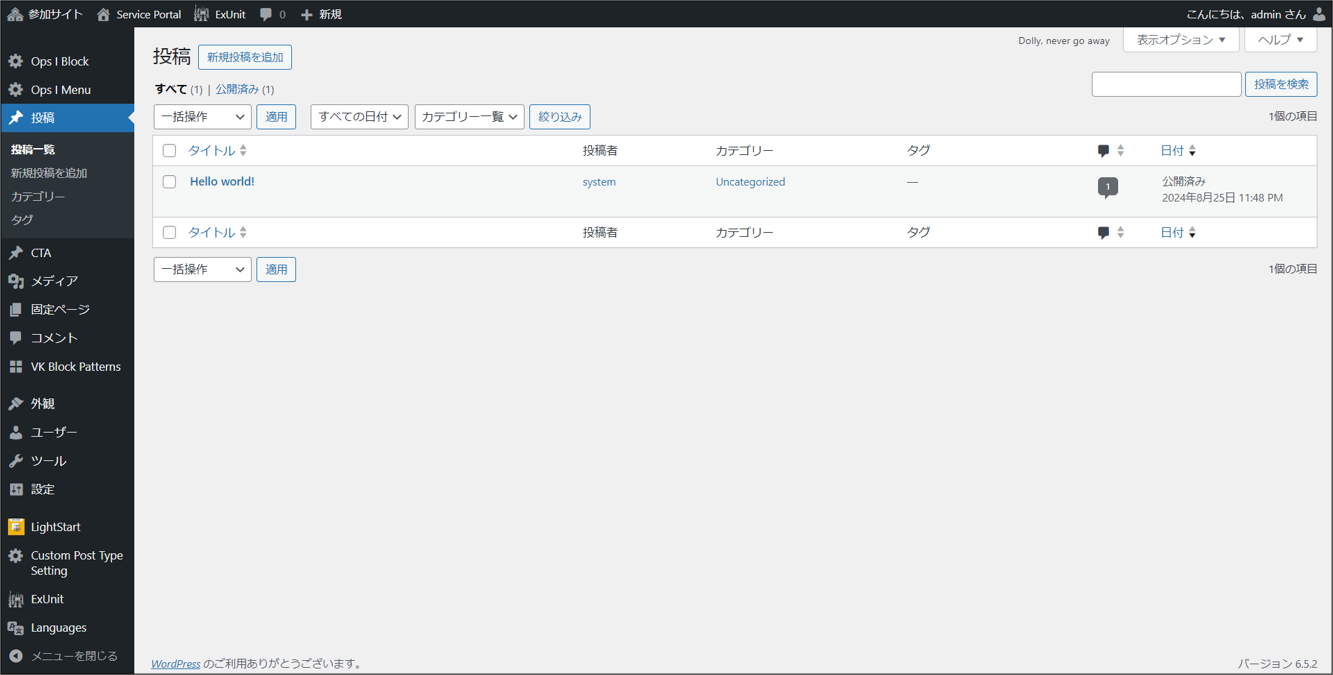
Details of the site administration windows are shown below.
- Site administration window URL: https://address set at site creation/wp-admin
- The site administration windows have two main windows: the [Network Admin] window and the [Site Management] window.
- Network Admin window: Window to manage all sites, including adding sites and installing themes
- Site management window: One window exists for each site to edit each site, such as creating pages and posts.
- The windows and items displayed on the site administration window vary depending on the role assigned. See "Windows and items displayed for each role" for details on window and items displayed by role.
(Figure) Site Management window
 Notes
Notes
- If more than one site management Ops I role is assigned, the one with the highest level of authority will take precedence. The Ops I role authority order is as follows.
portal_network_admin > portal_site_admin > portal_author > portal_contributor > portal_subscriber - Do not create sites, pages, and posts that contain the path "/wp-admin/".
- Avatars cannot be displayed on pages and posts even if [Avatar Block] is placed on them.
(3) Site-based access control
Each site you create can have its own unique URL. By preparing a YAML file with Statement defining URI authorization and linking ACLs to the required users via roles, it is possible to restrict user access to each site. For details on ACLs and Statement, see “Users and ACL”, “Application”, and “ACL, Statement”.
(4) Use cases
The following describes the expected procedures and operators, using common use cases as examples.
[Example 1: Creating and publishing a website]
The following is an example of creating a new site and publishing it to the user department.
Steps 1 through 7 are intended to be performed in an Ops I development environment, and steps 8 through 11 are intended to be performed in an Ops I production environment.
| Step | Worker | Refer to | |
|---|---|---|---|
| 1 | Create a new site from the [Network Admin] window. | Site Network Admin | - |
| 2 | Consider the configuration of the site. Edit the site created in #1 and change it to the configuration discussed. |
Site Network Admin, Site Admin |
- |
| 3 | Design ACLs (URI authorization) to each site | Site Network Admin | Site-based access control |
| 4 | Create a Statement/ACL YAML file for the designed ACL and register it in GitLab | Site Admin | |
| 5 | Assign ACLs to roles and associate them with users and groups | Users assigned the Pre-Installed role "System Security Administrator" | |
| 6 | Perform GUI and ACL testing on the created site | Site Admin | - |
| 7 | Export the created site | Site Network Admin | Import/export sites |
| 8 | Import the created site into the Ops I production environment | ||
| 9 | Reflect the created Statement/ACL in the Ops I production environment | Site Admin, Users assigned the Pre-Installed role "System Security Administrator" |
- |
| 10 | Assign ACLs to roles and associate them with users and groups | Users assigned the Pre-Installed role "System Security Administrator" | Site-based access control |
| 11 | Publish the migrated site | Site Network Admin | - |
The following is an example of editing an existing site.
Steps 1 through 2 are intended to be performed in an Ops I development environment, and steps 3 through 5 are intended to be performed in an Ops I production environment.
| Step | Worker | Refer to | |
|---|---|---|---|
| 1 | Consider the configuration of the site after the change. Edit the site and change to the configuration discussed. |
Site Network Admin, Site Admin |
- |
| 2 | Export the created site | Site Network Admin | Import/export sites |
| 3 | Put the site in maintenance mode | ||
| 4 | Import the created site | ||
| 5 | Deactivate the maintenance mode of the site | ||
The following is an example of deleting a site that is no longer needed.
| Step | Worker | Refer to | |
|---|---|---|---|
| 1 | Delete a site from the [Network Admin] window in the Ops I production environment | Site Network Admin | - |
[Example 4: Importing an exported site from WordPress in the Ops I environment]
The following is an example of importing a site exported from WordPress in another Ops I environment.
| Step | Worker | Refer to | |
|---|---|---|---|
| 1 | Export sites from other WordPress environments, such as the Ops I development environment | Site Network Admin | Import/export sites |
| 2 | Import the site exported in step 1 into WordPress in the Ops I production environment | ||
[Example 5: Adding a theme and deploying it to the site]
The following is an example of adding a theme, installing it, and deploying it on a site.
This example is intended to be performed in an Ops I development or Ops I production environment.
| Step | Worker | Refer to | |
|---|---|---|---|
| 1 | Download the zip file of the theme from WordPress (wordpress.org) | Site Network Admin | - |
| 2 | Upload and install the zip file of the theme on the [Add New Theme] window under [Themes] in the [Network Admin] window. | Site Network Admin, Site Admin |
Installing themes |
| 3 | Activate the theme on the [Theme] window of the [Site Management] window. | ||
[Example 6: Creating and publishing posts and announcements]
The following is an example of creating and publishing a post or announcement.
This example is intended to be performed in an Ops I production environment.
| Step | Worker | Refer to | |
|---|---|---|---|
| 1 | On the [Site Management] window, create an article for posting and announcement, and request approval | Contributor | - |
| 2 | Approve and publish the post or announcement on the [Site Management] window | Author | |
[Example 7: Browsing a website, applying for a service, or making an inquiry]
The following is an example of browsing the site and making an application or inquiry from the site.
This example is intended to be performed in an Ops I production environment.
| Step | Worker | Refer to | |
|---|---|---|---|
| 1 | Log in from the URL of the site you use | Customer users, Requestor users |
- |
| 2 | Select and open the application or inquiry menu on the site | ||
| 3 | Make an application or inquiry | ||
| 4 | Log out from the site | ||
Ops I also provides the following functions for site management. Please refer to the respective links for more information.
(Table) List of other functions
| Function | Outline |
|---|---|
| Prerequisite knowledge | The followings are prerequisite knowledge for site management.
|
| Ops I Menu | A menu that combines [Account Management] and [Log out] can be implemented on the site. |
| Embedding the Ops I window in a site | The Ops I windows can be embedded in a site. |
| Multilingual support for sites | You can make your site multilingual. |
| Notifications | Customer and requester users can view Ops I notifications in the site. |
| Log out from Ops I | You can log out of Ops I on the window of the site. |
| Changing Ops I password | You can change your Ops I password on the window of the site. |
Notes
The following are precautions regarding the display when using tablets.
- It is designed to be used in landscape orientation.
- When displaying the My Workflow List window, reduce the number of columns to be displayed before use.
- The width of the file list display area cannot be adjusted on the container window.
- Unnecessary lines may appear on the form.
Section structure
4.3.10.1 Prerequisite knowledge
4.3.10.2 Ops I Menu
4.3.10.3 Embedding the Ops I window in a site
4.3.10.4 Import/export sites
4.3.10.5 Installing themes
4.3.10.6 Multilingual support for sites
4.3.10.7 Notifications
4.3.10.8 Log out from Ops I
4.3.10.9 Changing Ops I password