3.2.3 Tickets
The “Ticket” tab is used for managing incidents and requests as tickets.
It can be used to create new tickets, confirm and update the information of tickets that have already been created and add associations between tickets. Workflows can also be executed from the “Ticket” tab as ticket operations.
“Ticket” tabs are displayed in both the task and request applications, with both “Ticket” tabs being identical apart from certain exceptions.*
The application that is to be operated differs depending on the role assigned to the user. The relationship between roles and the application to be operated is presented below. For details, see “Tasks and Requests”.
(Table) Relationship between roles and applications to be operated
| User types | Assigned role | Application to be operated |
|---|---|---|
| Customer user | Customer Manager Customer User |
Request application |
| Requester user | Requester Manager Requester User |
|
| Users other than above | The above roles are not assigned | Task application |
There are restrictions on creating, updating, and browsing tickets depending on the assigned role. For details on application display restrictions, see “Correspondence between roles and support functions in Ops I”. For details on ticket operations and browsing restrictions, see “Ticket management”.
- Some of the fields for ticket zoom information and adding new tickets are not displayed.
- The "Service catalog" window is not displayed.
- Ticket zoom information cannot be changed.
- By default, the options in the pull-down menu in the "Ticket" tab and the Ticket List do not display types other than the type "request". To change the type of ticket displayed, see "Adding and deleting types displayed on the ticket tab".
- The [Approval Flow] button is not displayed.
- The "Customer Visible" checkbox is not displayed.
- "Related Links" will not be displayed unless they have been added using the request application or the "Customer Visible" checkbox has been ticked in the task application.
- The files attached when adding a new ticket in the task application and attachments to work notes that do not have the "Customer Visible" checkbox ticked will not be displayed.
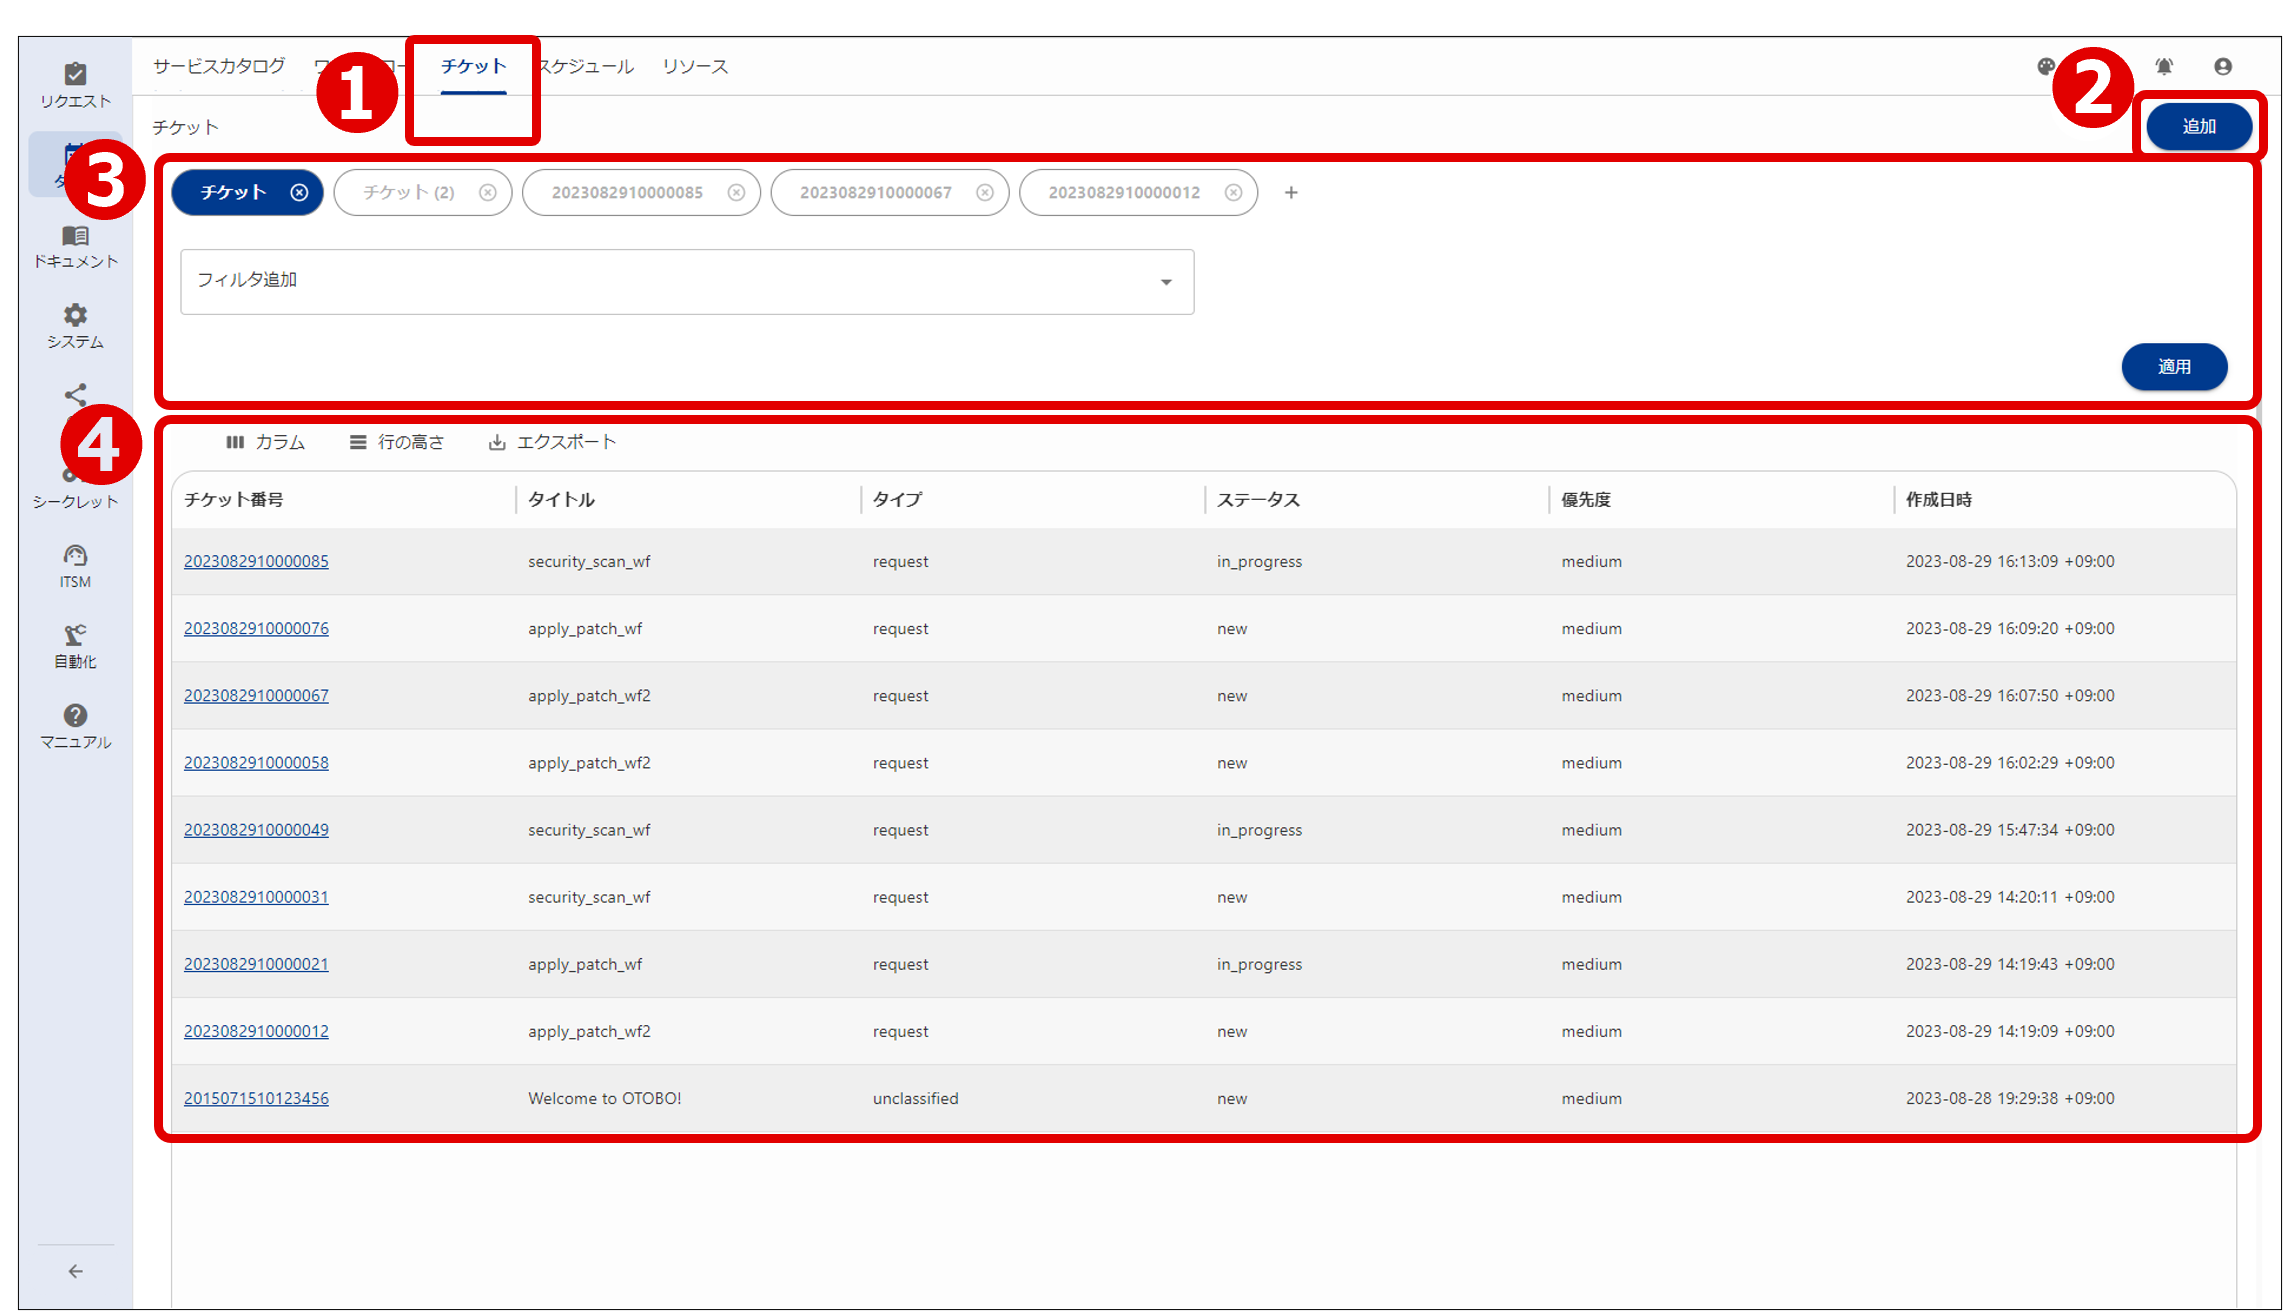
The Ticket tab consists of the (①) Ticket tab, an (②) Actions button, (③) Ticket browser window ticket filter area, and (④) Ticket List display area.
(Table) Ticket tab window components
| Components | Description | |
|---|---|---|
| ① | Ticket tab*1 | Displays a ticket list by ticket type. The task application displays all ticket types, while the request application only displays the "request" type by default. You can display a list of all ticket types or a list of individual ticket types. You can customize the displayed type names. You can also change the type display order and reduce the number of types displayed. For details, see "Customizing the ticket window". |
| ② | Actions button | Used to add tickets*2. Displayed when a "Ticket filter" tab is displayed in the filter area. Add: Displays the Add new ticket window where new tickets can be added. For details on adding tickets, see "Add new ticket window". |
| ③ | Filter area | Configure ticket filter conditions. |
| ④ | Ticket List | A list of tickets is displayed. |
All ticket types:
URL of Ops I/sys_task/ticket/ticket_browser
Individual ticket types:
URL of Ops I/sys_task/ticket/ticket_browser_ticket type name
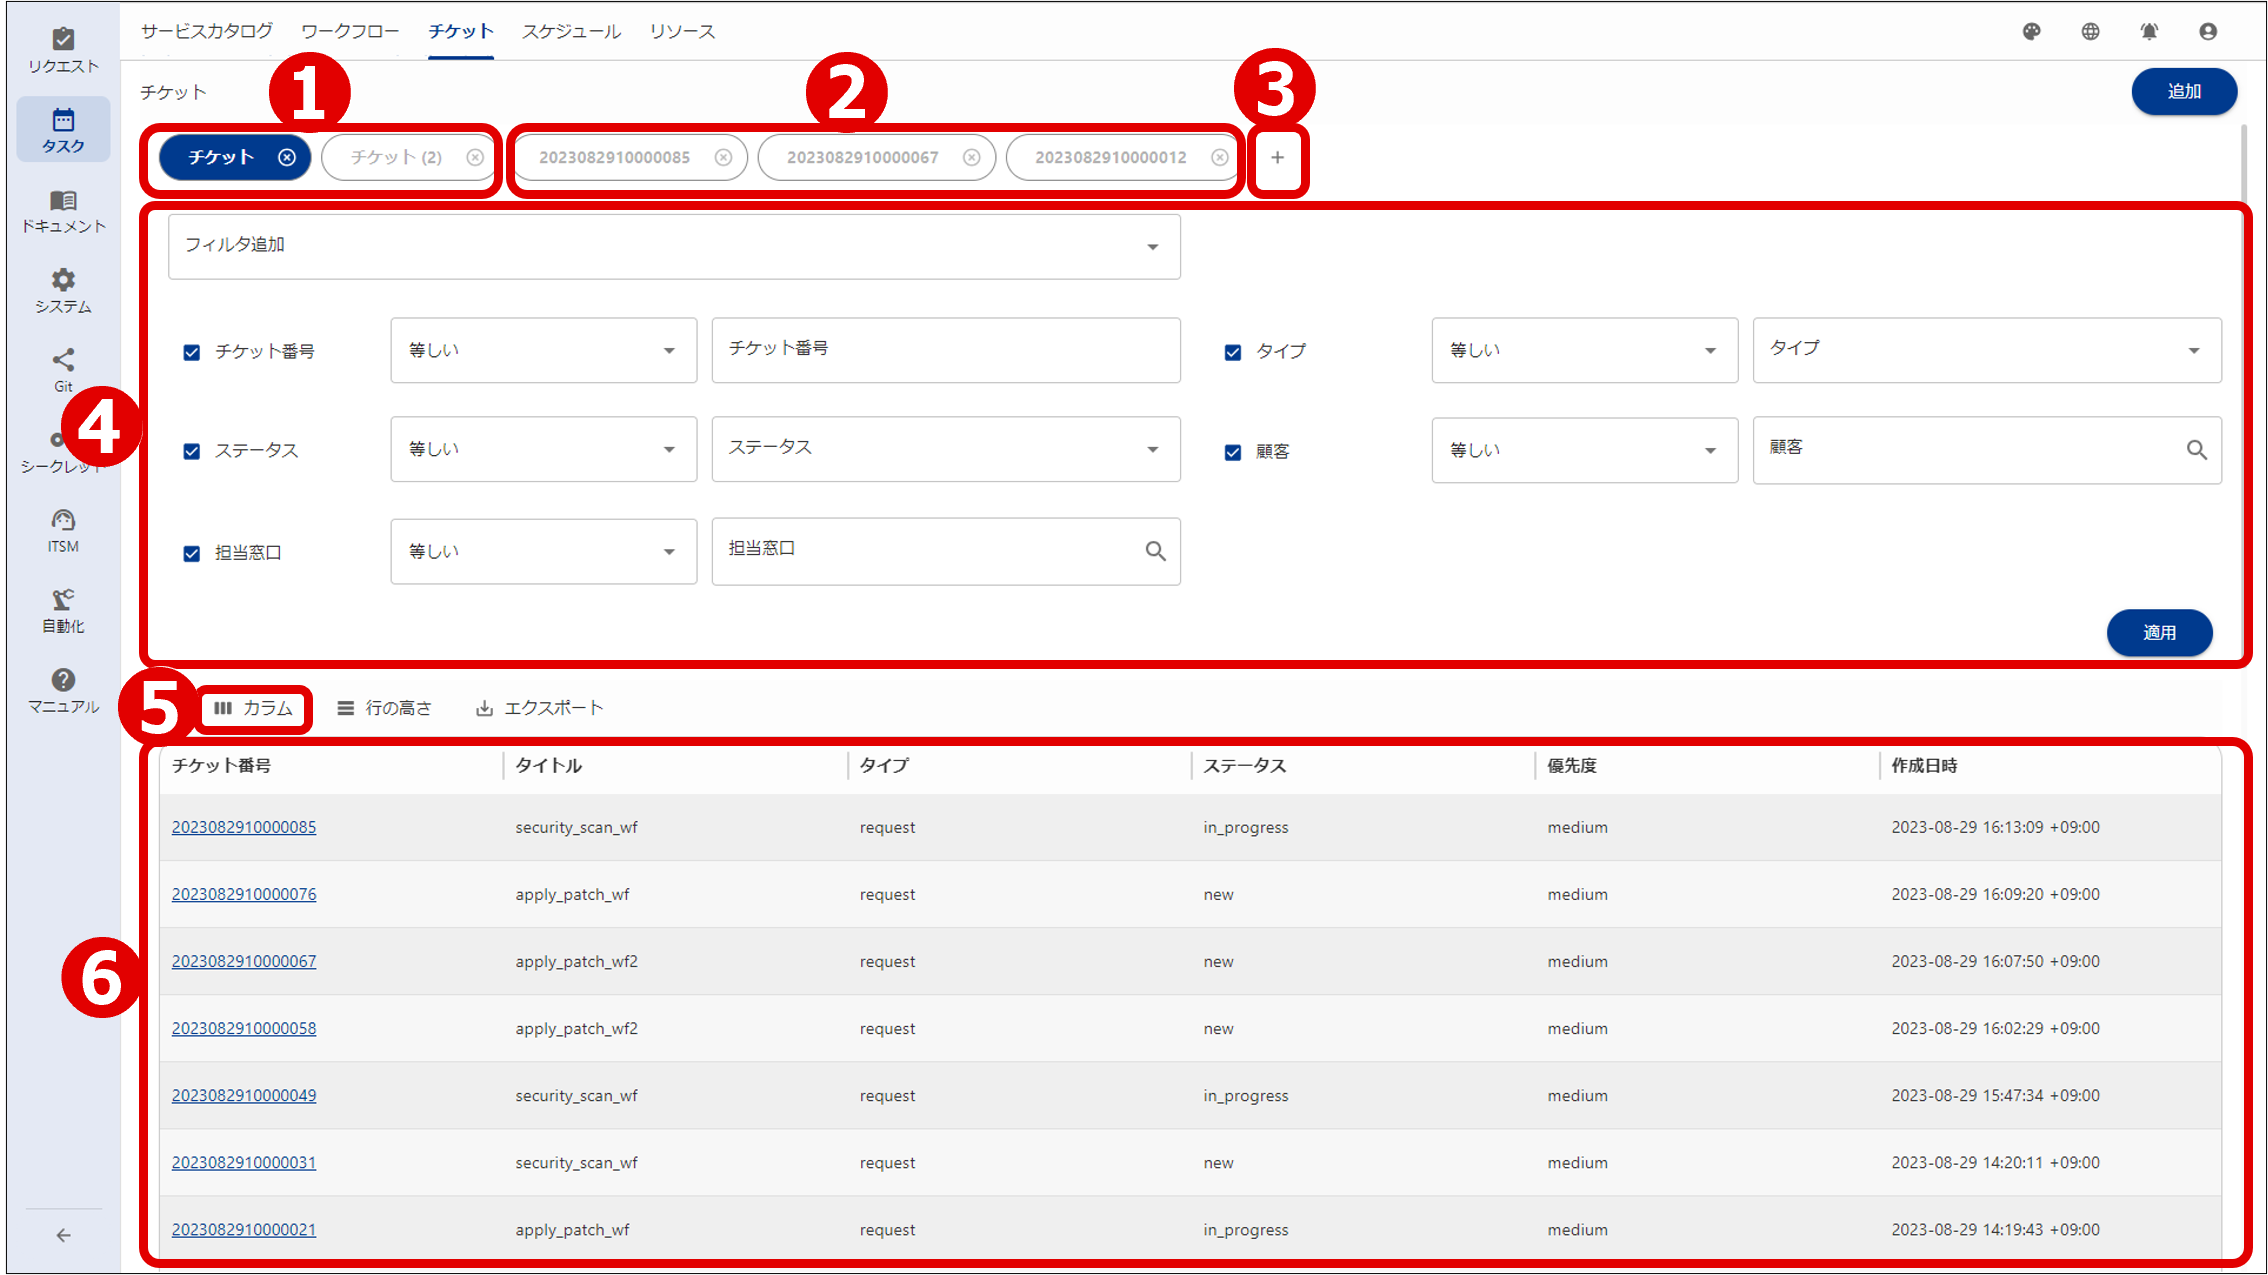
(1) Ticket browser window
The “Ticket browser” window can be used to display and filter lists of tickets. Multiple filter item combinations can be made, allowing for more advanced searching.
Although only the “Ticket filter” tab is shown by default, the “Ticket zoom” tab can be added by selecting tickets from the Ticket List. Multiple tabs can be added, allowing you to quickly confirm filter and ticket information by switching between the tabs.
(Figure) Ticket browser window
(Table) Ticket browser window details
| Item | Description | |
|---|---|---|
| ① | Ticket filter tab | Displays the filter area and the filtered ticket list for each filter condition. When adding the "Ticket filter" tab, if the display language of the screen is Japanese, it will be displayed as "チケット", and if it is English, it will be displayed as "Ticket". Once you have created a ticket filter tab, its display will not change even if you switch the display language of the screen after creating it.
|
| ② | Ticket zoom tab | Displays the Ticket zoom window. It is not possible to open multiple tabs for the same ticket. The tab name shows the ticket number by default.
|
| ③ |  icon icon |
Adds a "Ticket filter" tab. Multiple "Ticket filter" tabs can be opened at a time. |
| ④ | Filter area | Displays only tickets that meet the specified conditions based on the search keywords and filters. If you set both a search keyword and a filter, tickets that match both are displayed. Clicking the [Apply] button displays only tickets that meet the specified conditions in the Ticket List. The filter area is closed by default. Even when it is closed, you can check the number of filter conditions by looking at the value in parentheses in the [Filter Conditions] label. The initial open/closed state can be set in the Paper component, expanded, of the UI YAML file. For details, see "(Table) Paper properties (UI version 1.1)". [Search Keywords] Input a search keyword. Because all strings from string type fields (including user-created fields), attachment names, related links, and watcher names are searched, the search may take some time to finish. If you log in again or switch to a different application, the data will not be saved and the field will be left blank. If you specify multiple values using single-byte spaces, they will be judged using the "and" condition. Keywords are not case-sensitive. If the keyword is enclosed in double quotation marks, it is treated as a single character. [Add Filter] Sets the conditions for filtering tickets. The filter settings are cached in the browser. Therefore, unless you clear your browser cache, the filter setting will not return to its initial state. If the same user uses the same browser, the previously set filter setting will be retained.
|
| ⑤ | Column | Displays the same information as the "Ticket zoom information" field. |
| ⑥ | Ticket List | Displays a list of tickets. When you filter in the filter area, the filtered tickets are displayed. Click the ticket number or ticket ID on the Ticket List to add the "Ticket zoom" tab and display the "Ticket zoom" window. |
 icon: Filter is applied to the checked items. Items that are not checked are deleted when [Apply] (action button) is clicked.
Ops I URL/sys_task/ticket/ticket_browser?tab="Ticket filter" tab name or "Ticket zoom" tab name
If the ticket number is used as-is for the name of the “Ticket zoom” tab, specify the ticket number and ticket ID in the URL below.
Ops I URL/sys_task/ticket/ticket_browser?tab=ticket number&id=ticket ID
To display in the request application, replace “sys_task” in the URL with “sys_request”.
(2) Ticket zoom window
This section describes the “Ticket zoom” window which is displayed in the “Ticket zoom” tab on the ticket browser.
Users may not be registered correctly if any of the following apply. If authorized to access the OTOBO window, be sure to access it as the appropriate user. If not authorized, contact our support service.
- When users who are not set as a “Customer” in their user profile are not displayed in the list of agents on the “Ticket zoom information” window
- When posting articles to work notes, the user name of the poster becomes "--"
A description of the Ticket zoom window is shown below.
(Table) Ticket zoom window components
| Components | Description |
|---|---|
| Actions button | Sets ticket watchers, copies ticket URLs and saves changed content. Approval Flow*1 *3: Configures and edits the approval flow. Watch: Sets the watcher of open tickets. If a user is set as a watcher they will receive notifications of tickets in the same way as the agent or the creator of the ticket. Share: Copies the URL of an open ticket. Save*3: Saves changed ticket zoom information content. Approve*2 *3: Approvers can approve tickets. Decline*2 *3: Approvers can decline tickets. |
| Ticket zoom information | Displays detailed information such as ticket IDs and types. You can update the status of tickets based on progress as well as do things like change the assigned agent. The information displayed differs depending on the type of ticket. Ticket zoom information cannot be changed on the request application. |
| Ticket-related information | Displays ticket-related information. The information displayed differs depending on the type of ticket. Ticket-related information cannot be changed on the request application. |
- Approval function is enabled
- The order of ticket status transitions includes a status to which the approval function is applied.
For details on the approval function, see "Ticket approval function".
By directly entering the following URL, you can display the ticket zoom screen directly without going through the tab.
URL of Ops I/sys_task/ticket/ticket_browser/ticket_detail/ticket ID
Ticket information can be changed here too. Use the [Save] button to save the changed content.
To display in the request application, replace "sys_task" in the URL with "sys_request".
The description of the operation buttons [Approval Flow], [Watch] and [Share] are shown below.
Clicking the [Approval Flow] button opens the approval flow dialog box. On the approval flow dialog box, you can set and edit approval flows.
The approval flow is set when a new ticket is added or when a ticket is edited and saved. The approval flow settings are held in the browser for each logged-in user, ticket type, and status. When you open the approval flow dialog box for a ticket of the same ticket type as the settings held in the browser, the settings held in the browser will be set as the initial values. If a user is set from the group at this time, the user in the group at the present time will be set. Even if the number of users in the group increases or decreases after the settings have been made, this will not be reflected in the approval flow.
If you use the settings as they are, a message saying “The approval flow that was used before was set.” is displayed.
If the user or group that was being used with the saved settings has been deleted, a message saying “The approval flow that was used before was set, but some users or groups did not exist.” is displayed, and the relevant user or group will not be set in the approval flow. If at this time the number of approvers in a step becomes 0, the step will be deleted.
(Table) Approval flow dialog box components
| Components | Description | |
|---|---|---|
| Status | Displays the statuses that need approval. When you select a status from the pulldown menu, the approval flow for the selected status will be displayed. If the approval function is disabled, "(Removed)" is displayed at the end of the status name. |
|
| Approval Flow | Displays the Approver, Approval Group, and Approved On for each step. When you click on the  icon, the Approver, Approval Group, and Approved On within the step are displayed in two levels. icon, the Approver, Approval Group, and Approved On within the step are displayed in two levels.Only the first level of checkboxes can be selected. You can also select multiple checkboxes. |
|
| Approver | Displays step information and approver. First level: Step information* Second level: User name of the approver |
|
| Approval Group | If the approver of a step is added from a group, the group from which the approver was added is displayed. First level: Group name of the approval group Second level: Group name of the approval group |
|
| Approved On | Displays the date and time the step was approved. If the conditions are not met, the field is left blank. First level: Date and time when the minimum required approvals was met Second level: Date and time when the approver completed the approval |
|
| Add | Displays the "Add Approval Flow Step" dialog box. Activated when all of the following conditions are met.
|
|
| Users | Switches to a search form for users (excluding customer users). | |
| Group | Switches to a search form for groups. | |
| Search form | Displays a search form according to the selected tab. When you click the  icon, the window for selecting the approver or approval group is displayed. Approvers and groups that have already been registered will not be displayed on the selection window. The description of the selection window is as follows. icon, the window for selecting the approver or approval group is displayed. Approvers and groups that have already been registered will not be displayed on the selection window. The description of the selection window is as follows.
Click the [Cancel] button to return to the selection window. |
|
| Minimum Required Approvals | Set the number of approvals required in the spin box. You can set a number of 1 or more. If a value greater than the number of set approvers is set, it will be changed to the number of approvers when the [OK] button is clicked. |
|
| OK | Adds the user selected in the tab that is currently displayed as a new step to the approval flow, and closes the dialog box. If you select from a group, the users in the group at the current time will be added. The added step will be added to the end of the approval flow. |
|
| Cancel | The dialog box is closed without adding a step to the approval flow. | |
| Edit | Displays the "Edit Approval Flow Step" dialog box. If the selected step is selected on a per-user basis, the dialog box for users is displayed. If it is selected on a per-group basis, the dialog box for groups is displayed. The values set as the initial values for the Approvers, Group, and Minimum Required Approvals will be entered. Activated when all of the following conditions are met.
|
|
| Search form | Displays a search form according to the selected step. Clicking the icon displays the selection window. Approvers and groups that have already been registered will not be displayed on the selection window. The description of the selection window is as follows.
Click the [Cancel] button to return to the selection window. |
|
| Minimum Required Approvals | Set the number of approvals required in the spin box. You can set a number of 1 or more. If a value greater than the number of set approvers is set, it will be changed to the number of approvers when the [OK] button is clicked. |
|
| OK | The step is updated with the settings you have made, and the dialog box is closed. | |
| Cancel | The dialog box is closed without editing the step. | |
| Up | Swaps the order of the selected step with the one step before. Activated when all of the following conditions are met.
|
|
| Down | Swaps the order of the selected step with the one step after. Activated when all of the following conditions are met.
|
|
| Delete | Deletes the selected step. Activated when all of the following conditions are met.
|
|
| OK | Closes the dialog box while retaining the approval flow settings. The [OK] button is not activated if there are no specified approvers. |
|
| Cancel | Closes the approval flow dialog box. | |
N: Step number
n: Current number of approvers
m: Number of required approvers
Clicking the [Watch] button opens the ticket watcher dialog box. In the ticket watcher dialog box, you can add and delete watchers.
(Table) Ticket watcher dialog box components
| Components | Description |
|---|---|
| Watcher list | Displays the user names of added watchers. If a watcher is a customer user, "(Customer User)" will be displayed after the user name. |
| Add Me button | Adds a ticket operator. |
| Add button | Selects a watcher from the "Register watcher" dialog box. The choices of watchers are limited by the permissions of the user who is adding the watcher, from among the users who can browse the ticket. For details, see "Ticket watcher settings". |
| Delete button | Select the user to delete from the watcher list, then click the [OK] button to delete the target user. |
| Close button | Closes the dialog box. |
You can copy the URL to use the Ticket zoom window for sharing.
Accessing copied URLs displays only the Ticket zoom window, with no tabs being displayed.
A description of the ticket types is shown below. See the references for details on each type. Types are described in the format “Ops I type variable name (Ops I type label name)”. The Ops I type variable name is used in YAML definitions and API settings. The Ops I type label name is the type name displayed in the Ops I GUI.
| Type | Description | Refer to |
|---|---|---|
| incident (Incident) |
Incident ticket Handles various events affecting IT services, such as user inquiries and system failures. |
incident tickets |
| request (Request) |
Request ticket Manages user requests for IT services. You can tell the difference between request type tickets, which are automatically created when you create a workflow, and other tickets by looking at the "Source" field. |
request tickets |
| task (Task) |
Task ticket Manages work tasks required to handle other tickets. It is used as a child ticket of another ticket. |
task tickets |
| problem (Problem) |
Problem ticket Manages the problems that are occurring. |
problem tickets |
| rfc (RFC) |
RFC ticket Manages changes to IT services. The following change types are used depending on the change content.
|
rfc tickets |
| release (Release) |
Release ticket Manages the implementation of permitted changes to IT services. |
release tickets |
| case (Case) |
Case ticket Maintains information to resolve customer questions and problems. |
case tickets |
| unclassified (Unclassified) |
Unclassified ticket Used for tickets that do not fall under any of the types. |
unclassified tickets |
(3) Add new ticket window
This section describes the Add new ticket window.
(Table) Add new ticket window components
| Components | Description |
|---|---|
| Actions button | Used to save new tickets and cancel ticket additions. Approval Flow button*: Registers and edits approval flows. For details on the window, see "Approval flow". Save button: Save edited contents. Cancel button: Cancel ticket additions and transition to the Ticket browser window. |
| Ticket information input area | Input ticket information. The fields displayed differs depending on the type of ticket. |
| Ticket-related information input area | Input ticket-related information. The information displayed differs depending on the type of ticket. |
- Approval function is enabled
- The order of ticket status transitions includes a status to which the approval function is applied.
By default, the only ticket type that can be added from the request application is “request”. To add other ticket types, see “Adding and deleting types displayed on the ticket tab”.
For details on ticket types, see “(Table) Ticket types”.
(4) Other functions
The following section describes the information (work notes, related records, related links, service catalogs, and attachments) that can be displayed and shared between all ticket types. The SLAs that can be displayed on the Ticket zoom window for incident tickets are shown below.
Work notes display articles exchanged between users regarding tickets. For tickets created by executing a workflow, “This article was created automatically at the start of the workflow.” is automatically displayed. For tickets created on the Add new ticket window, “Ticket has been created.” is automatically displayed.
(Table) Work Notes window details
| Item | Description |
|---|---|
| Articles | Articles other than those you created yourself are displayed on the left. Articles created yourself are displayed on the right. |
| Text box | A text box for entering articles. Clicking the  icon transmits entered articles and reflects them in the work notes. icon transmits entered articles and reflects them in the work notes. |
| Customer Visible | For articles and attachments displayed to customer users and requester users, transmit the article with a check added to the checkbox. The background of articles displayed to customer users and requester users are displayed in blue. The "Customer Visible" checkbox is not displayed in the request application. |
| Attachments | Press the  icon to display the Add attachments window, where you can attach files to articles. The attached file will be displayed at the bottom of the article and on the attached file screen, and is downloaded when clicked. For how to attach files, see "Attachments". icon to display the Add attachments window, where you can attach files to articles. The attached file will be displayed at the bottom of the article and on the attached file screen, and is downloaded when clicked. For how to attach files, see "Attachments". |
Related records consists of a workflow tab and a “Ticket” tab.
■ Workflow tab
Displays the following workflows related to tickets. Click workflows displayed in the workflow tab to transition to the corresponding work.
- Workflows executed when tickets automatically created upon execution of a workflow are opened
- Workflows executed from an incident ticket when an incident type ticket is opened.
- Workflows directly linked to tickets displayed in the “Ticket” tab
■ Ticket tab
Displays the following tickets related to tickets. Click tickets displayed in the “Ticket” tab to transition to the corresponding ticket zoom tab.
- Tickets that are automatically created upon execution of a workflow from the service catalog for an open ticket and parent-child tickets specified as “Parent tickets” in the ticket zoom information
- Standard tickets specified from OTOBO
For more information on parent-child and standard tickets, see “Relationships between tickets”.
In “Related Links”, you can register multiple URLs related to tickets and display them as links. If you click on the link on the Ticket window, the registered URL will open in a new window, allowing you to check the contents directly. You can easily delete any links that have become unnecessary.
■ Registering related links
You can register related links from the Add new ticket window and the Ticket zoom window.
Click the [Add] button of the related link to display the Link Information window.
(Table) Description of Link Information window
| Item | Description |
|---|---|
| Name* | Link title |
| URL* | URL that begins with http or https |
| Description | Description of related links |
■ Checking registered related links
You can check registered links in the “Related Links” list. Click the link title to open the corresponding web page.
■ Deleting registered related links
Check the checkbox to the left of the link name, and click the [Delete] button at the bottom right to delete the selected link.
■ Related links display settings
The “Customer Visible” checkbox is displayed in the task application. Check the “Customer Visible” checkbox to make related links visible to customer users and users.
- Checked: Related links are displayed in both the request application and task application.
- Unchecked: Related links are displayed only in the task application.
The “Customer visible” checkbox is not displayed in the request application.
■ Automatically register related link at ticket creation
If your event management tool is set to issue tickets, the issuer link can be automatically registered as a related link.
For example, if a ticket is created when an alert occurs, the alert details can be automatically registered as a related link. When the system administrator receives a notification of a ticket being created, they can open the related link from the “Ticket zoom” screen and check the contents of the alert.
To register JP1/IM events as Ops I incident tickets and automatically register related links, add “relatedLinks” as a parameter to the API “POST /capi/v1/tickets” in the script file set as the automatic action or coping action for JP1/IM.
For details, see “Settings for registering incidents”.
Displays a list of registered catalog items. For settings on displaying/hiding catalog items and settings regarding the display order of catalog items, see “Designing a data model”.
Click on displayed catalog items and execute a workflow to add relationships between created tickets and source tickets.
In the case of the request application, the “Service Catalogs” window will not be displayed.
You can attach files to tickets and view and download the attached files. If you are on the Add new ticket window, the screen for adding attachments will be displayed. If you are on the Ticket zoom window, a list of attached files will be displayed.
The Add attachments window is displayed, allowing you to attach files to tickets. For customer users and requester users, the files attached when adding a new ticket in the task application and attachments to work notes that do not have the "Customer Visible" checkbox ticked will not be displayed.
(Table) Description of the Add attachments window
| Item | Description |
|---|---|
| List of files to be attached | Displays a list of files uploaded in the attachment area. The uploaded files are attached to the ticket when the ticket is created. Click the  icon to cancel the uploading of files. icon to cancel the uploading of files. |
| Add attachments area | You can upload files by dragging them onto the area or by clicking "Upload". The files you can upload are as follows.
|
The Show attachments window is displayed. On the Show attachments window you can view and download the files attached to tickets.
(Table) Description of the Show attachments window
| Item | Description |
|---|---|
| Attached files | Displays the file names of the uploaded files. Click a file name to download the file. |
| Upload time | The time when the file was uploaded is displayed as a time zone-included string on the right side of the file. (YYYY-MM-DD hh:mm:ss ±hh:mm) |
To attach a file from the Ticket zoom window, use the Add attachments window in the Work Notes window. Attached files will be uploaded when the article is submitted. The conditions for the types of files that can be uploaded are the same as for the new ticket window.
Uploaded files are linked to articles in the Work Notes window, and deleting an article will also delete the linked files. However, if the ticket status is “completed”, you will not be able to delete the article, and you will not be able to delete the linked files either. You can add attachments even when the ticket status is “completed”.
 Notes
Notes
- Uploading large attachments may take some time.
- The article may be displayed while the attached file is being uploaded, but the attachment name will be added once the file has been uploaded.
- If the attachment name exceeds 220 bytes, the part before the extension may be truncated when uploading.
SLAs display compliance of SLA. SLA is a target value for four metrics for resolving incidents. You can assign SLAs manually or automatically for each ticket. Managing compliance of SLA allows you to respond appropriately to incident tickets. SLAs will not be displayed if no SLA is assigned to a ticket. For details on the management function for SLA, see “SLA management function”.
The items of SLAs are as follows.
(Table) Description of SLAs window
| Item | Description |
|---|---|
| Compliance | Color icons are displayed according to SLA compliance. When you hover the cursor over the color icon, a description of the compliance will be displayed.
|
| Metric name | Displays SLA metrics.
|
| Deadline and confirmation date | The deadline or confirmation date is displayed as a string with a time zone. For details about the displayed date and time, see "Ticket management". The displayed content is as follows.
|
| Time difference | A string corresponding to the SLA compliance status and deadline is displayed. The displayed content is as follows.
|
 icon
iconSubsection structure
3.2.3.1 incident tickets
3.2.3.2 request tickets
3.2.3.3 task tickets
3.2.3.4 problem tickets
3.2.3.5 rfc tickets
3.2.3.6 release tickets
3.2.3.7 case tickets
3.2.3.8 unclassified tickets