4.3.8.2 SLA management function
The incident SLA management function allows you to check compliance with handling target times from incident occurrence to resolution. The SLA in the Ops I ticket management function refers to the target values for four metrics for resolving incidents. You can check the compliance for each incident ticket against the SLA on the Ticket zoom window and Ticket List. By using the sort function in the Ticket List, you can check which incident tickets should be prioritized. For details on the window, see “SLAs”. Also, “tickets” here refers to incident tickets.
The SLA function allows you to do the following.
- Managing multiple SLAs
- Set the targets (business days, business hours, holidays, and time zones) used to calculate SLA compliance for each ticket
- Set SLAs appropriate for each ticket (automatic assignment, manual assignment)
- Check SLA compliance for each ticket
- Check SLA compliance in the Ticket List
- Notify to the agent when the SLA deadline and advance warning set for each ticket are exceeded
Details are described in the following sections.
(1) SLA metrics
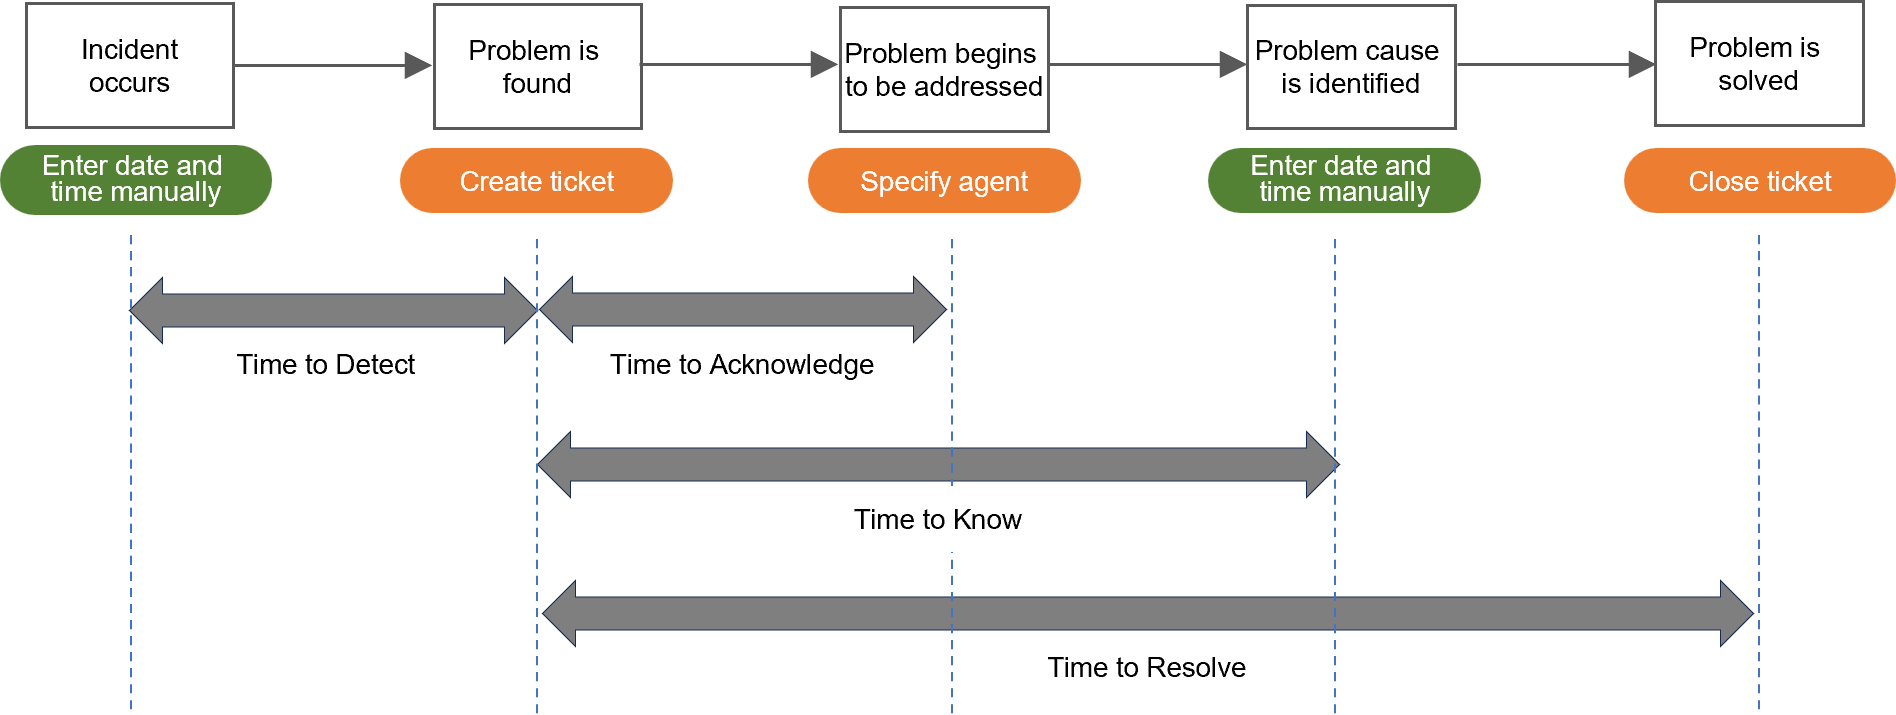
Four types of SLA metrics are supported: Time to Detect, Time to Acknowledge, Time to Know, and Time to Resolve. Each metric represents the time required for various actions in the series of steps from incident occurrence to resolution.
(Figure) SLA metrics
(Table) SLA metrics
| Metric | Description |
|---|---|
| Time to Detect | Time from when the incident occurred to discovering the problem
|
| Time to Acknowledge | Time from discovering the problem to starting handling
|
| Time to Know | Time from discovering the problem to identifying the cause
|
| Time to Resolve | Time from discovering the problem to when the problem was resolved
|
(2) How to create SLA
SLAs are prepared in advance before being assigned to tickets. You can define multiple SLAs to assign the most appropriate SLA for each incident. Define SLAs using the following procedure.
Set the warning threshold value (%) for the SLA metrics Time to Acknowledge, Time to Know and Time to Resolve. Time to Detect calculates whether the target time has been exceeded when the incident occurrence date and time are entered manually, so no warning threshold is set for this metric.
Target times and warning thresholds are used as criteria for calculating compliance and notifying agents.
These actions are performed using the [Admin] function of the ITSM application. Therefore, you need the permissions of the “itsm_admin” Primitive role.
For details on setting up calendars and creating, updating and disabling SLAs, see “[Admin] > Set calendars” and “[Admin] > Manage SLAs” in the “JP1 Cloud Service/Operations Integration User’s Guide (ITSM Operation Manual)”.
(3) Assigning SLA to each ticket
The appropriate SLA varies depending on the customer and the severity of the incident. You can assign SLA for each ticket manually or automatically.
(Figure) Assigning SLA to tickets

[Automatically assign]
You can automatically assign SLAs to tickets by using the GenericAgent function of the ITSM application. If there is at least one valid Generic Agent job, SLA will be assigned automatically. The automatically assigned SLA will be displayed in the “SLA” field of the Ticket zoom window.
To make registered SLAs eligible for automatic assignment, set Generic Agent jobs for each SLA.
The following conditions can be set for Generic Agent jobs.
- Type: Set the incident. (Required condition)
- SLA: Set the SLA to assign. (Required condition)
- Customer
- Customer user
- Priority
- Queue
- Ticket status
- Agent/Owner You can also set fields added by users as conditions. For details on how to add fields, see “Adding fields”.
The timing of automatic assignment can also be determined when setting Generic Agent jobs. The following settings are recommended.
- When a new ticket is created
- When a ticket field is changed (including user-created fields)
Setting Generic Agent jobs is performed using the [Admin] function of the ITSM application. Therefore, you need the permissions of the “itsm_admin” Primitive role.
For details on the procedure for registering Generic Agent jobs, see “[Admin] > Register GenericAgent” in “JP1 Cloud Service/Operations Integration User’s Guide (ITSM Operation Manual)”.
[Manually assign]
You can also manually assign SLAs to tickets when you want to change automatically assigned SLAs, when automatic assignment has not been configured, or when the conditions for automatic assignment are not met. Manual assignment is performed by searching and selecting SLAs from the “SLA” field in the Add new ticket window and Ticket zoom window. After selecting an SLA, the name of the selected SLA is displayed in the SLA field.
(4) Checking SLA compliance for each ticket
When you set deadlines and warning thresholds for each SLA metric, the status of each ticket will be displayed in the SLAs of the Ticket zoom window and in the Ticket List.
The Ticket zoom window displays the following for each metric.
- SLA compliance
- compliant: Within the deadline and below the warning threshold, or SLA is confirmed within the deadline
- warning: Within deadline, warning threshold exceeded, and SLA unconfirmed
- breached: Deadline exceeded
- indeterminate: SLA not defined or deadline cannot be calculated
- Deadline (before confirming SLA) or confirmation date (after confirming SLA)
Once the SLA has been confirmed, a check icon will appear, and the confirmation date will be displayed when you hover over it with the mouse cursor. - Time remaining before deadline, time exceeded after deadline
(Figure) SLA compliance

SLA compliance is calculated for the target calculation period specified in the calendar linked to the SLA.
For details on the window, see “SLAs”.
Compliance with SLAs for each ticket is calculated and updated at the following times.
- When creating tickets
- When updating tickets
- When displaying ticket details
- When changing or deleting the SLA set for a ticket
In addition, ticket SLA compliance is regularly checked and updated.
 Notes
Notes
- Tickets with a status of "closed" will not have their SLA metrics recalculated even if the SLA definition is changed.
- Tickets with a status besides "closed" will not have confirmed SLA metrics recalculated even if the SLA definition is changed. Only unconfirmed SLA metrics are recalculated.
- If you accidentally confirm an incorrect entry in a field, you can return it to an unconfirmed state by entering the correct value, canceling the SLA assignment, and then reassigning the same SLA.
[Notifications]
The agent is notified when the warning threshold or the deadline is exceeded. Notifications will be sent at each timing only once. Notifications can be sent via the Ops I notification function and via e-mail. For details on notifications related to tickets, see “Ticket notification function”. However, if “Use Cases > Use cases for notifications and email-based ticket creation > Notification using an email server” in the “JP1 Cloud Service/Operations Integration User’s Guide (ITSM Operation Manual)” has been configured, notifications are sent only via e-mail.