3.8.1 Registering authentication information
The authentication information registered in Automation manages the secret information of the target host where the job is executed.
This section describes how to register the following authentication information.
(1) Authentication information for accessing the secret and GitLab
(2) Authentication information using PAT
(1) Authentication information for accessing the secret and GitLab
This section describes how to register authentication information for accessing the secret and GitLab.
To register authentication information, a GitLab access token must be stored in the secret in advance, and the information of that secret must be obtained. The table below shows the items and references that must be obtained.
(Table) List of information to be obtained in advance for registration of authentication information
| Item | Refer to |
|---|---|
|
Creating a secrets engine |
|
Creating a secret |
|
Obtaining authentication information for accessing the Secret from Automation |
[Procedure for registering authentication information to access the secret]
The procedure for registering authentication information to access the secret is as follows.
(Figure) Create New Credential window (Credential Type “HashiCorp Vault Secret Lookup”)
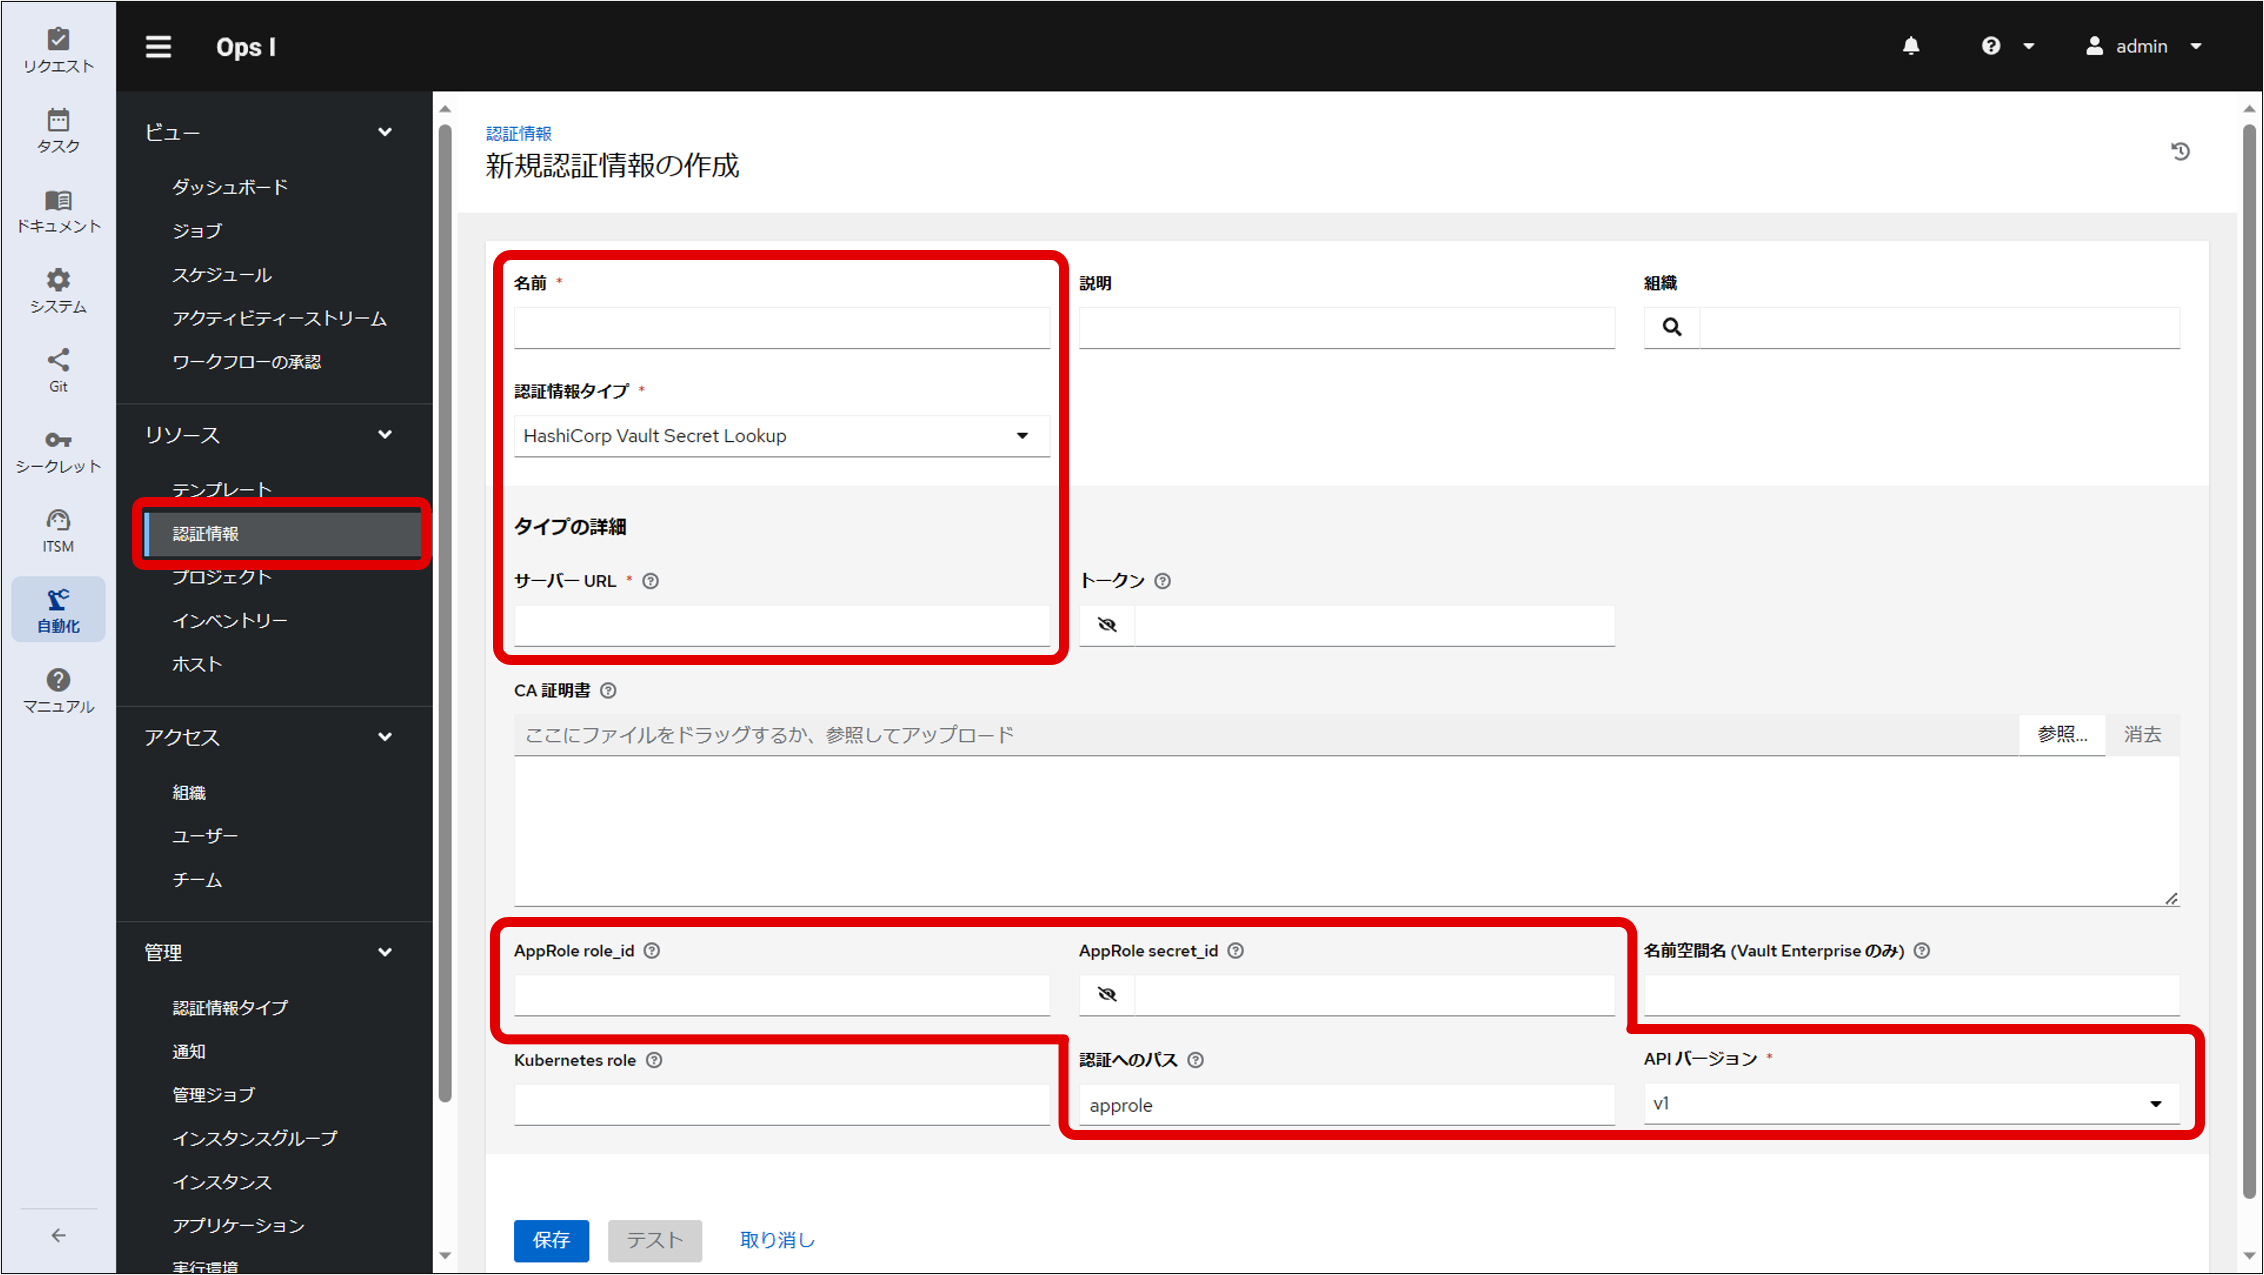
(Table) List of information to be entered in the Create New Credential window to access the secret
| Item | Description |
|---|---|
| Name | Name of authentication information to access the secret "Outpost" is a reserved word and cannot be used |
| Credential Type | Select "HashiCorp Vault Secret Lookup" to access the secret |
| Server URL | http://vault.tenant name-service:8200 Replace tenant name with the name of a tenant who has a Playbook. |
| AppRole role_id | Role ID for AppRole obtained in advance in the secret |
| AppRole secret_id | Secret ID for AppRole obtained in advance in the secret |
| Path to Auth | approle (default) |
| API Version | Select "v2" |
[Procedure for registering authentication information to access GitLab]
Authentication information for accessing GitLab is registered using the “Source Control” authentication type. By referencing the authentication information for “HashiCorp Vault Secret Lookup” from the authentication information for “Source Control”, the key can be obtained from the secret to access GitLab.
(Figure) Create New Credential window (Credential Type “Source Control”)
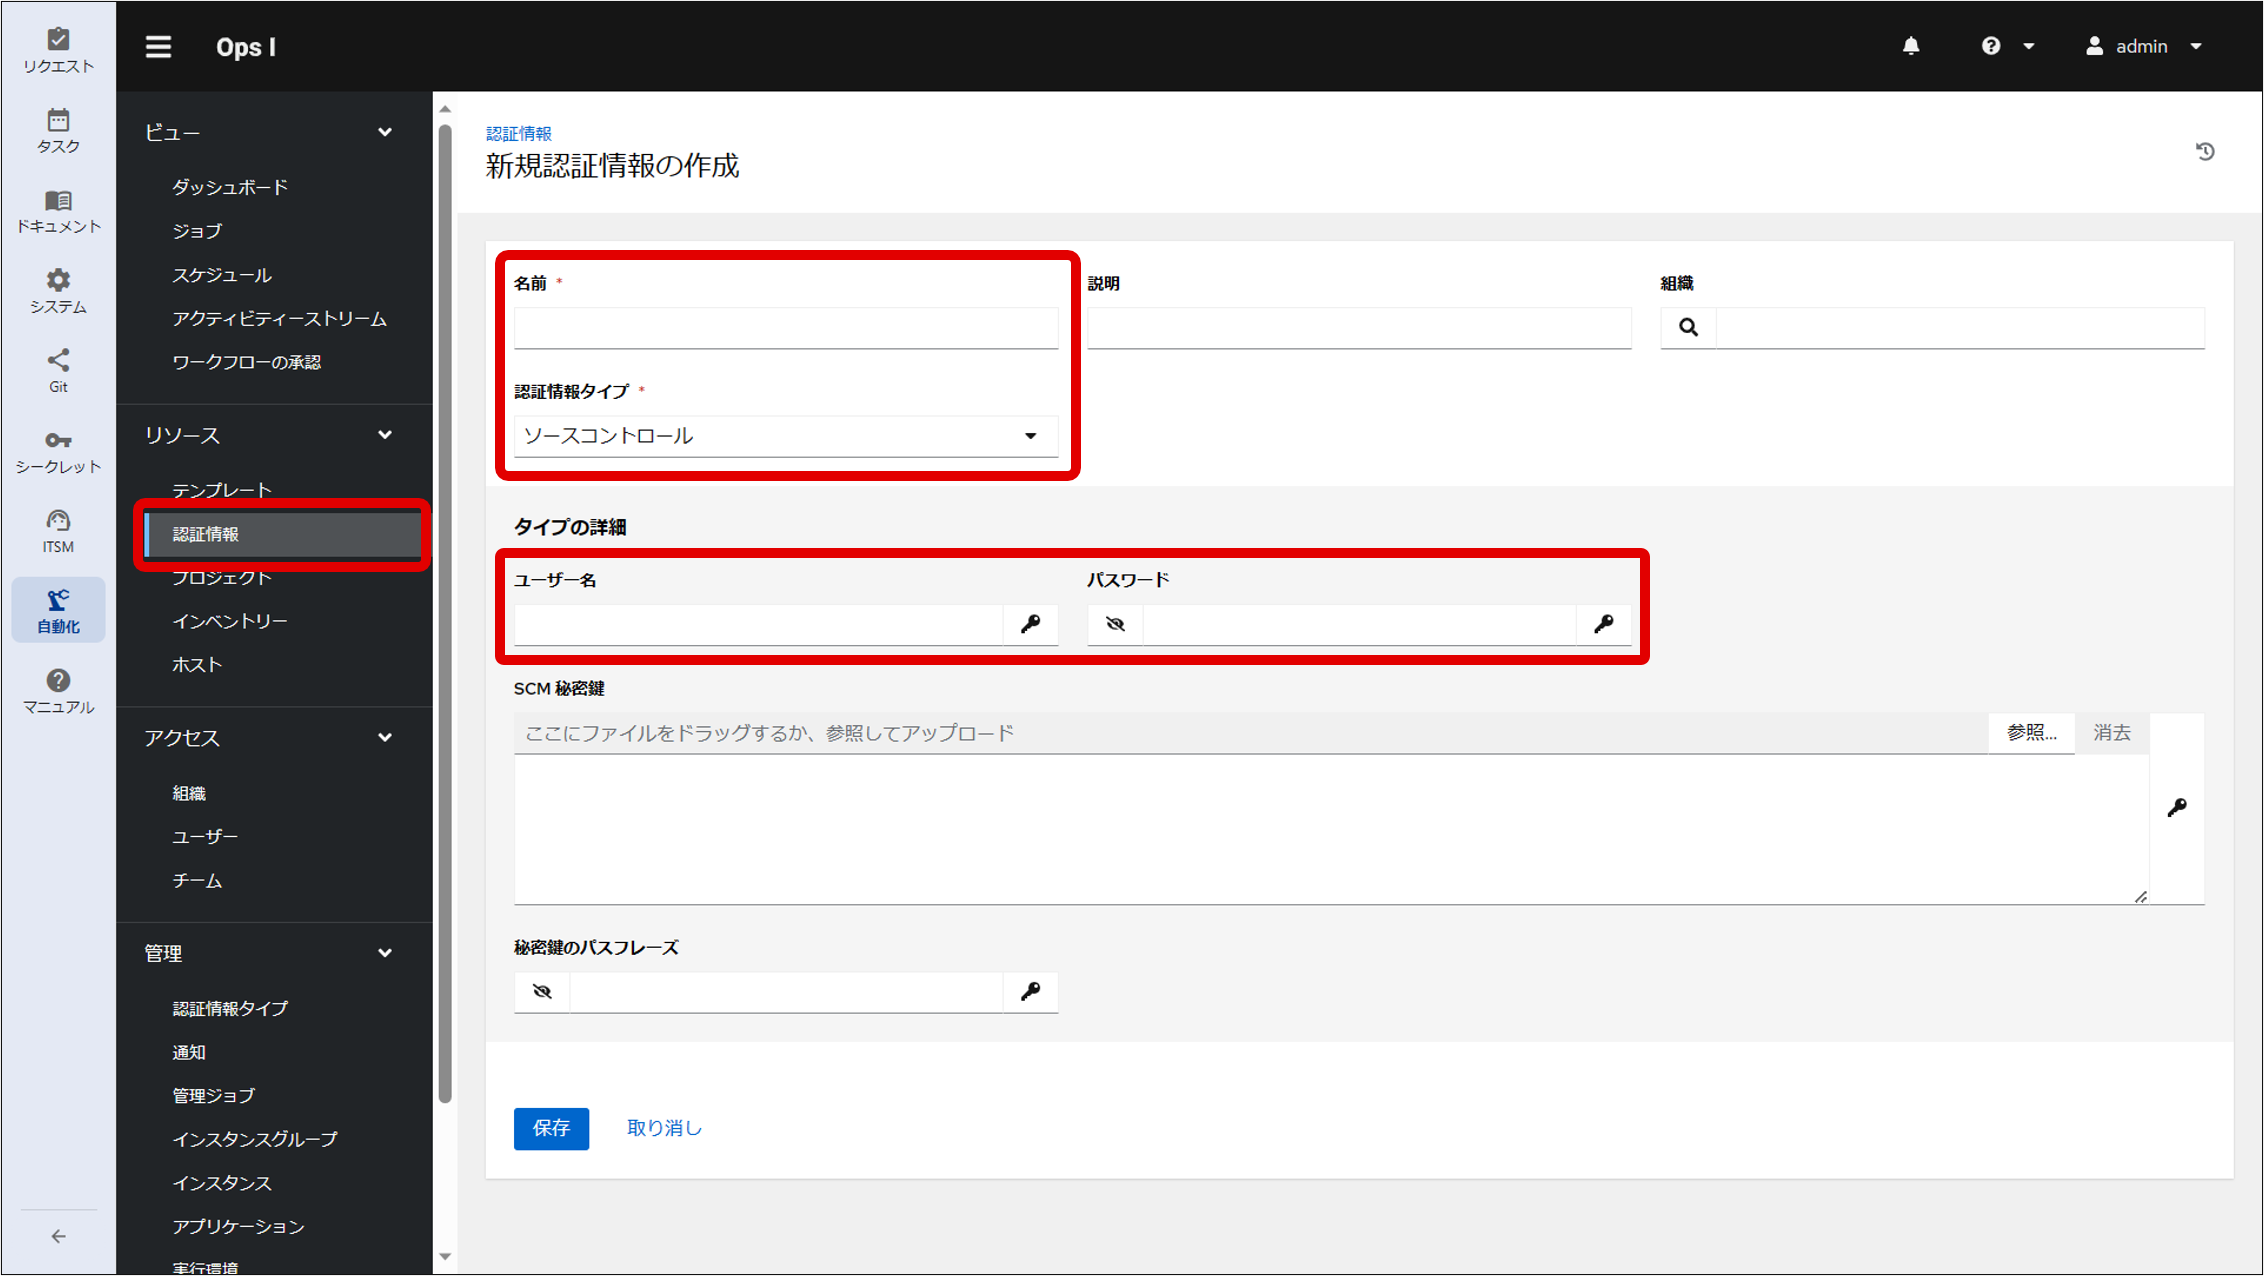
(Table) List of entries in the Create New Credential window for referencing “HashiCorp Vault Secret Lookup”
| Item | Description |
|---|---|
| Name | Authentication information name for referencing the authentication information of the credential type "HashiCorp Vault Secret Lookup" "Outpost" is a reserved word and cannot be used |
| Credential Type | Select "Source Control" to access GitLab |
| Username | User name under which the Secret authentication information was registered |
| Password | Configure according to the following procedure.
|
(Figure) External Secret Management System window

(Table) List of external secret management system metadata to enter
| Item | Description |
|---|---|
| Name of Secret Backend | Secret Engine Name |
| Path to Secret | Path to the secret obtained in advance in the secret |
| Path to Auth | Same parameters as "Path to Auth" on the Create New Credential window |
| Key Name | Key name obtained in advance in the secret |
(2) Authentication information using PAT
PAT (Personal Access Token) is authentication information for Provided Ops I components to access automation.
When using PAT, user information (user name, user password) is not required. Therefore, because Ops I does not store user information (user names and passwords) internally, the external IdP can manage user information in bulk when linking external IdP.
For details on provided Ops I components, see “Provided Ops I components”, and for linking external IdP, see “Setting up external IdP linkage”.
[PAT Creation Procedure]
PAT creation is performed by the user who will use the PAT.
- Select the Automation application and then select "Access" - "Users" in the AWX window displayed in the contents area.
- A list of users will be displayed. Select the user who will obtain the token.
- The Details window will be displayed, so click the Add button on the "Tokens" tab.
- The Create user token window will open. Select "Write" in the "Scope" item and click the Save button to issue the token.
- A token will be issued and displayed in the window. If you navigate to another window, you will no longer be able to view the token, so please save it in a memo.
Save the created PAT (the token issued in step 5) in Secret Management. For more information on secrets, see “Register a secret”.
As a PAT is valid for 1,000 years, it generally does not need to be renewed.
To renew a PAT, create a new PAT and replace the old PAT stored in the secret with the new PAT. After all workflows created before replacing the PAT with the new PAT in the secret are complete, delete the old PAT from Automation.