4.5.3.1 Ticket fields
The ticket fields can be customized as follows.
When changing ticket information on the Ops I Ticket window, information is exchanged with OTOBO via API. To add or delete “fields” to be displayed on the Ticket window, it is necessary to edit the configuration file for the API to be used. The API to be used is called “custom API” here. If no change to fields is needed, you do not have to modify the custom API configuration files.
Fields can be added or deleted for each ticket type, and the changes will be reflected in all tickets of the same ticket type. On tickets that have already been created, the added fields appear blank and the deleted fields will no longer appear.
Additions and deletions of fields can also be reflected in the filter function in the Ticket browser window. For details, see “Reflecting to filters”.
For details on the Tickets window, see “Tickets”.
You can also change the field names. For details, see “Changing field names”.
The following custom API functions allow you to add and delete fields.
(Table) Custom API functions that can edit fields
| Action | API | Related window |
|---|---|---|
| Obtaining the ticket list | GET /capi/v1/tickets | Ticket browser window |
| Obtaining ticket details | GET /capi/v1/tickets/{id} | Ticket zoom window Ticket browser window |
| Creating tickets | POST /capi/v1/tickets | Add new ticket window |
| Updating part of ticket information | PATCH /capi/v1/tickets/{id} | Ticket zoom window Ticket browser window |
| Displaying related tickets* | GET /capi/v1/tickets/{id}/related-tickets | Ticket browser window Ticket zoom window |
The procedure for the changes is as follows.
(1) Adding fields
① Create OTOBO dynamic fields
Perform the following tasks in the ITSM application. This action is performed using the [Admin] function of the ITSM application. Therefore, you need the permissions of the “itsm_admin” primitive role.
- Checkbox
- Date
- Date / time
- Dropdown
- Text
- Textarea
② Edit the custom API configuration files on the Ticket window
(Figure) Custom API configuration files for Ticket window
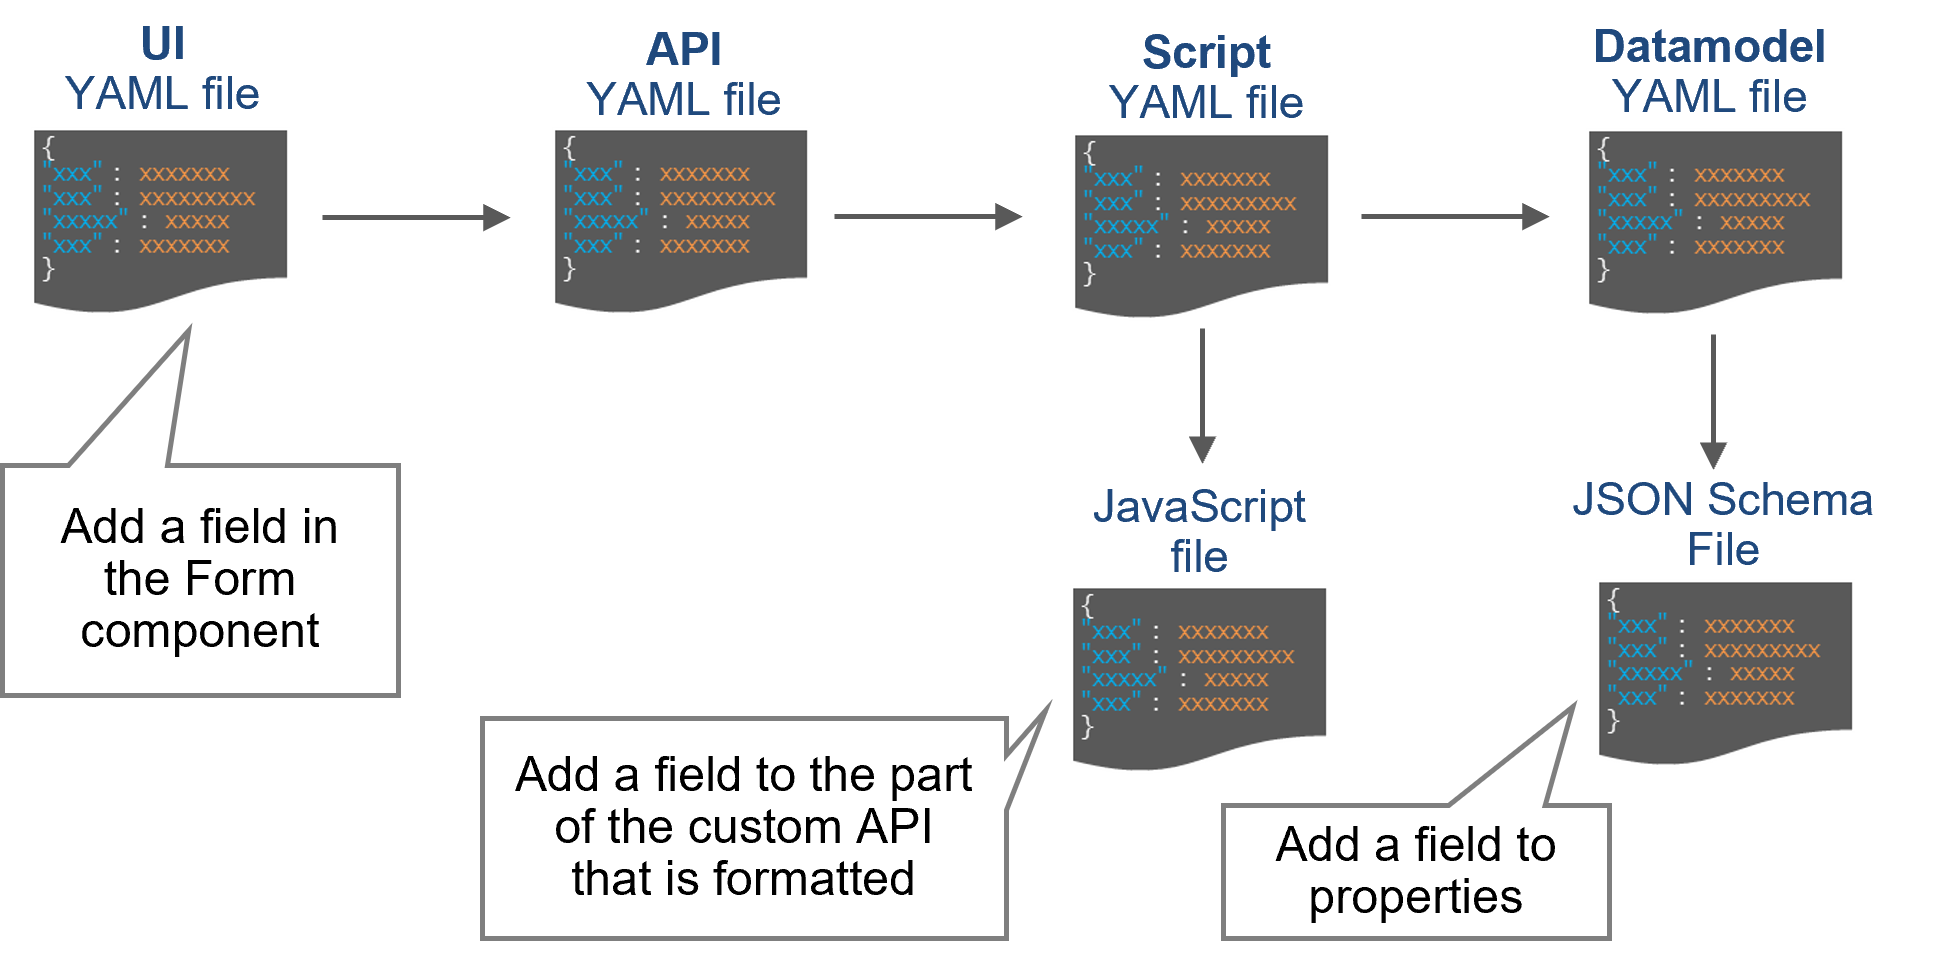
Among the configuration files, the files that you need to edit when adding fields are the JavaScript, JSON Schema, and UI YAML files. These are “default YAML files” that have been registered in advance. For information on the locations of the default YAML files, see “Customizing the default YAML files”.
The following is a description of the files that need to be edited.
For each custom API, there are one or two JSON Schema files, each of which needs to be edited. Files that need to be edited are stored in "apps/datamodel/otobo-datasource-schemas/".
(Table) JSON Schema files that need to be edited
| Custom API | JSON Schema file | Location |
|---|---|---|
| GET /capi/v1/tickets | ticket-search-response.json | "properties" in "content" |
| GET /capi/v1/tickets/{id} | ticket-details-response.json | "properties" of the first level |
| POST /capi/v1/tickets | Request: create-ticket-request-capi.json Response: create-ticket-response-capi.json |
"properties" of the first level |
| PATCH /capi/v1/tickets/{id} | Request: update-ticket-request-patch.json Response: update-ticket-response-patch.json |
"properties" of the first level |
| GET /capi/v1/tickets/{id}/related-tickets | list-related-ticket-response.json | "properties" in "content" |
The following is an example of changes to a JSON Schema file.
(Figure) Example of changes to JSON Schema file
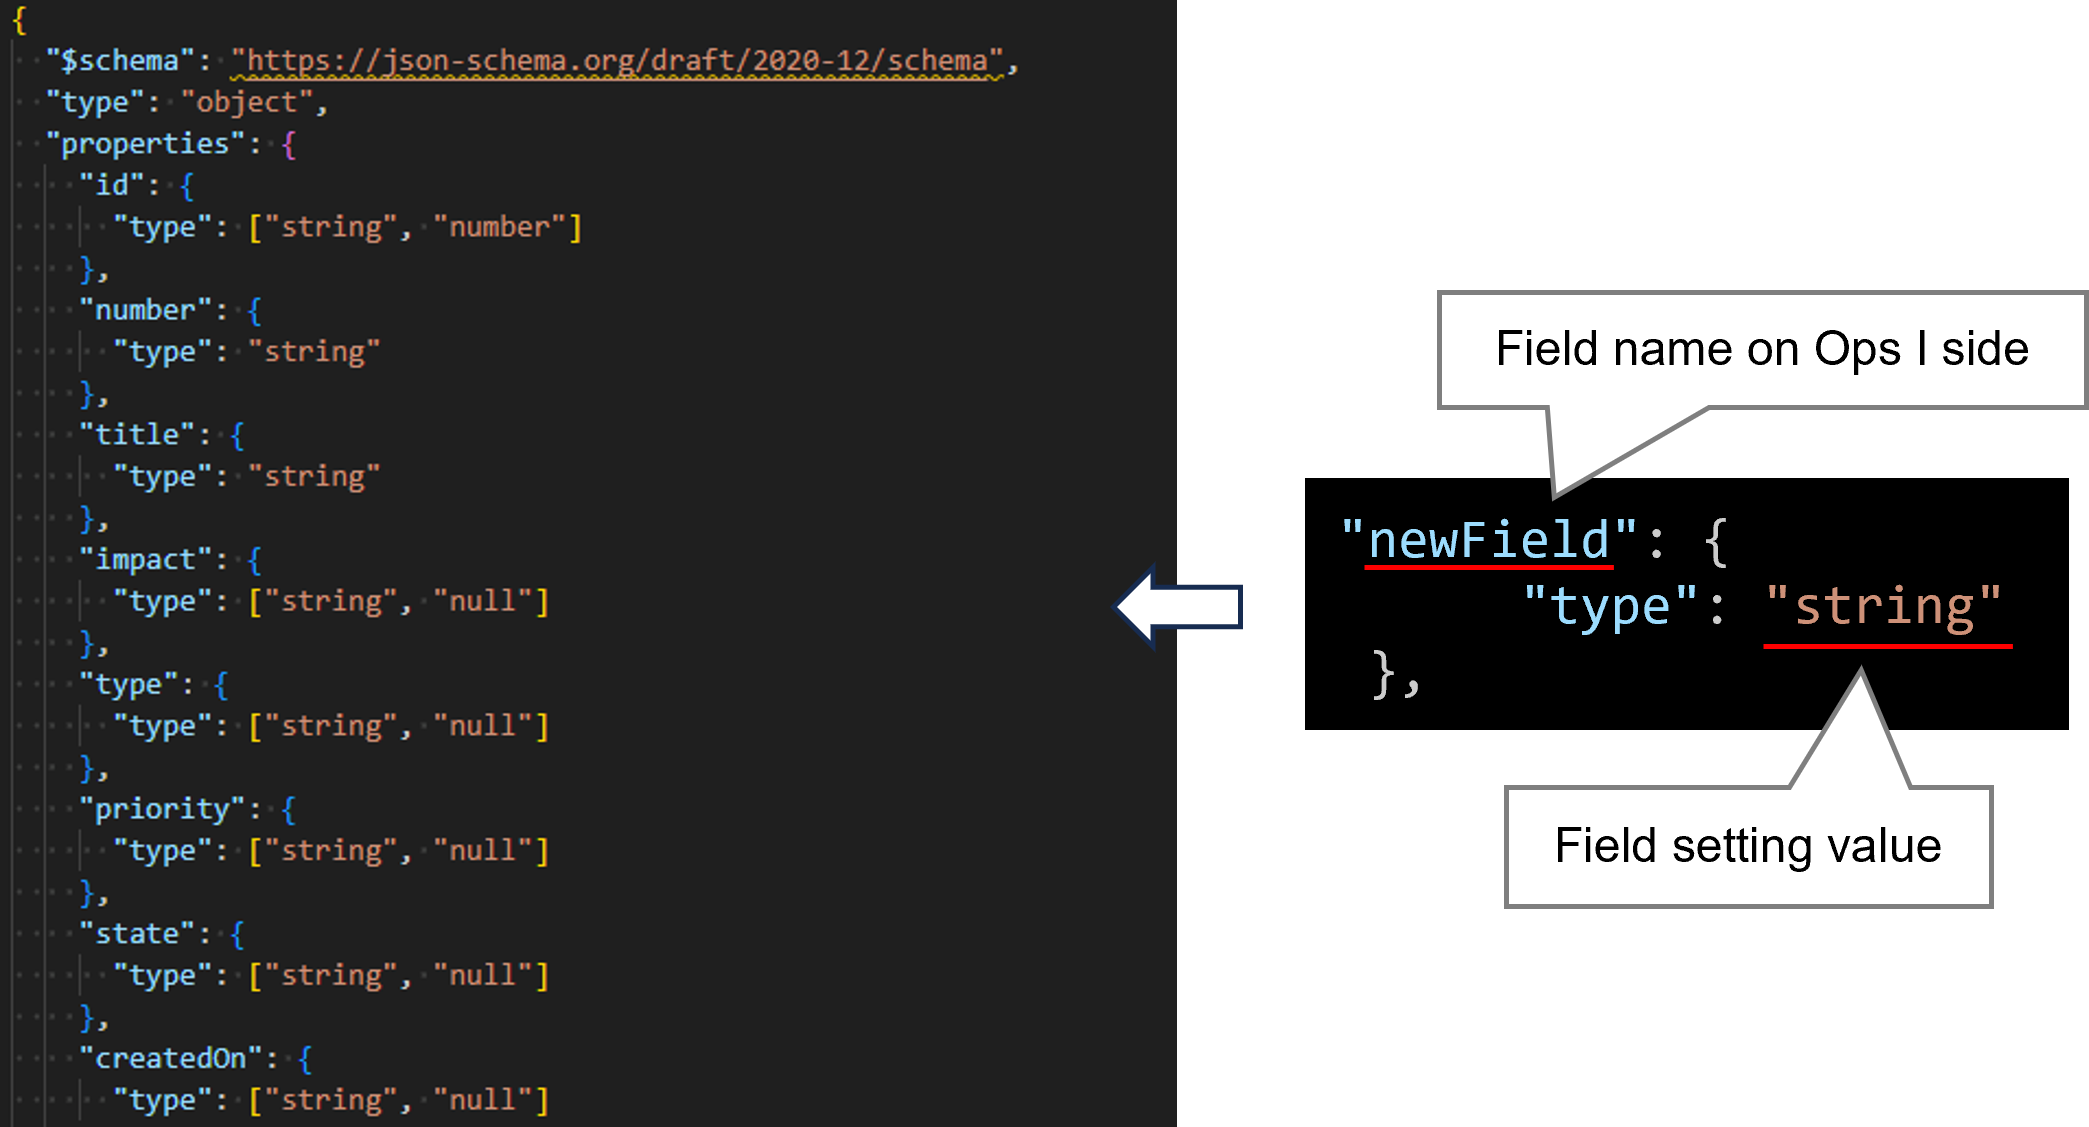
Add the field names and setting values (type, format, enum, default, or formControl) on the Ops I side to “properties,” where a list of fields to be passed to the UI side is defined.
- Field name on the Ops I side: Specify any value. Refer to the value specified here from the JavaScript files and the UI YAML file.
- Field setting values: Set the required value depending on the field type (type, format, enum, default, or formControl) . For details, see “(Table) Relationship between field types and setting values”.
(Table) Relationship between field types and setting values
| Field type | type | format | enum | default | formControl |
|---|---|---|---|---|---|
| Checkbox | boolean and null | - | - | - | - |
| Date | string | date | - | - | - |
| Date / time | string | date-time | - | - | - |
| Dropdown | string | - | Options*1 | Default value*2 | - |
| Text | string or number | - | - | - | - |
| Textarea | string | - | - | - | text |
To add fields to already created tickets, include an "empty string", which means unselected, in the options for "enum" so no error occurs for existing tickets.
JavaScript files associated with custom APIs must be edited.
The file that needs to be edited is "apps/script/ticket-common/ticket_field_definition.js".
(Table) JavaScript files that need to be edited
| Custom API | Location |
|---|---|
| GET /capi/v1/tickets | response of TICKET_SEARCH_RESPONSE |
| GET /capi/v1/tickets/{id} | response of TICKET_GET_DETAILS_RESPONSE |
| POST /capi/v1/tickets | Request: extra in extBody of CREATE_TICKET_REQUEST Response: response of CREATE_TICKET_RESPONSE |
| PATCH /capi/v1/tickets/{id} | Request: extra in extBody of UPDATE_TICKET_PATCH_REQUEST Response: response of UPDATE_TICKET_PATCH_RESPONSE |
| GET /capi/v1/tickets/{id}/related-tickets | response of TICKET_GET_LIST_RELATIONS_RESPONSE |
The syntax format differs between a "response from OTOBO to Ops I" and a "request from Ops I to OTOBO".
The following shows the syntax formats and examples of responses and requests.
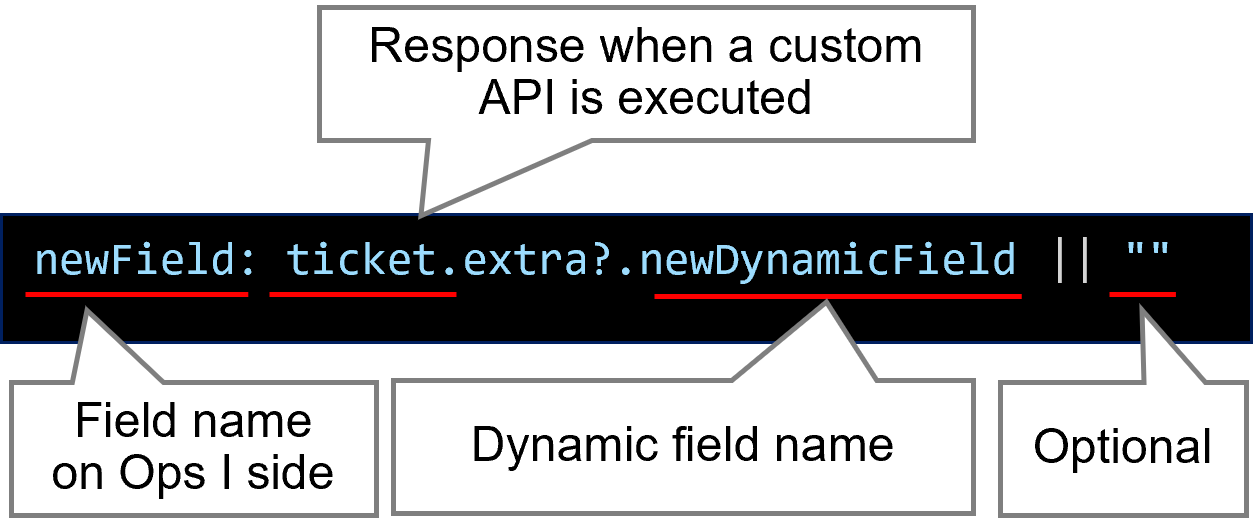
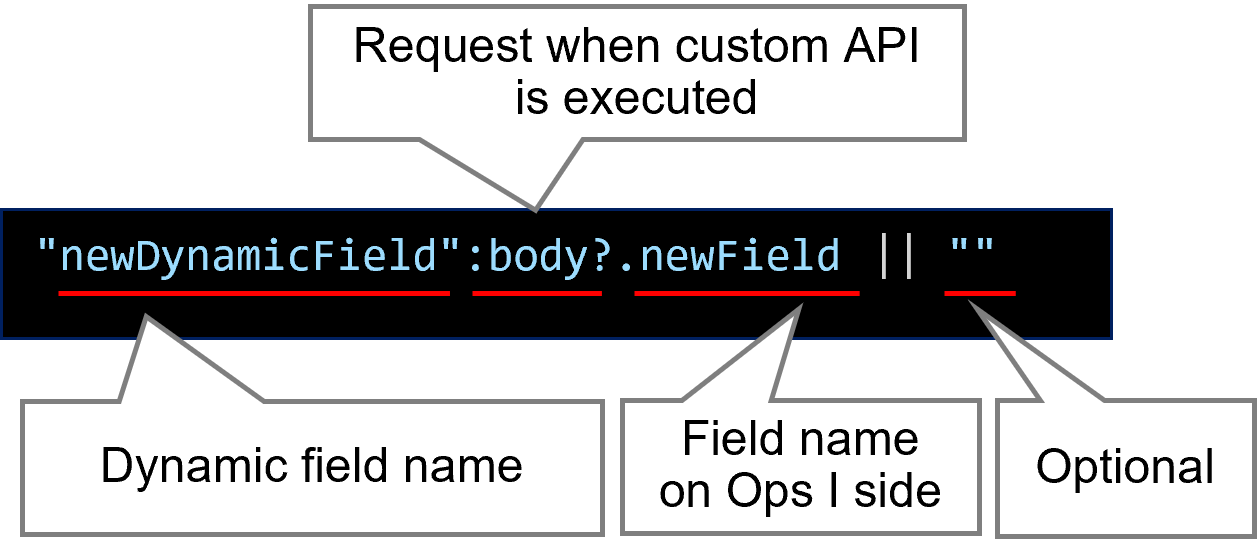
- Field name on Ops I side: Name to be added to the "properties" label in the JSON Schema file
- Dynamic field name: Name of the dynamic field added at Step ①
- Option: This can be set arbitrarily. (For example, this can be set to null or a process can be added.)
(Figure) Syntax format (response from OTOBO to Ops I)
opsi_checkbox1: convertFormatFromNumToBool(ticket.extra?.OTOBO_CheckBox1), // Checkbox type*1
opsi_date1: ticket.extra?.OTOBO_Date1 || "", // Date Type
opsi_datetime1: toUtcDateTimeFormat(ticket.extra?.OTOBO_DateTime1), // Date / Time Type*2
opsi_dropdown1: ticket.extra?.OTOBO_DropDown1 || "", //Dropdown Type
opsi_text1: ticket.extra?.OTOBO_Text1 || "", // Text Type of string Type
opsi_text2: Number(ticket.extra?.OTOBO_Text2) || 0, // Text Type of number Type
opsi_textarea1: ticket.extra?.OTOBO_TextArea1 || "", // Textarea Type of string Type
(Figure) Syntax format (request from Ops I to OTOBO)
OTOBO_CheckBox1: convertFormatFromBoolToNum(body.opsi_checkbox1), // Checkbox Type*3
OTOBO_Date1: body.opsi_date1, // Date Type
OTOBO_DateTime1: formatDateTimeRequestToOtobo(body.opsi_datetime1), // Date / Time Type*4
OTOBO_DropDown1: body.opsi_dropdown1, // Dropdown Type
OTOBO_Text1: body.opsi_text1, // Text Type of string Type
OTOBO_Text2: body.opsi_text2?.toString(), // Text Type of number Type
OTOBO_TextArea1: body.opsi_textarea1, // Textarea Type of string Type
Also, when adding a date and time, enter the field name on the Ops I side in DATETIME_CUSTOM_FIELDS.
Edit the UI YAML file for each window according to the following table.
(Table) UI YAML files that need to be edited and changes to make
| Window | UI YAML file | Components to modify/changes to make *Replace italicized characters with actual values |
|---|---|---|
| Ticket zoom window |
Task application:
Request application:
|
<Components to update> ticket_detail_form <Changes to make> Add elements to form fields according to the following format. The field properties listed in "(Table) Form properties (UI version 1.1)" such as classification of required/not required and entry check can be added as needed. - name: Arbitrary name source: api field: read: ticketDetails.Ops I field name update: patchTicketCustom.Ops I field name label: Label display name |
|
<Components to update> related_records_ticket (list of tickets for related records) <Changes to make> Add elements to table columns according to the following format. If you do not want the added columns to be initially displayed in the ticket list of related records, add the hide attribute true. - name: Arbitrary name source: api column: read: ticketRelated.Ops I field name label: Label display name |
||
| Add new ticket window |
Task application:
Request application:
|
<Components to update> ticket_creation_form <Changes to make> Add elements to form fields according to the following format. The field properties listed in "(Table) Form properties (UI version 1.1)" such as classification of required/not required and entry check can be added as needed. - name: Arbitrary name source: api field: create: createTicketCustom.Ops I field name label: Label display name |
| Ticket browser window |
Task application:
Request application:
|
<Tab to update>
<Components to update> ticket_filter_table (ticket list) <Changes to make> Add elements to table columns according to the following format. In the ticket list, if you do not want the added column to be initially displayed, add the hide attribute true. If the Ops I field name is different from the dynamic field name, specify the dynamic field name in "sortname". Specify the following values for each tab to be updated in the API for obtaining the ticket list.
source: api column: read: API for obtaining ticket list.Ops I field name label: Label display name sortable: true sortname: Dynamic field names |
| <Tab to update> ticket_detail_type name*_tab <Components to update> ticket_detail_form (ticket details) <Changes to make> Add elements to form fields according to the following format. The field properties listed in "(Table) Form properties (UI version 1.1)" such as classification of required/not required and entry check can be added as needed. - name: Arbitrary name source: api field: read: ticketDetails.Ops I field name update: patchTicketCustom.Ops I field name label: Label display name |
||
| <Tab to update> ticket_detail_type name*_tab <Components to update> related_records_ticket (list of tickets for related records) <Changes to make> Add elements to table columns according to the following format. If you do not want the added columns to be initially displayed in the ticket list of related records, add the hide attribute true. - name: Arbitrary name source: api column: read: ticketRelated.Ops I field name label: Label display name |
For details on the UI YAML definitions, see “UI”.
(2) Deleting fields
① Disable OTOBO dynamic fields
② Edit the custom API configuration files on the Ticket window
Delete the fields disabled at Step ① from “properties” where the list of fields to pass to the UI is defined.
For information on the sections to update, see “(Table) JSON Schema files that need to be edited”.
Delete the fields disabled at Step ① from the section to update to modify the custom API.
For information on the sections to update, see “(Table) JavaScript files that need to be edited”.
Delete the fields disabled at Step ① from the section to update in the Form component.
For information on the sections to update, see “(Table) UI YAML files that need to be edited and changes to make”.
Remove the part of the field disabled in ① from the section to edit of the filter function.
For details on the sections to edit, see “Reflecting to filters”.
(3) Reflecting to filters
If the filter function will be used in the ticket browser window, modify the following files in addition to the files described in “Adding fields”.
a. JSON Schema file
- apps/datamodel/detamodels_for_ticket_detail_ui/filter-form-schema.json
- "properties" of the first level
- enum in filterItemsAgentJA and filterItemsAgentEN
(When adding to the list window for all ticket types in the task application) - enum in filterItemsAgenttype name*EN and filterItemsAgenttype name*JA
(When adding to the list window for individual ticket types in the task application) - enum in filterItemsRequesterEN and filterItemsRequesterJA
(When adding to the list window for all ticket types in the request application) - enum in filterItemsRequestertype name*EN and filterItemsRequestertype name*JA
(When adding to the list window for individual ticket types in the request application)
b. JavaScript files
- apps/script/ticket-common/ticket_field_definition.js
- TICKET_FILTER_MAPPING
If you add both Japanese and English display names in the "JSON Schema file", list them separately.
filterItems display names: Dynamic field names
c. UI YAML file
- apps/ui/ticket_browser_agent/manifest.yaml
- apps/ui/ticket_browser_requester/manifest.yaml
- ticket_filter_tab
(When adding to the list window for all ticket types) - ticket_filter_type name*_tab
(When adding to the list window for individual ticket types)
- ticket_filter_form
- name: Dynamic field names
source: schema
field:
all: filter.Ops I field name
label: Label display name
properties:
visible: false
operator: true
checkbox: true
xs: 12
sm: 12
md: 12
lg: 12
xl: 6
(4) Changing field names
You can change existing field names.
To change field names, edit the label (label display name) in the YAML file of the ticket UI. For the YAML file to be edited,
see “② c. UI YAML file” in “Adding fields”.