4.3.2 Designing a workflow
When designing workflows, create a workflow for each task, and use a YAML file to define the content and order for each activity, such as application, approval, or task execution, as well as the roles that can execute the activities.
There are various types of activities, including review and approval of applications and automation tasks using Playbook. Also, YAML files can be used to define labels for each step of any workflow. The workflow list window displays the progress for each of these labels.
To move to the next step in the workflow, click the action button on the window for each step. There are two types of action buttons: those provided by Ops I (standard action buttons) and those that users can configure on their own. Customizing the standard action buttons is allowed with UI version 1.1. For details, see “Customizing standard action buttons”.
See “Workflow” for workflow window configuration and “Workflow” for YAML definitions.
(Table) Workflow design items and outline
| Item | Definition method | Key design points |
|---|---|---|
| ・Workflow | YAML file | Consider what operations and approval steps are required for the task to be designed. Consider which users will perform these tasks and in which roles. |
(Figure) Workflow conceptual diagram

The workflow design identifies the activities required as steps for the task to be designed and assigns roles that can execute each activity.
 Notes
Notes
- The first window of the workflow appears when a new workflow is opened from the Service Catalog window, or when a workflow that has not yet been started is opened. When a workflow is executed using the work item management function, the task in the first window will move on to the next task without waiting for any input from the user. Therefore, the group and role settings specified for "task" on the first window will apply when you open a new or unstarted workflow.
- If you specify multiple UIs within a single workflow, the UI versions used within the workflow definition must be the same. For details on the UI versions, see "UI version".
The following is a workflow diagram with a VM loan application as an example, where activities include application and confirmation of the application. The columns required for each activity are defined in the data model.
(Figure) Workflow with VM lending as an example
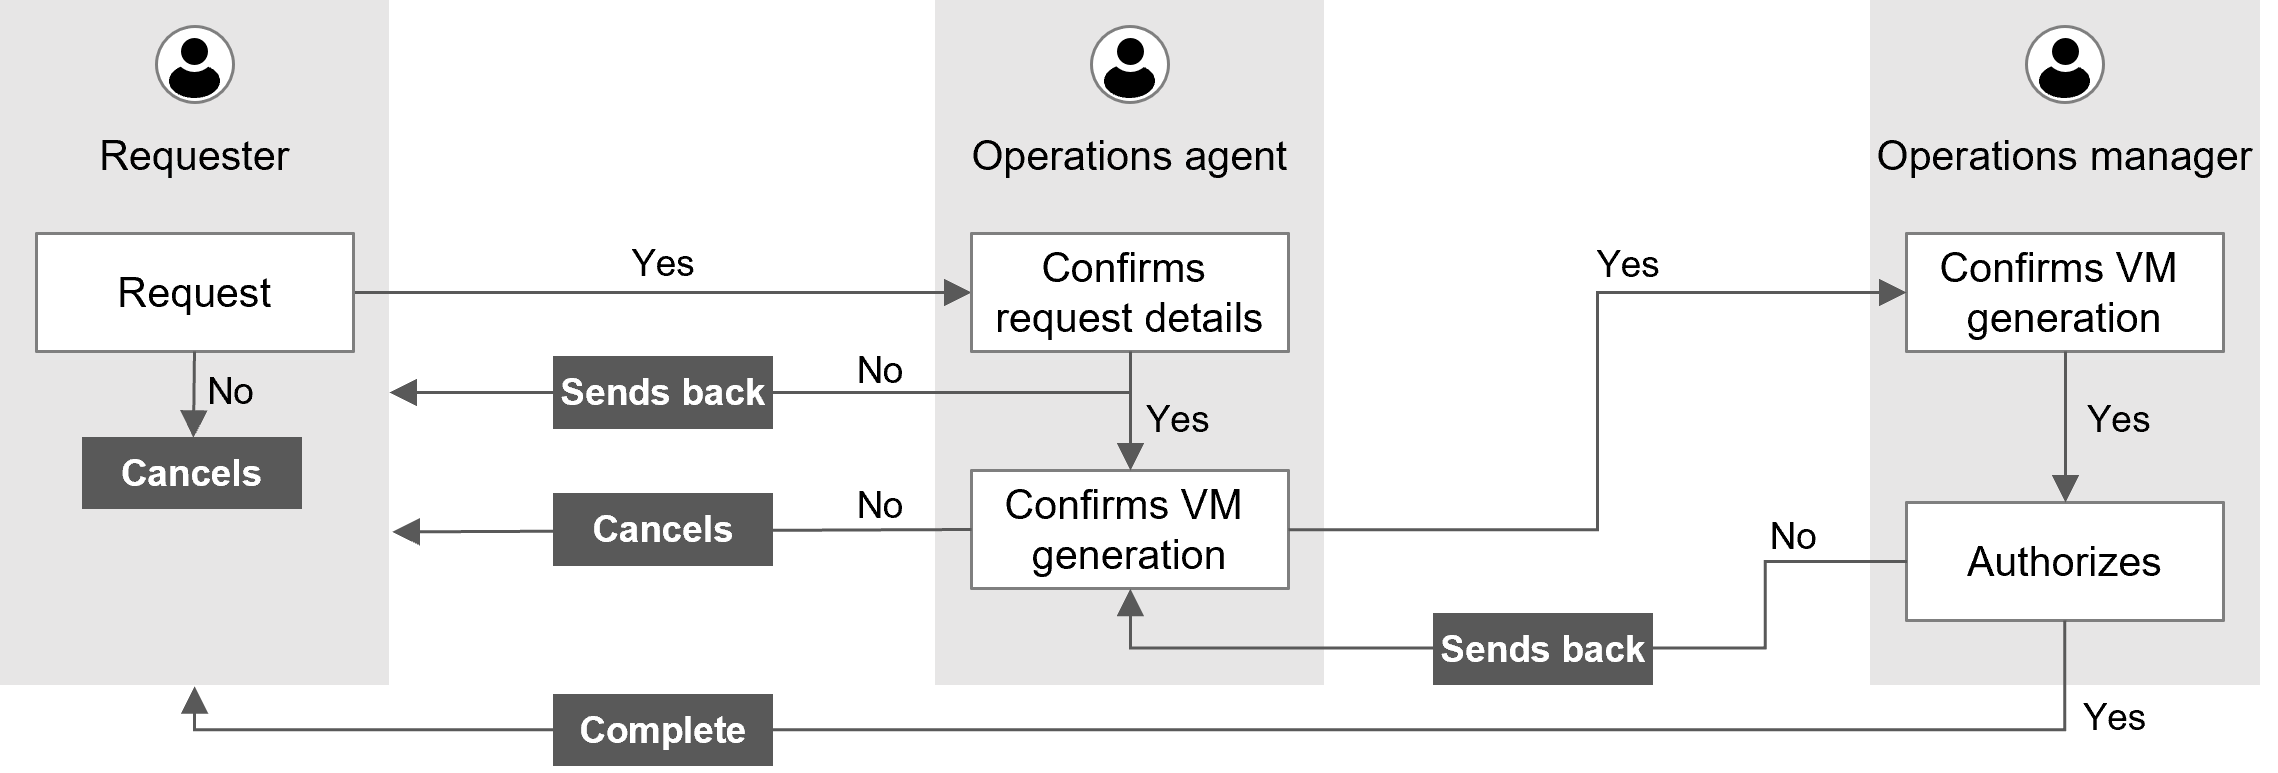
(Table) List of workflow steps and roles with VM lending as an example
| Work task name | Workflow step | Operator | Role | UI | |||
|---|---|---|---|---|---|---|---|
| Classification | Name | Action | Input value rule check | ||||
| VM lending | |||||||
| Makes a request | Requester | Customer User | The data model defines the information and columns required by the application, and the UI defines actions, etc. for each column. | ||||
| Reviews the request | Operations agent | Operation Management Office Agent |
|||||
| VM generation | (Autorun) | - | |||||
| Confirms VM generation | Operations agent | Operation Management Office Agent |
|||||
| Authorize | Operation Manager | Operation Management Office Manager |
|||||
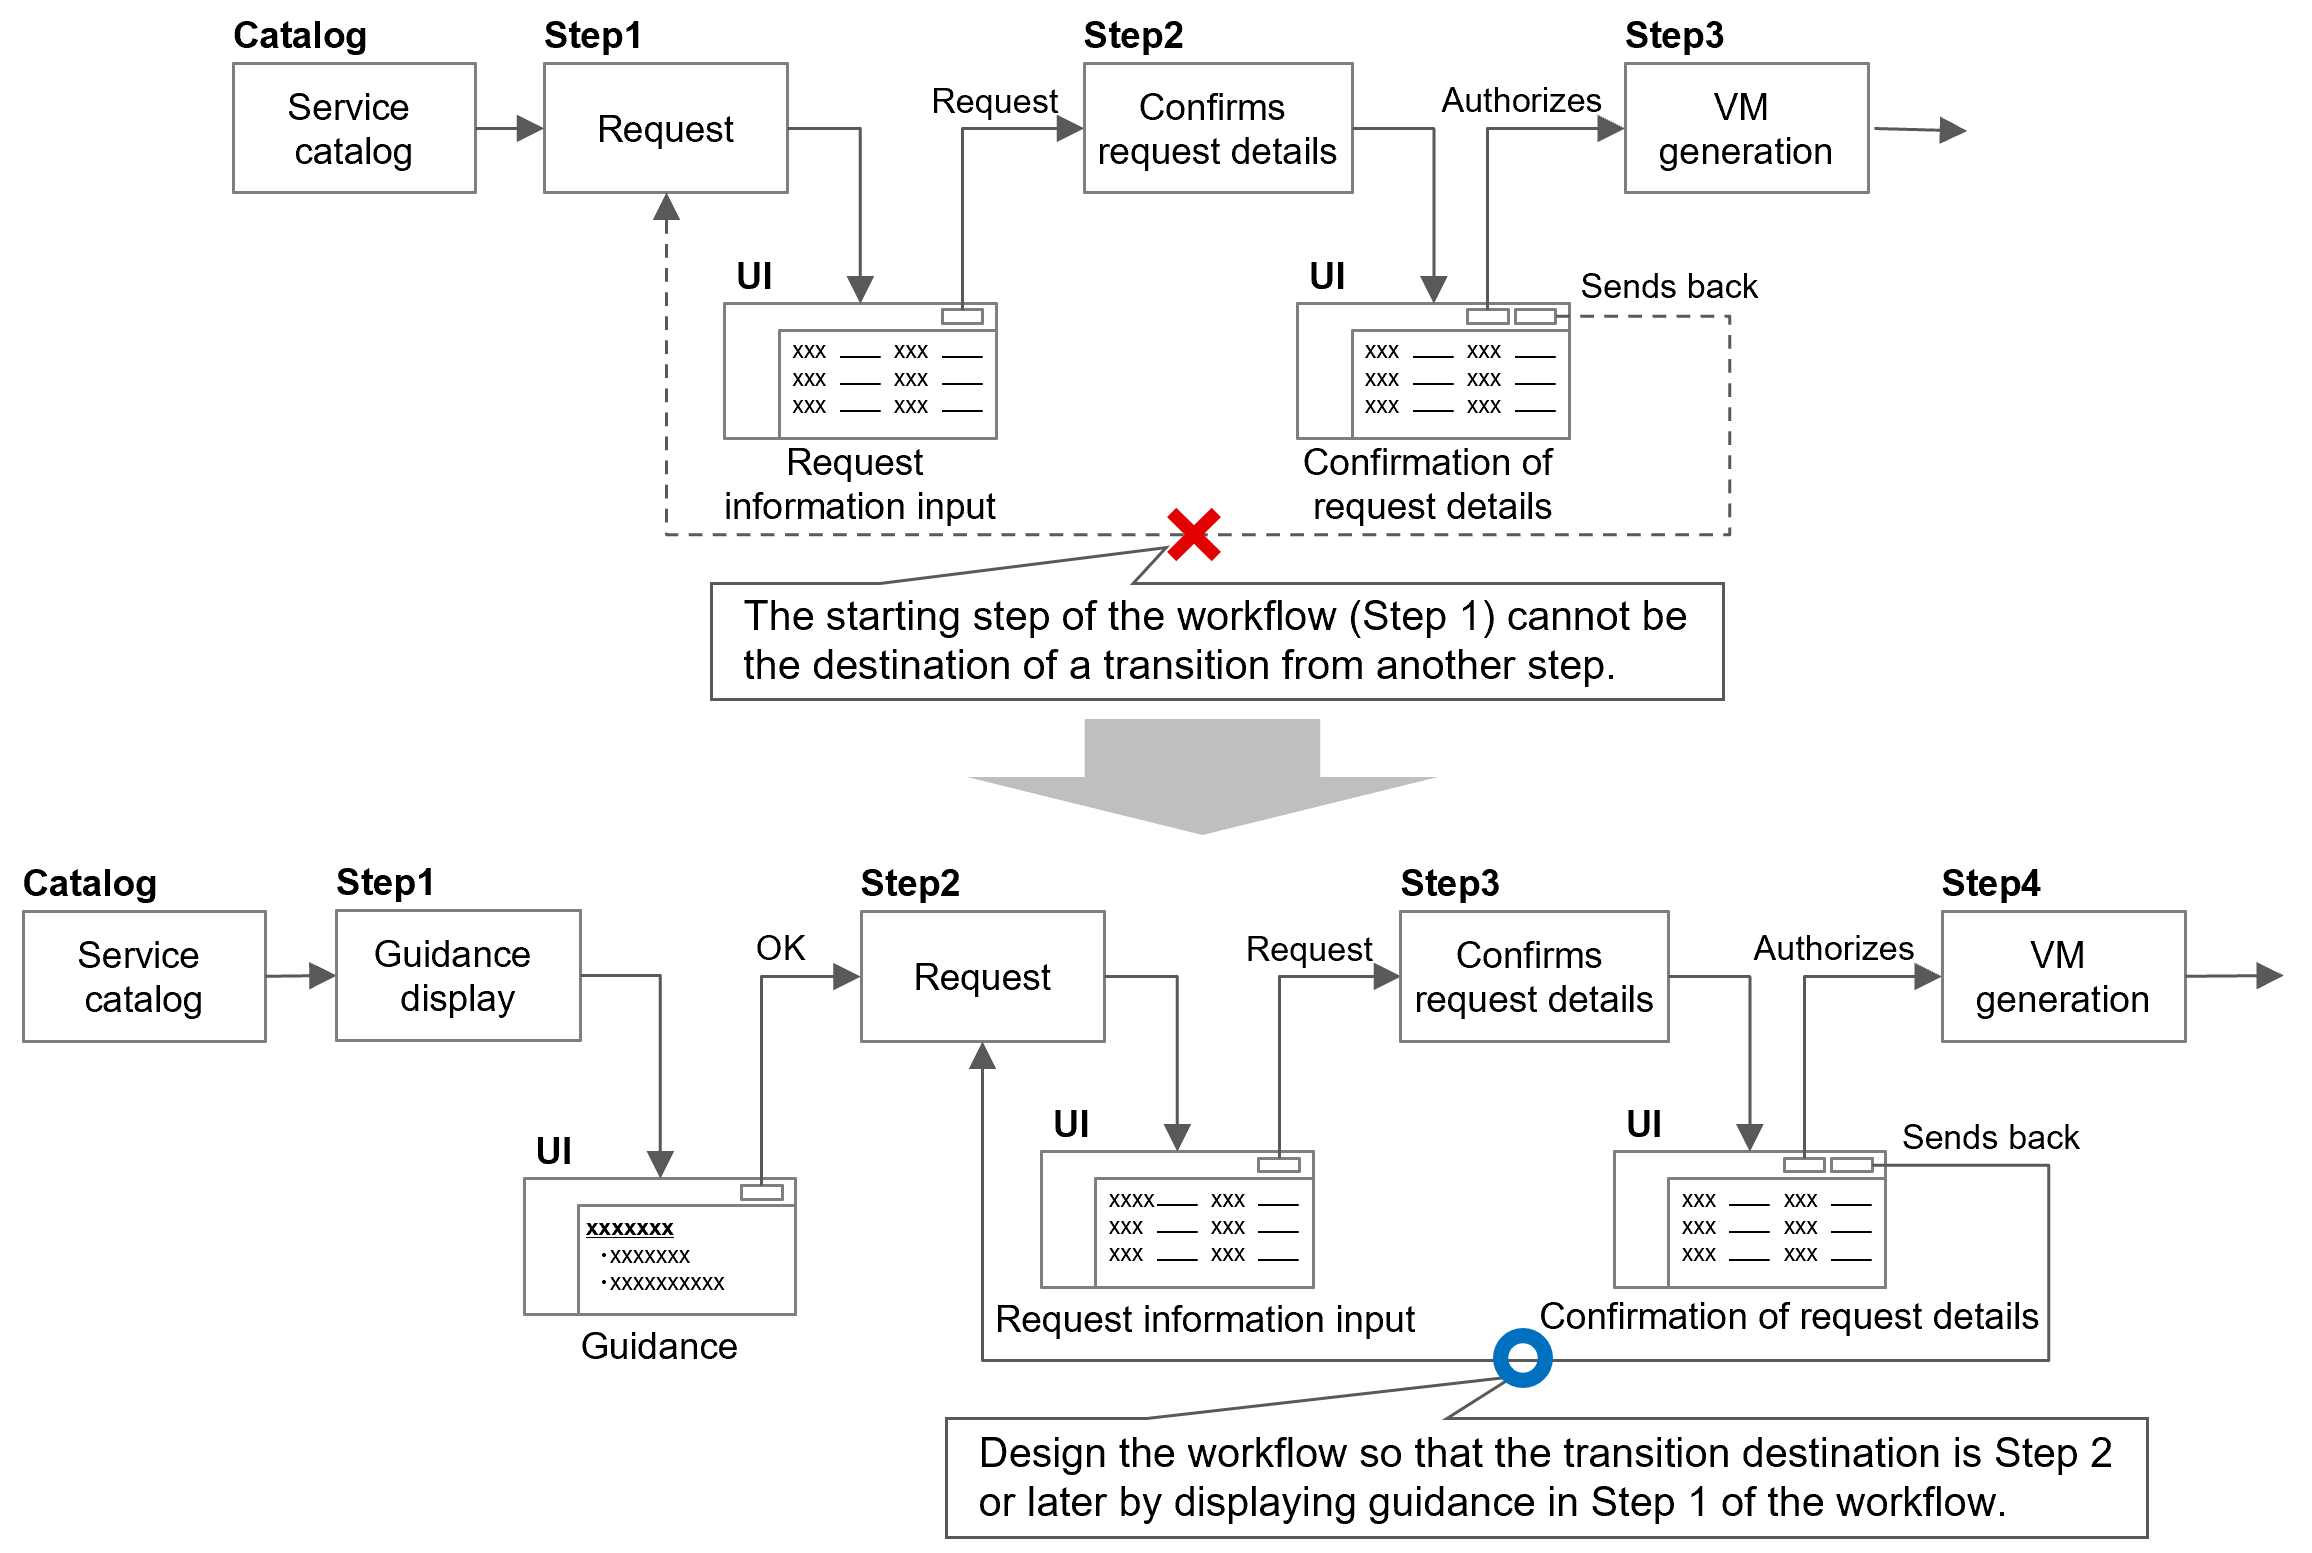
In the YAML file definition, it is not possible to jump from another step to a step that is the starting point of a workflow. To return the application to the requester due to incomplete application details, design the workflow so that the starting step of the workflow does not become the transition destination by creating a step with a guidance display at the starting step.
(Figure) Design for transitions to the starting step of the workflow
For more information on data models, see “Designing a data model”, “Datamodel”.
For more information on UI, see “UI design”, “UI”.
In addition, the following functions are available depending on the use case.
- Setting a user with skills required for operation
- Performing parallel processing
- Customizing standard action buttons
(1) Setting a user with skills required for operation
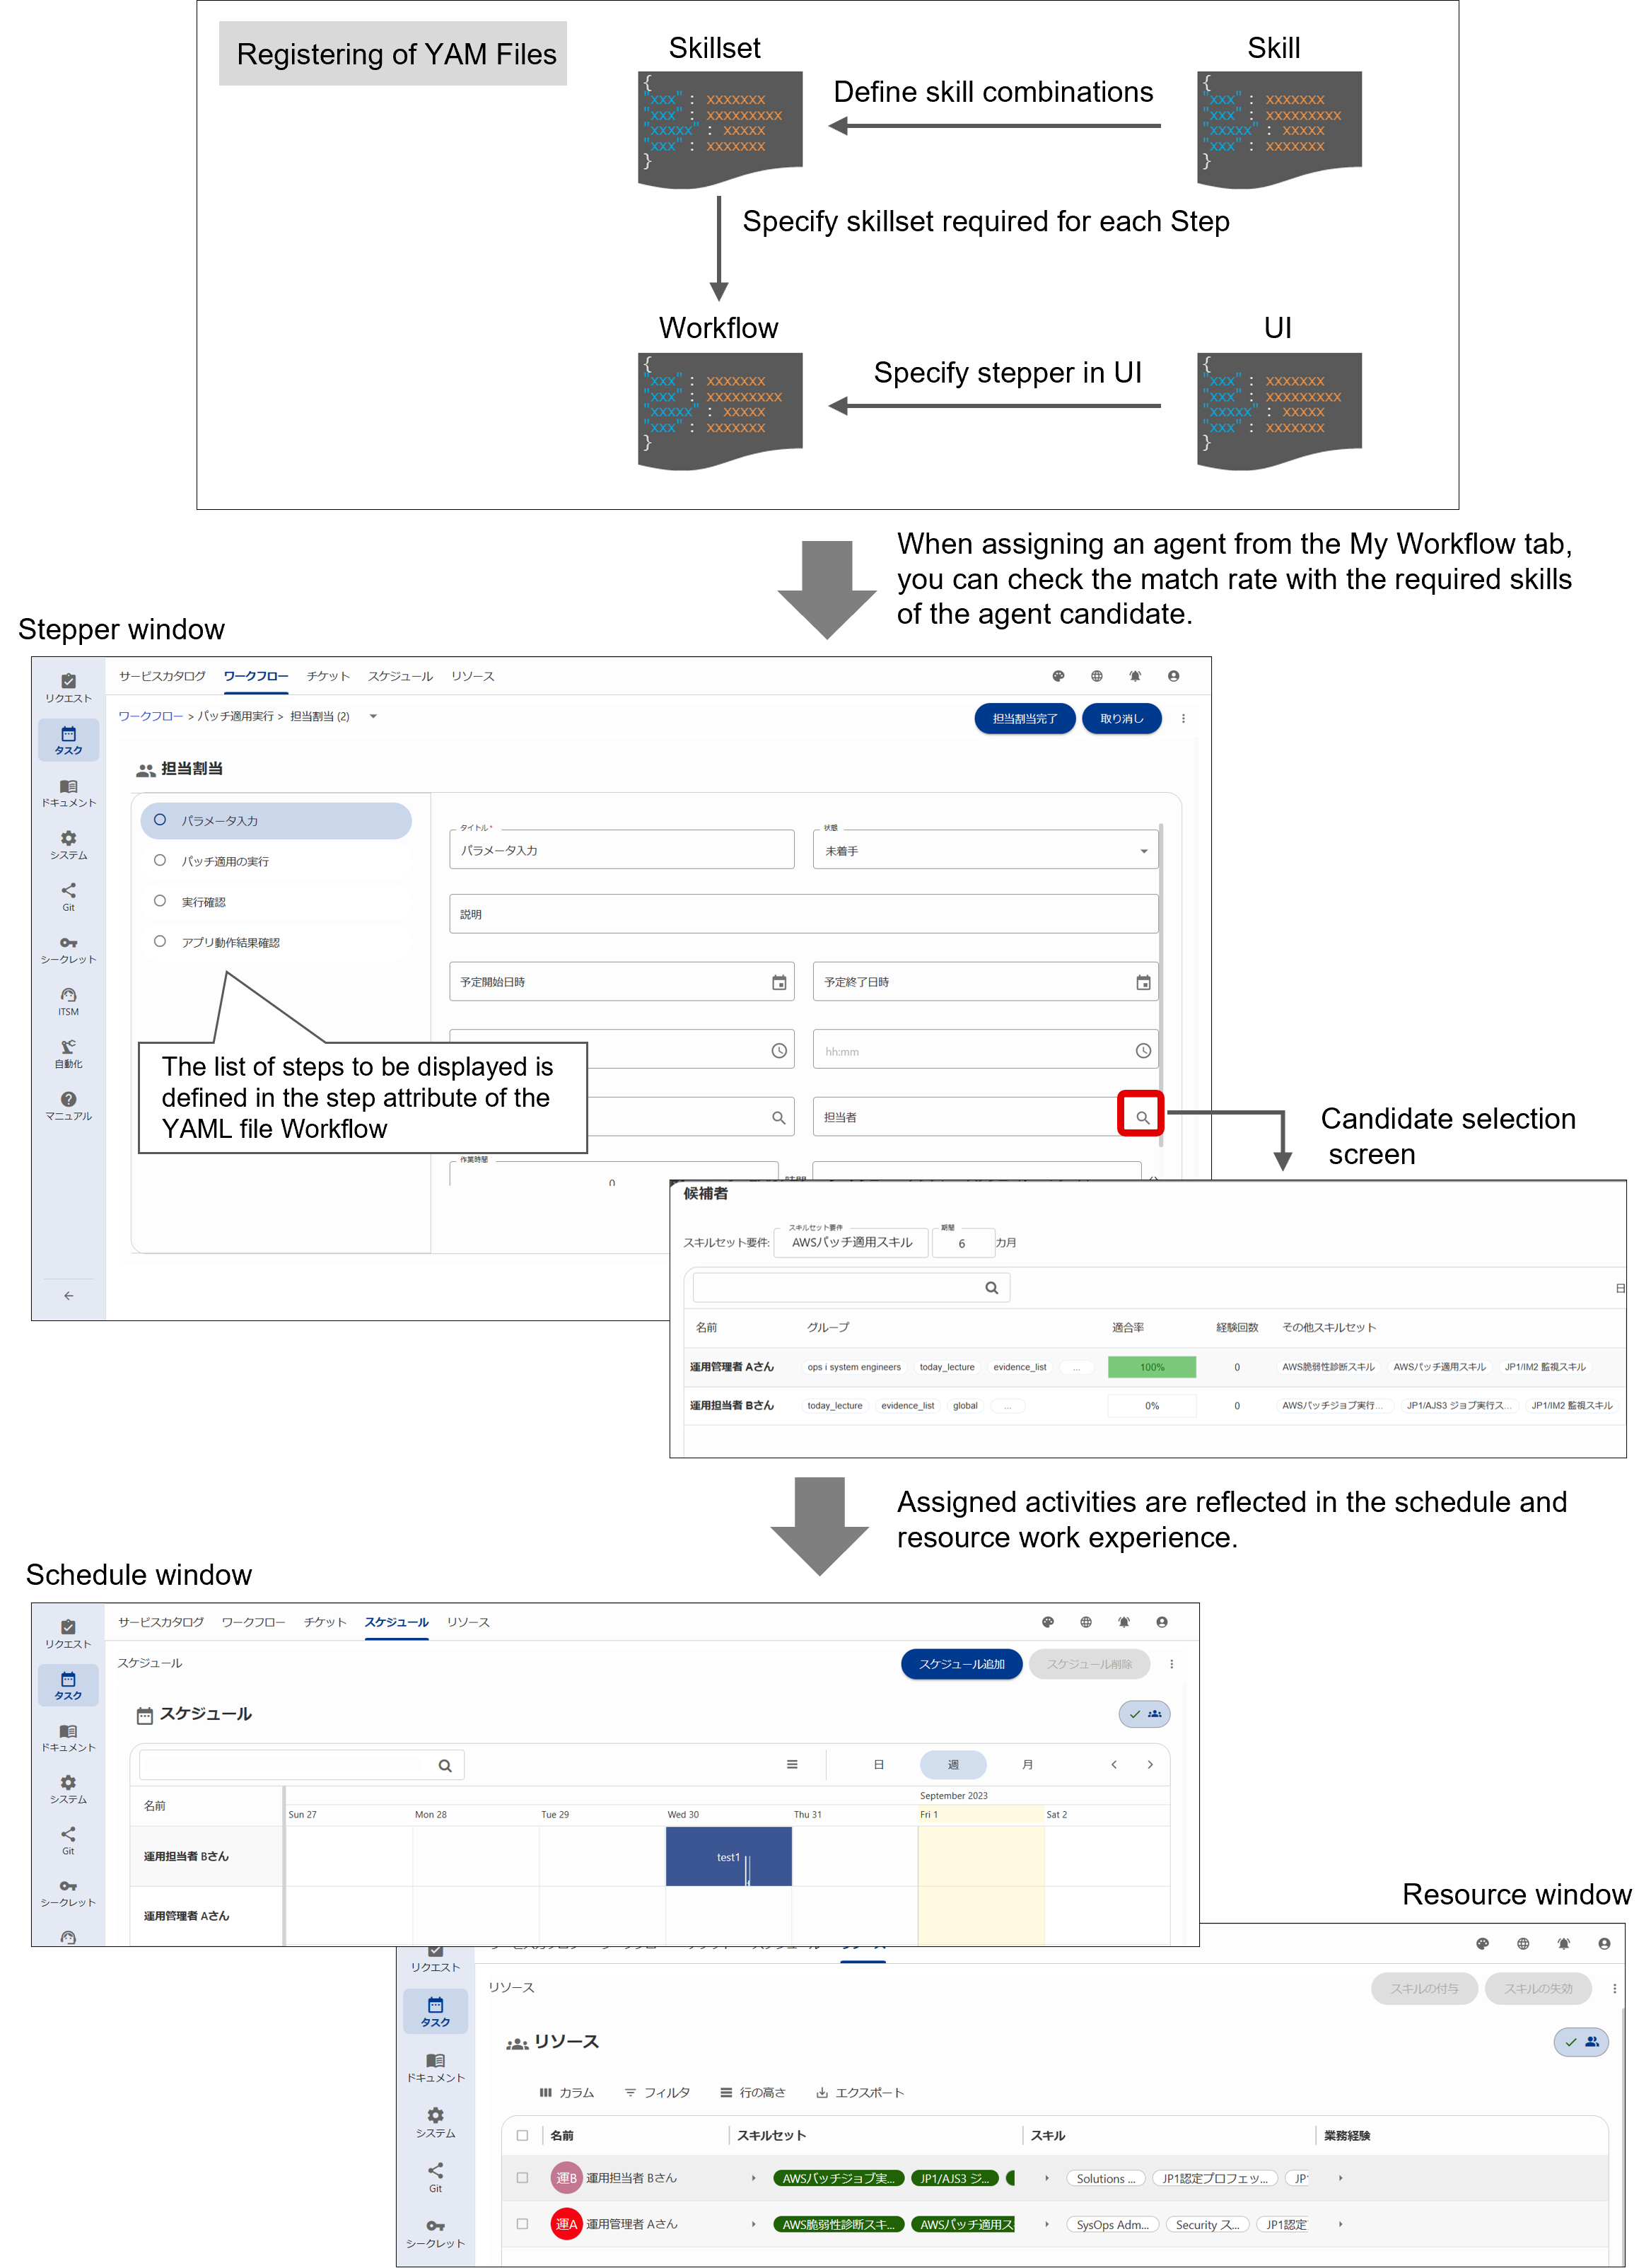
Skills defined in the YAML files by “Skill” and “Skillset” can be configured as skill sets (combinations of skills) required for each activity in the YAML file “Workflow”. User assignment according to skill sets can be performed from the Stepper window in the Workflow tab.
Assigned activities are reflected in the user’s work experience and can be viewed from the Resources tab. It is also reflected in the schedule and can be viewed from the Schedule tab.
(Table) User settings with required skills in activities
| Item | Definition method | Key design points |
|---|---|---|
| skill, skillset | YAML file | You can set the skills and skill sets (combinations of skills) that are required for the operation. |
| workflow | YAML file | You can specify the skill sets required for each activity. |
| Applying skills to users | GUI | Skills can be applied to users from the Resources tab. Depending on the skills applied, the skill set is also automatically applied. |
| Assigning users to each activity | GUI | Users can be assigned based on the skillset sufficiency, experiences, and schedule. |
For details on YAML files, see “Workflow”, “UI”, “Skill, Skillset”; for details on skill settings, see “Skill management”; for details on user assignments, see “Workflow”.
(Figure) User designation per activity
(2) Performing parallel processing
Multiple parallel processes can be executed by defining subflows in the YAML file “Workflow”, such as when multiple people perform different tasks in parallel, or when working manually while performing parallel processing with automated scripts at the same time. As with the main flow, the configured subflows can be managed from the workflow list in the Workflow tab.

The functions of subflows include the following features.
- Predefined flows can be used as subflows.
- Custom table and attachment data can be shared between the main flow and subflows.
- When multiple activities are executed in parallel, all steps need to be made into a subflow.
- The following options are available for the subflow type.
- static: Context is created at the point of saving the main flow
- dynamic: Context is created at the point of subflow execution
See “Workflow” for details on YAML files and “Workflow” for subflow operation windows.
(3) Customizing standard action buttons
There are two types of action buttons: those provided by Ops I (standard action buttons) and those that users can configure on their own. For details on action buttons, see “(Table) Action button type (UI version 1.0)” and “(Table) Action button type (UI version 1.1)”.
For the workflow execution stages when processing action buttons, see “(Figure) Relationship between user operations and workflow execution stages”.
For UI version 1.1, standard action buttons can be customized. To customize a standard action button, specify the following for the button label in the YAML file of the UI.
- type: Standard action button type (other than “custom”)
- action: Script file that defines functions (event handlers) for customizing standard action buttons
For UI YAML files (UI version 1.1), see “UI (UI Version 1.1)”.
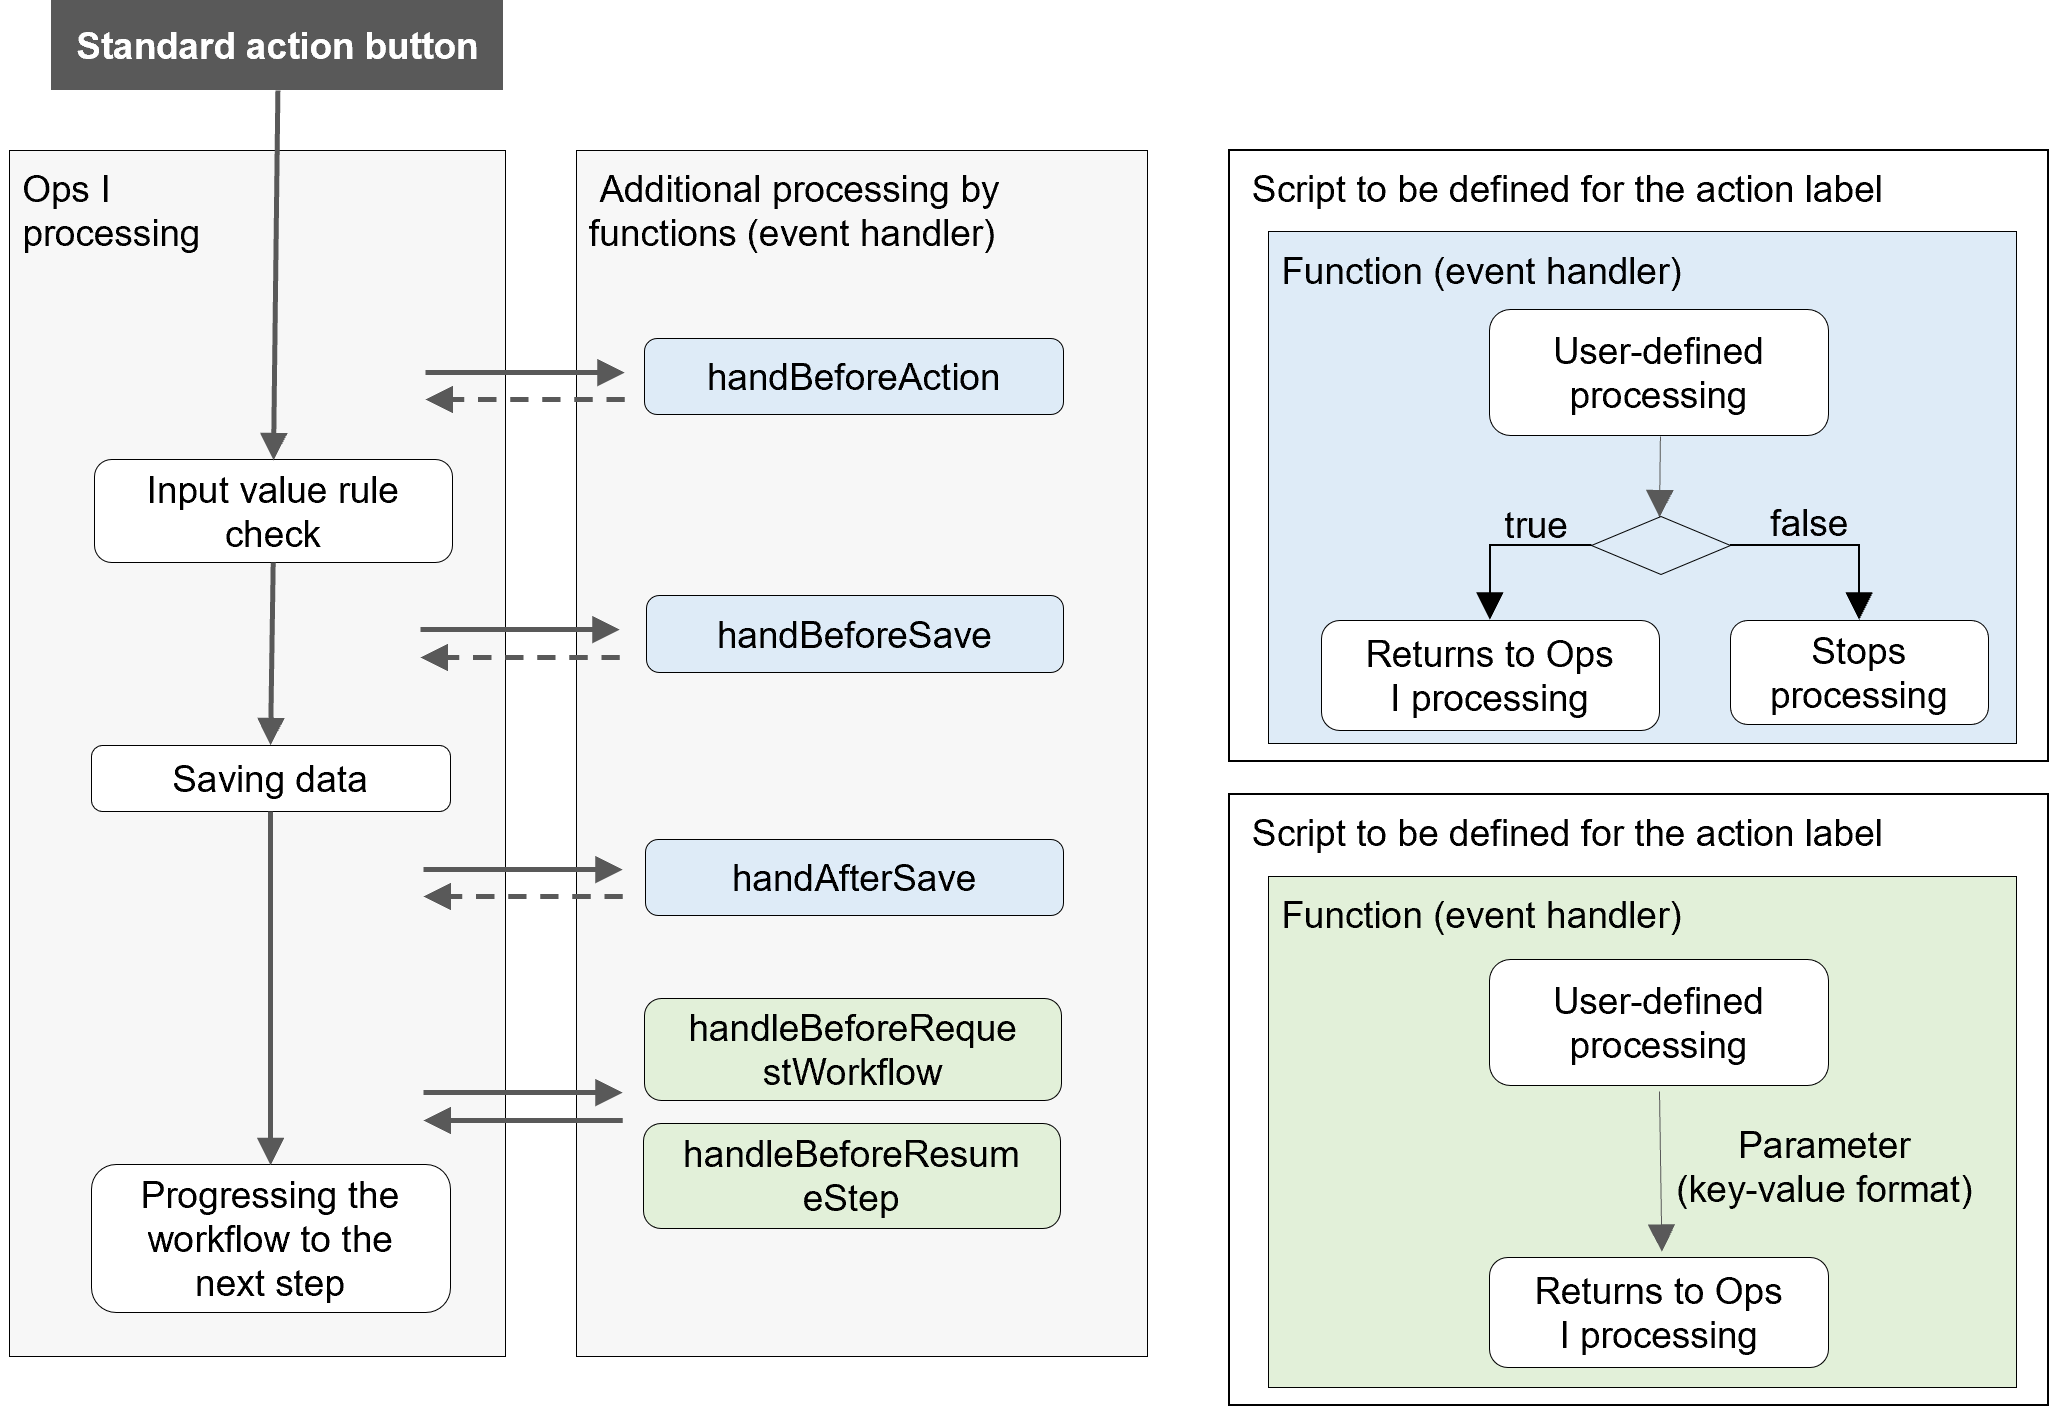
Functions (event handlers) are described in Scripts defined in the action label. Users are free to define their own processes in Script, which makes it possible to have processes such as the following.
- Confirm continuation of the process after clicking the action button
(Function to be used: handleBeforeAction) - Perform data correlation checks before data is stored
(Function to be used: handleBeforeSave) - Register information in other tables as an operation log after saving data
(Function to be used: handleAfterSave) - Pass parameters before moving on to the next step in the workflow
(Function to be used: handleBeforeRequestWorkflow/handleBeforeResumeStep)
Notes
Do not update tables before saving data. If the table is updated prior to data saving, a version mismatch error will be output when the data is saved.
Details of the functions (event handlers) for customizing the standard action buttons are shown below. There are no arguments to the function.
(Table) Functions (event handlers) for customizing standard action buttons
| Function | Execution timing | Standard action buttons for customized targets | Return value |
|---|---|---|---|
| handleBeforeAction | Immediately after button click | start/save/accept/reject/complete/edit(save/discard)/cancel | boolean
|
| handleBeforeSave | Before saving data | start/save/accept/reject/complete/edit (Save) | |
| handleAfterSave | After saving data | ||
| handleBeforeRequestWorkflow | Before moving on to the next step in the workflow | start | Object Returns the value to be passed to the API in a key-value format. Values beginning with "oi_" cannot be specified for keys. e.g., {paramA: 'aaa', paramB: 'bbb'} |
| handleBeforeResumeStep | accept/reject/complete |
(Figure) Processing that can be added to standard action buttons
The return value of the “handleBeforeRequestWorkflow” function is set to the workflow parameters by the following API.
POST: /practice-contexts/{id}/workflow/execute
{params: {paramA: 'aaa', paramB: 'bbb'}}
In this case, the YAML file of the workflow should be defined as follows.
parameters:
paramA:
required: false
type: string
paramB:
required: false
type: string
input:
- paramA
- paramB
The return value of the “handleBeforeResumeStep” function is set to the receiving parameter in the workflow by the following API.
POST: /practice-contexts/{id}/{activity}
{oi_response: 'accept', paramA: 'aaa', paramB: 'bbb'}
In this case, the YAML file of the workflow should be defined as follows.
input:
schema:
type: object
properties:
oi_response:
type: string
required: true
paramA:
type: string
required: false
paramB:
type: string
required: false