4.3.10.4 Import/export sites
Exported sites can be imported into another environment, for example, when a site created in the Ops I development environment is published to the Ops I production environment. While a site is being migrated to another environment, the site can also be put into maintenance mode to let users know that it is undergoing maintenance.
To create the same site as an existing site in the same environment, export the existing site and import it into a new site.
The details are as follows.
[Resources that can be imported]
You can select and import the resources you need from the table below. For example, if you want to edit a page in an existing site, select only the page to import.
(Table) Resources that can be imported
| Resource |
Possibility |
Description |
| Post |
△ |
Manual modification of URLs, images, and translated page assignments is required after import |
| Settings of custom post type |
〇 |
- |
| Custom post |
△ |
Manual modification of URLs, images, and translated page assignments is required after import |
| Page |
△ |
Manual modification of URLs, images, and translated page assignments is required after import |
| Setting a theme |
△ |
Some manual modifications required after import |
| Setting plug-ins |
× |
Non-importable resources require manual configuration in the migrated environment after site import |
| Media file |
× |
Non-importable resources require manual upload in the migrated environment before site import |
| Comment |
△ |
Page and custom post type comments are not importable |
| User |
× |
Non-importable resources require manual assignment of ownership of posts, etc., upon site import (see step 8. in "Site migration procedure") |
(Legend) ◯: Importable △: Importable (with conditions in the "Description" column) ×: Not importable
[Site migration procedure]
The procedure for migrating sites is as follows.
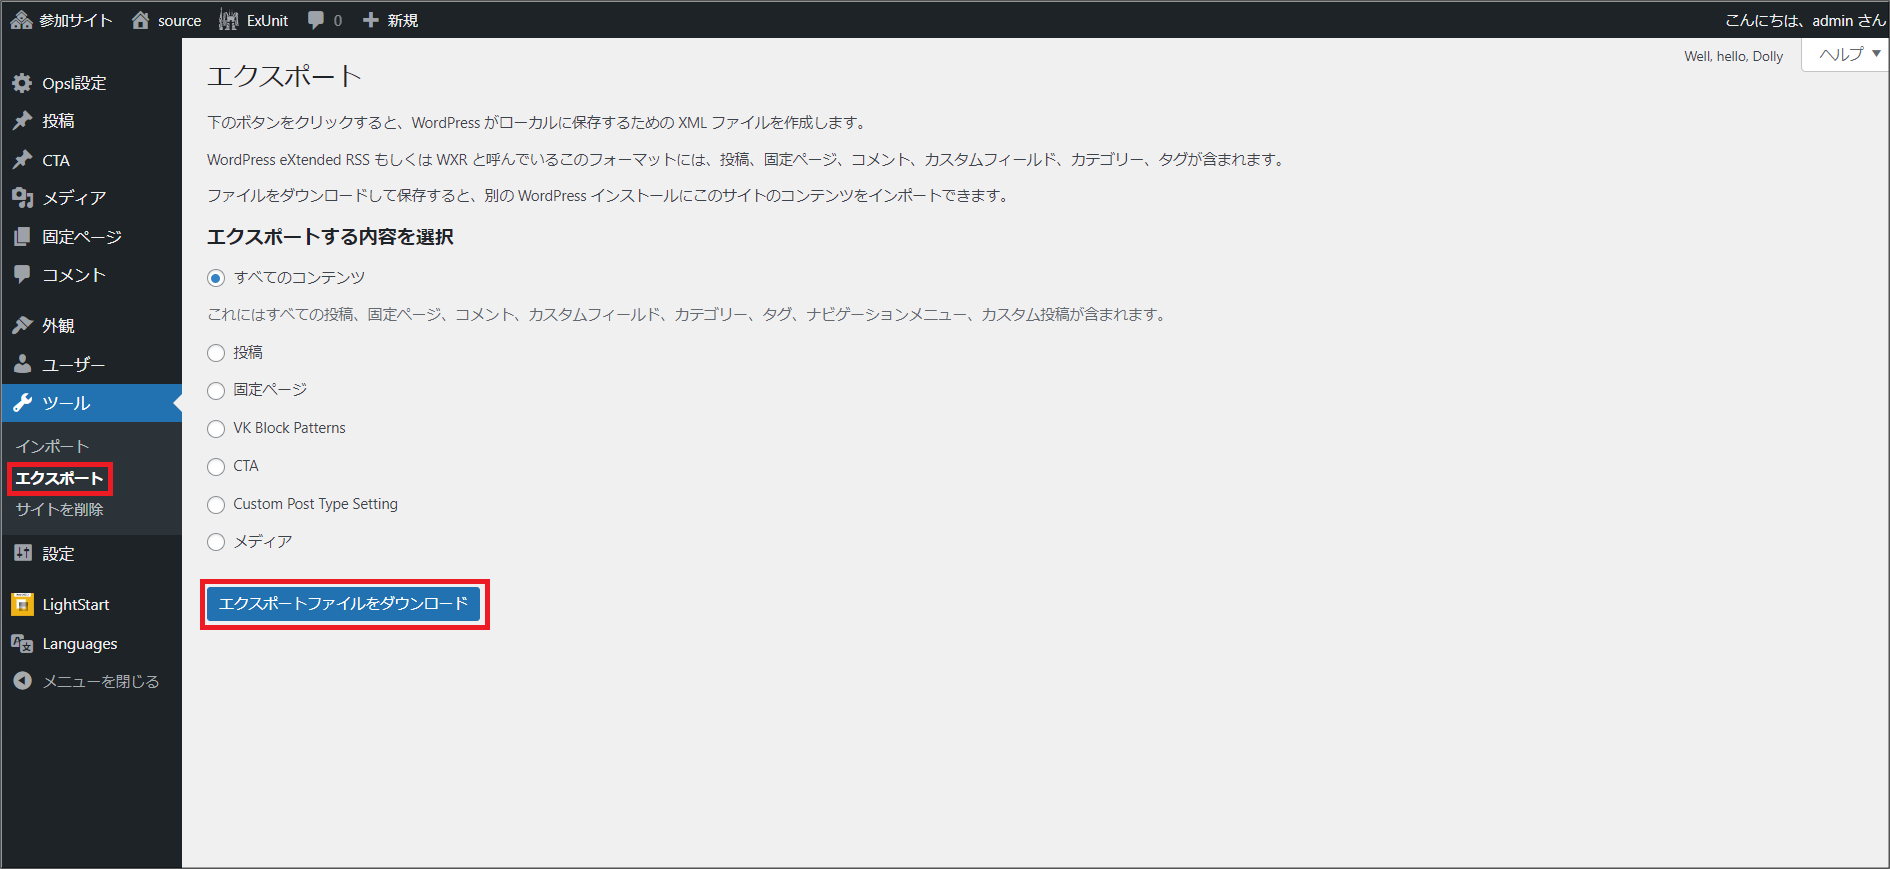
① On the [Site Management] window of the migration source, open the settings window for the site to be migrated.From [Tools] - [Export], export the content of the site you wish to migrate as an XML file.
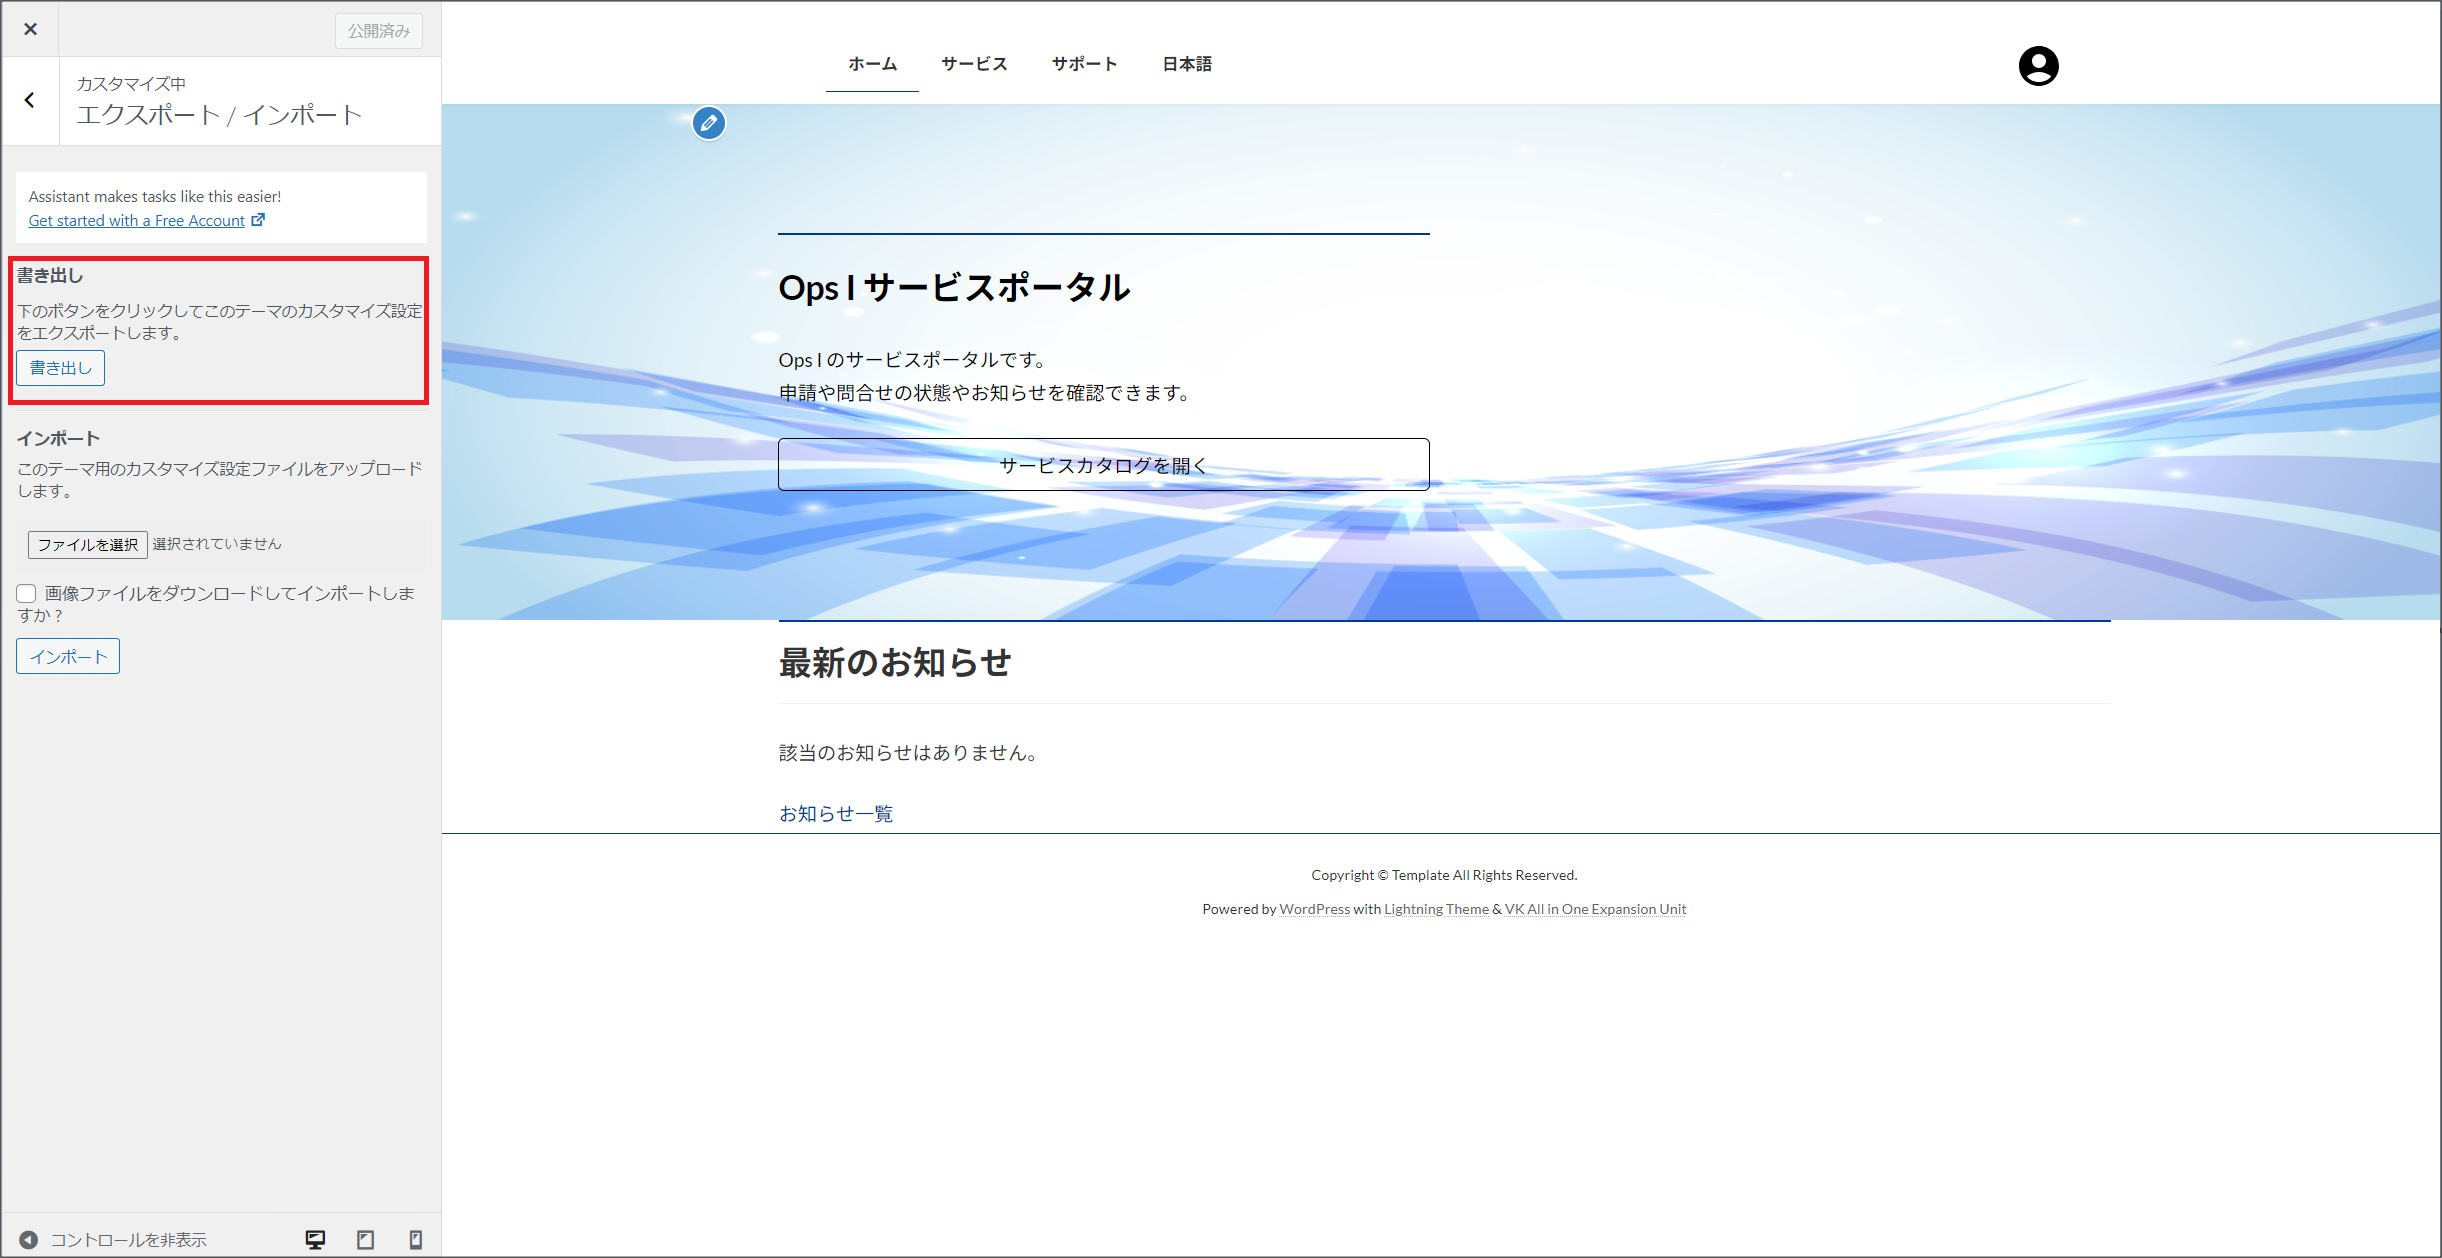
② On the [Site Management] window of the migration source, open the settings window for the site to be migrated. From [Appearance] - [Customize], click on the [Export/Import] menu. Click [Export] on the Export/Import window to export the theme customization settings.
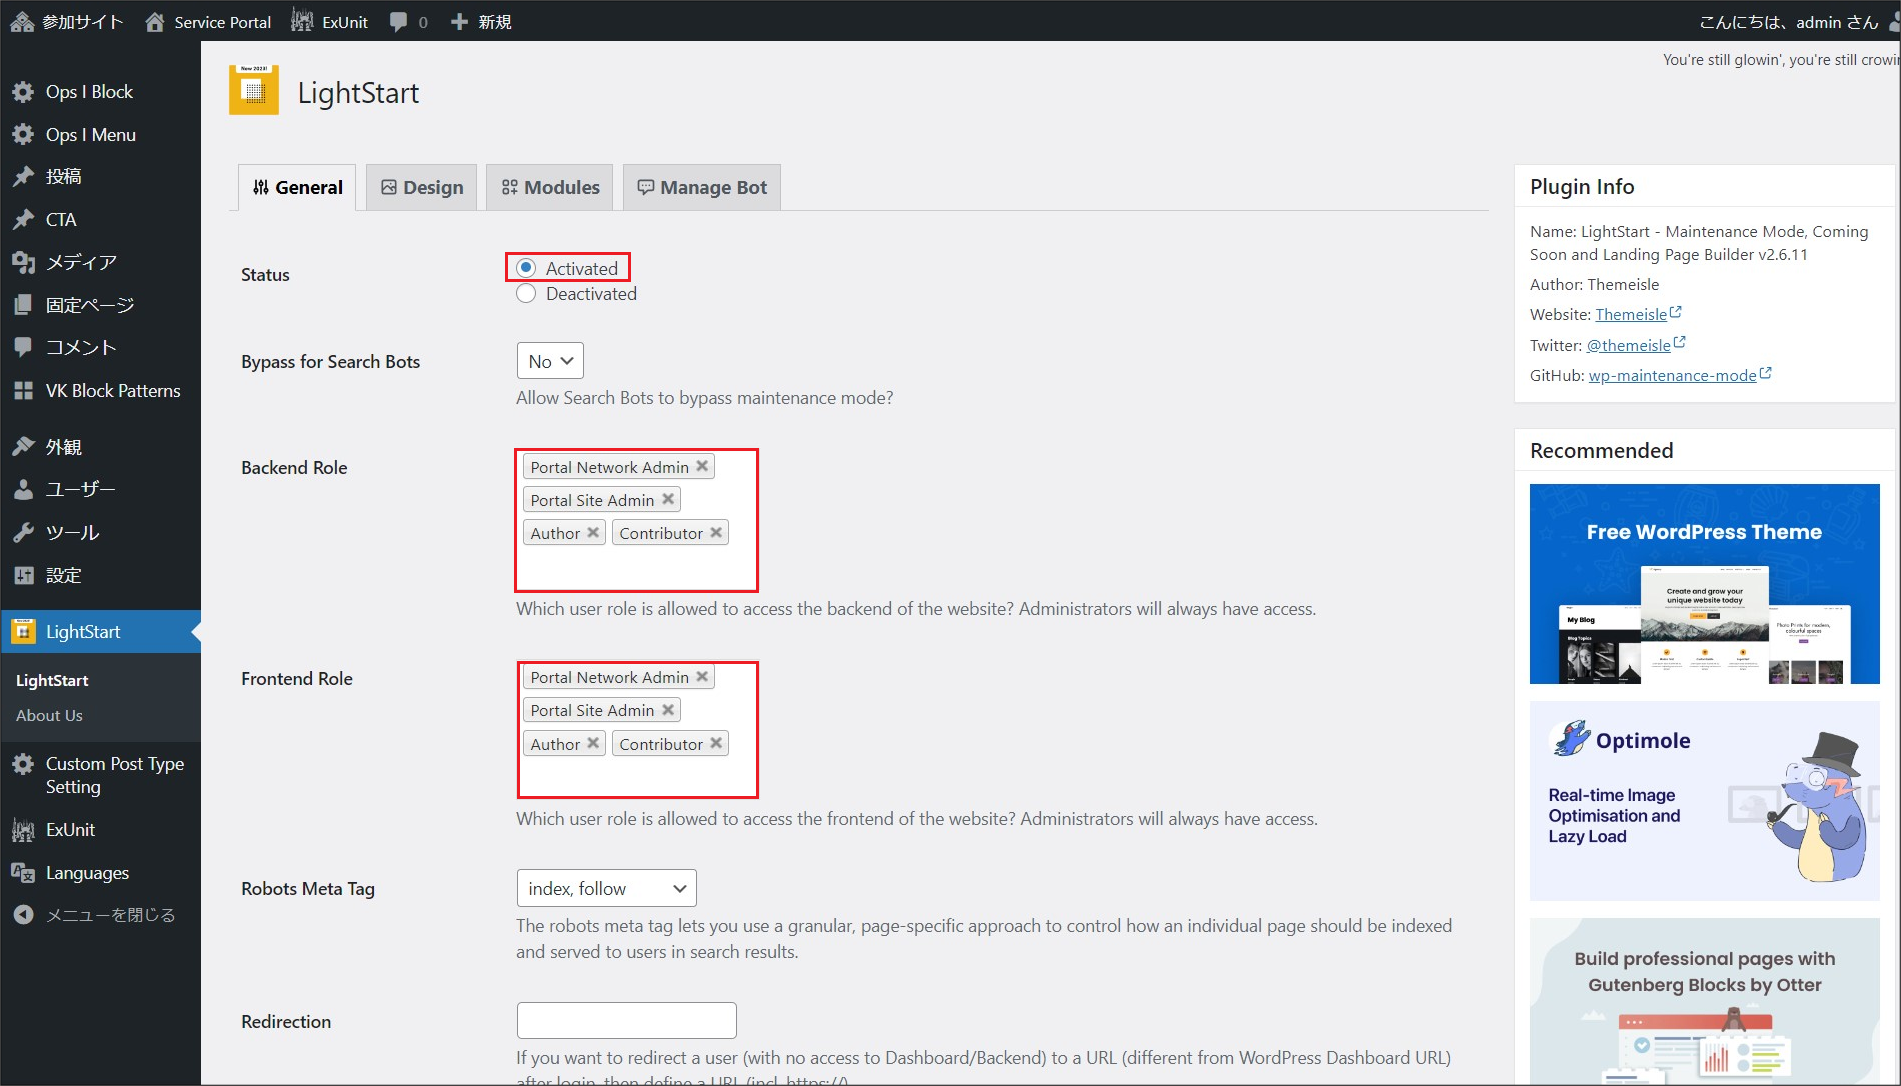
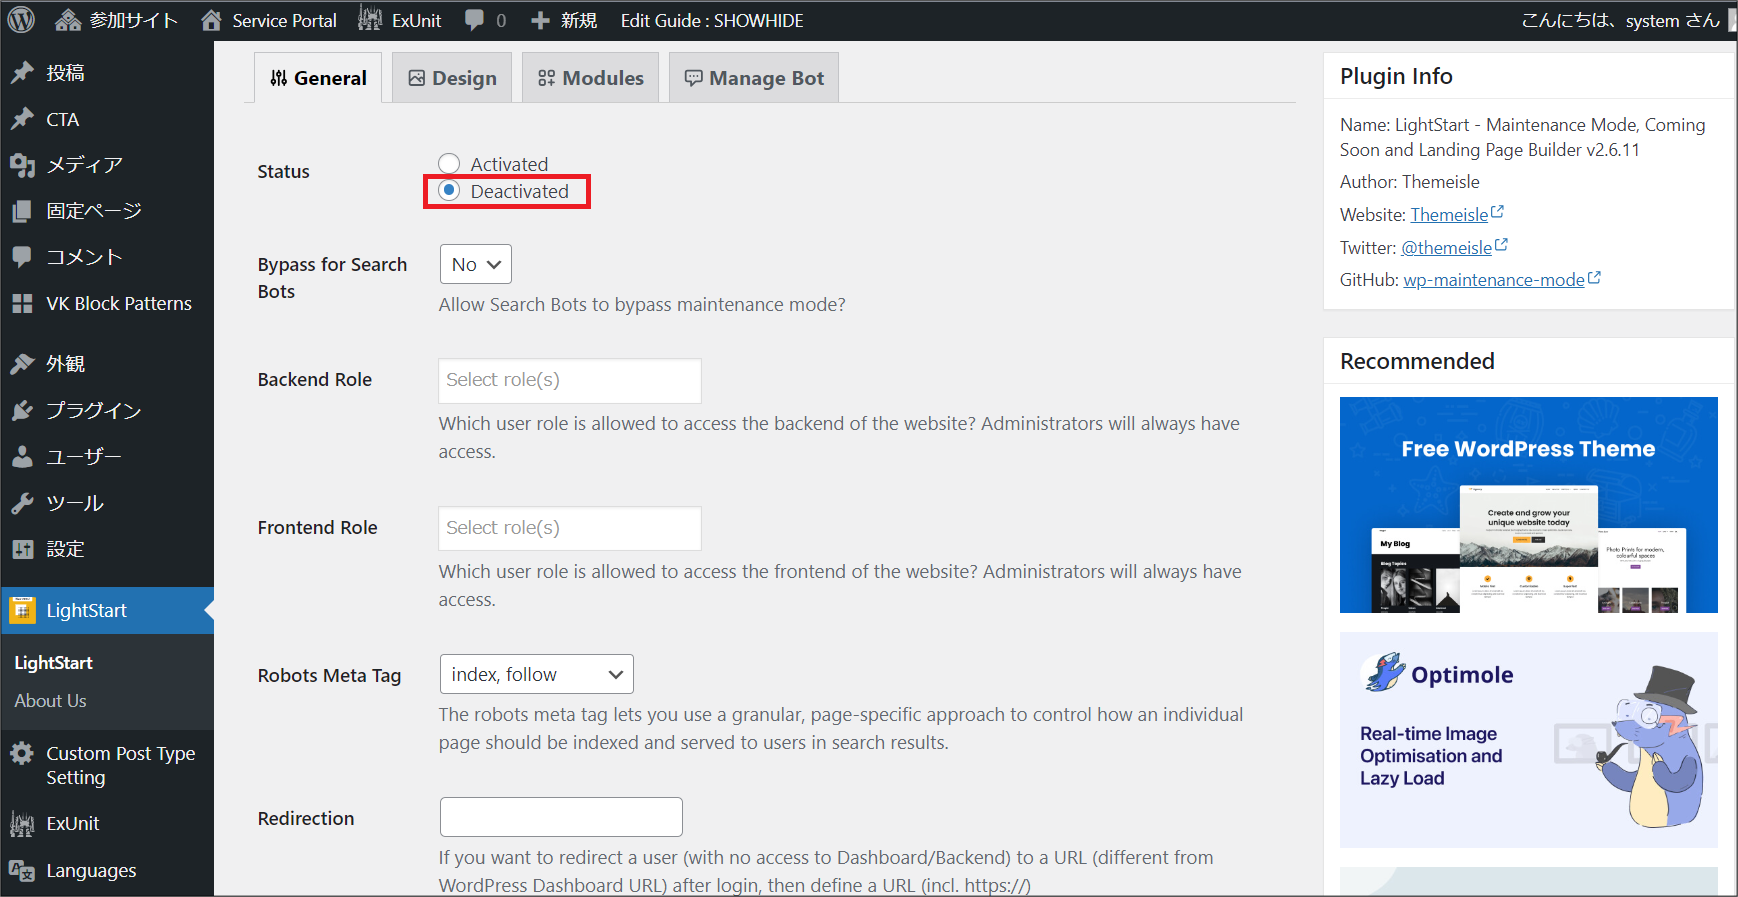
③ On the [Site Management] window of the migration source, open the settings window for the site to be migrated. Go to the General tab of [LightStart], change [Status] to [Activated], and add the following four Primitive roles to [Backend Role] and [Frontend Role]: "Portal Network Admin", "Portal Site Admin", "Author", and "Contributor". Click [Save Settings] to switch to maintenance mode.
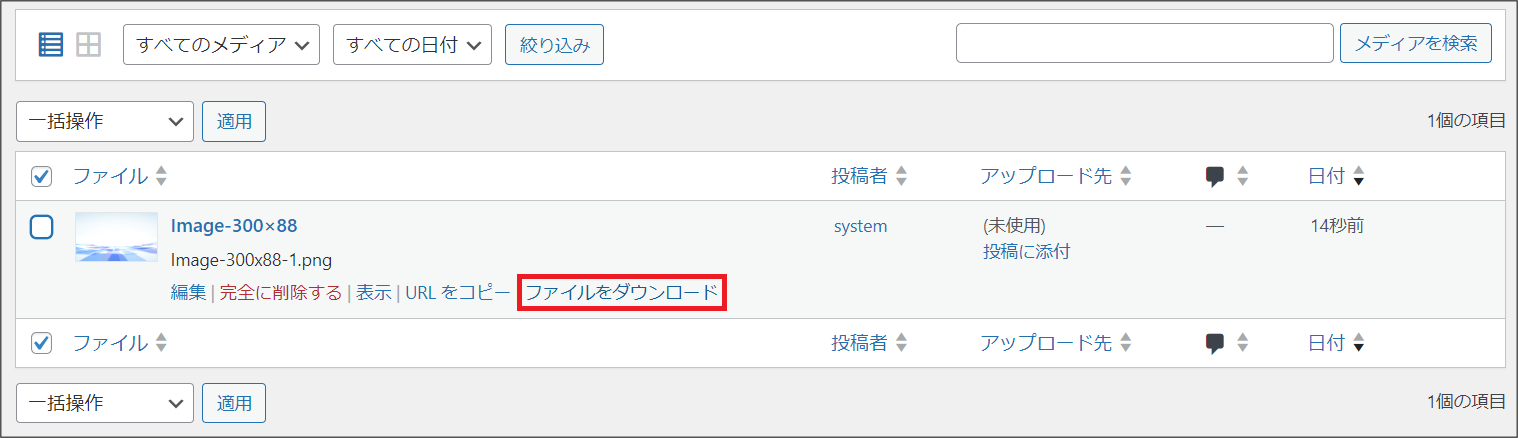
④ On the [Site Management] window of the migration source, open the settings window for the site to be migrated. Download the media files to be migrated from [Media] - [Library].
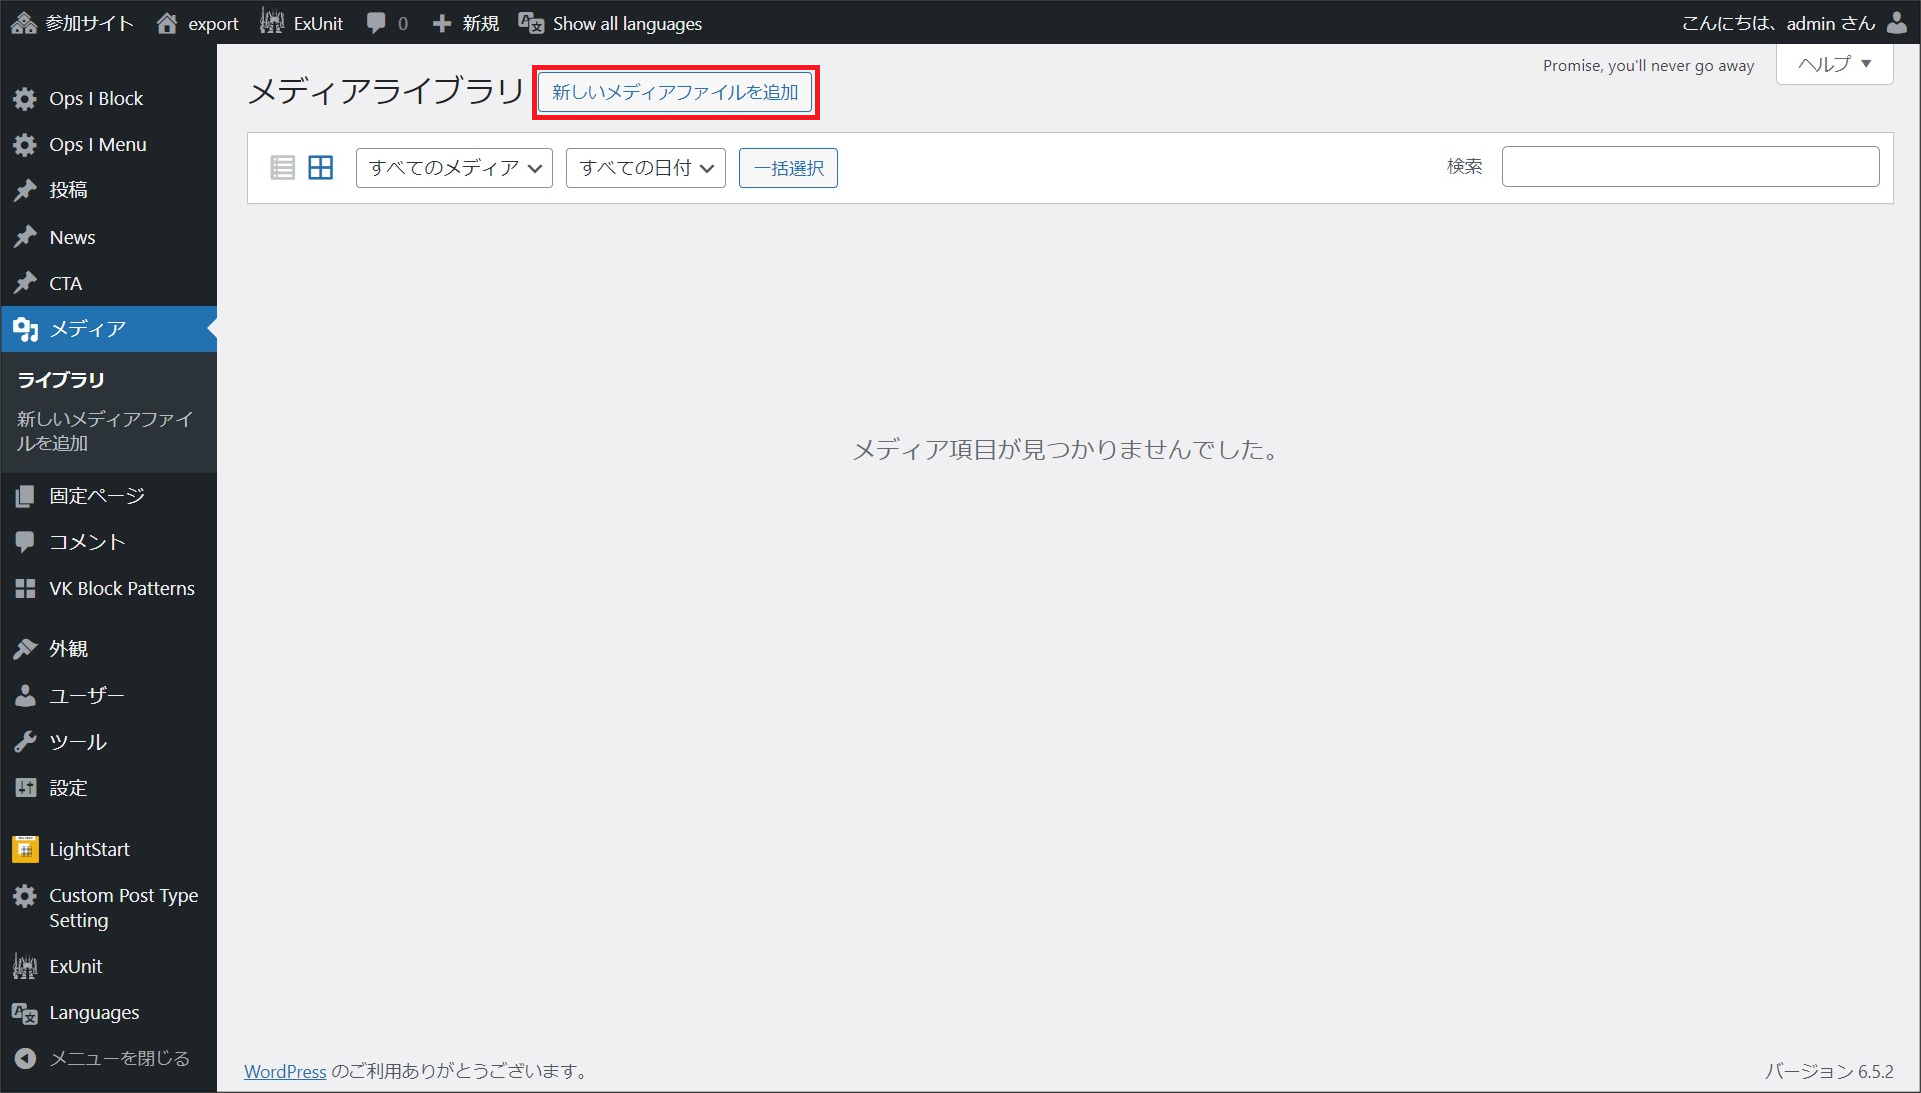
On the [Site Management] window of the migration source, open the settings window for the site to be migrated. From [Media] - [Library], click [New Media File] and upload the file to be migrated.
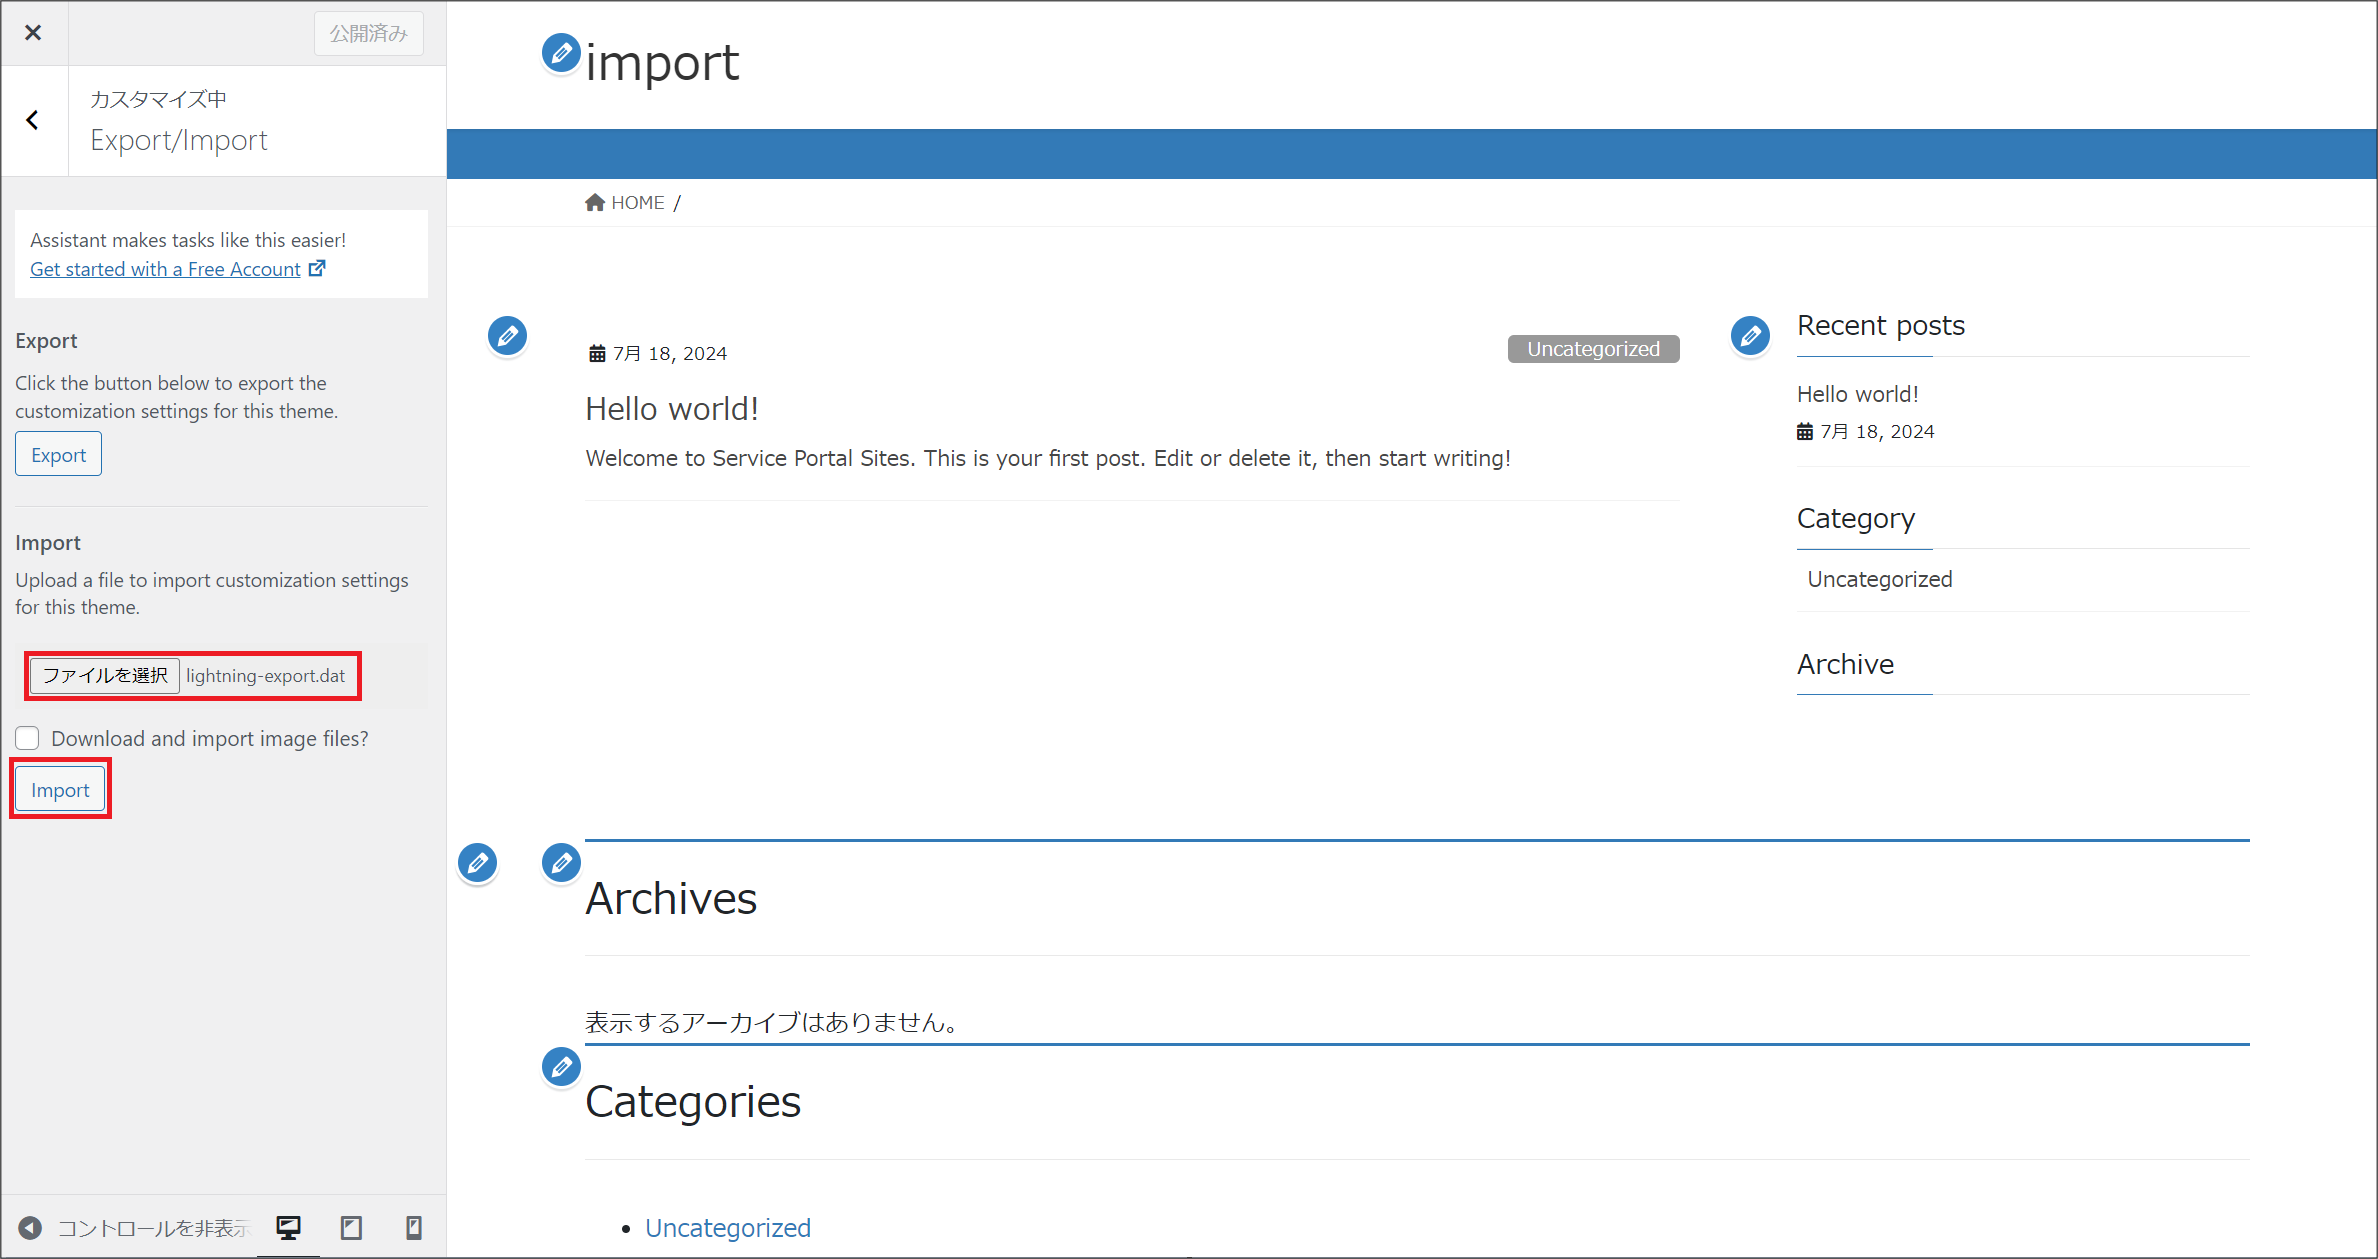
⑤ On the [Site Management] window in the migration destination, open the settings window for the site to be migrated. From [Appearance]-[Themes], set the migration destination theme to the same theme as the migration source. Then, from [Appearance] - [Customize], click the [Export/Import] menu. On the Export/Import window, click [Import] to import the theme customization settings exported in Step 2.
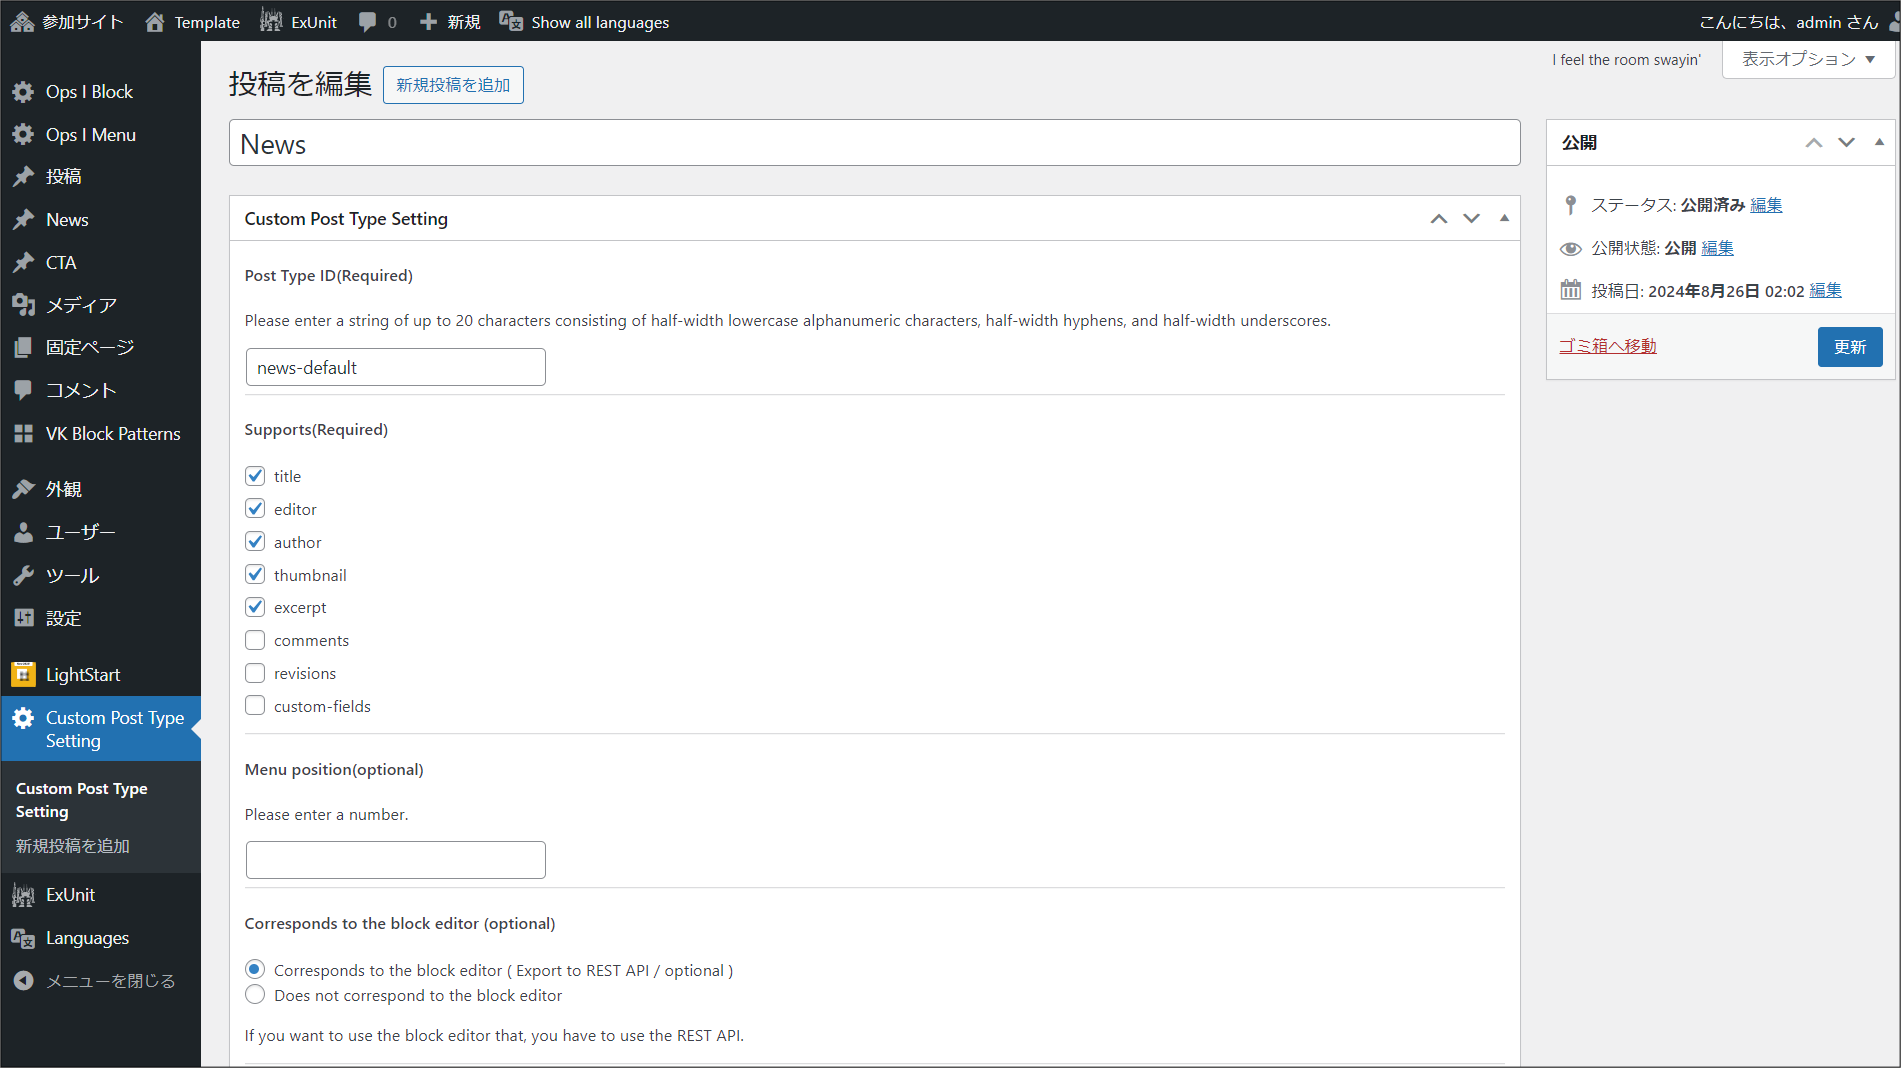
⑥ On the [Site Management] window of the migration source, open the settings window for the site to be migrated. From [Custom Post Type Setting], check the custom post types that exist in the migration source.
On the [Site Management] window of the migration source, open the settings window for the site to be migrated. If there is no custom post type registered at the migration destination, go to [Custom Post Type Setting] - [Add New Post] and create a custom post type that is the same as the migration source.
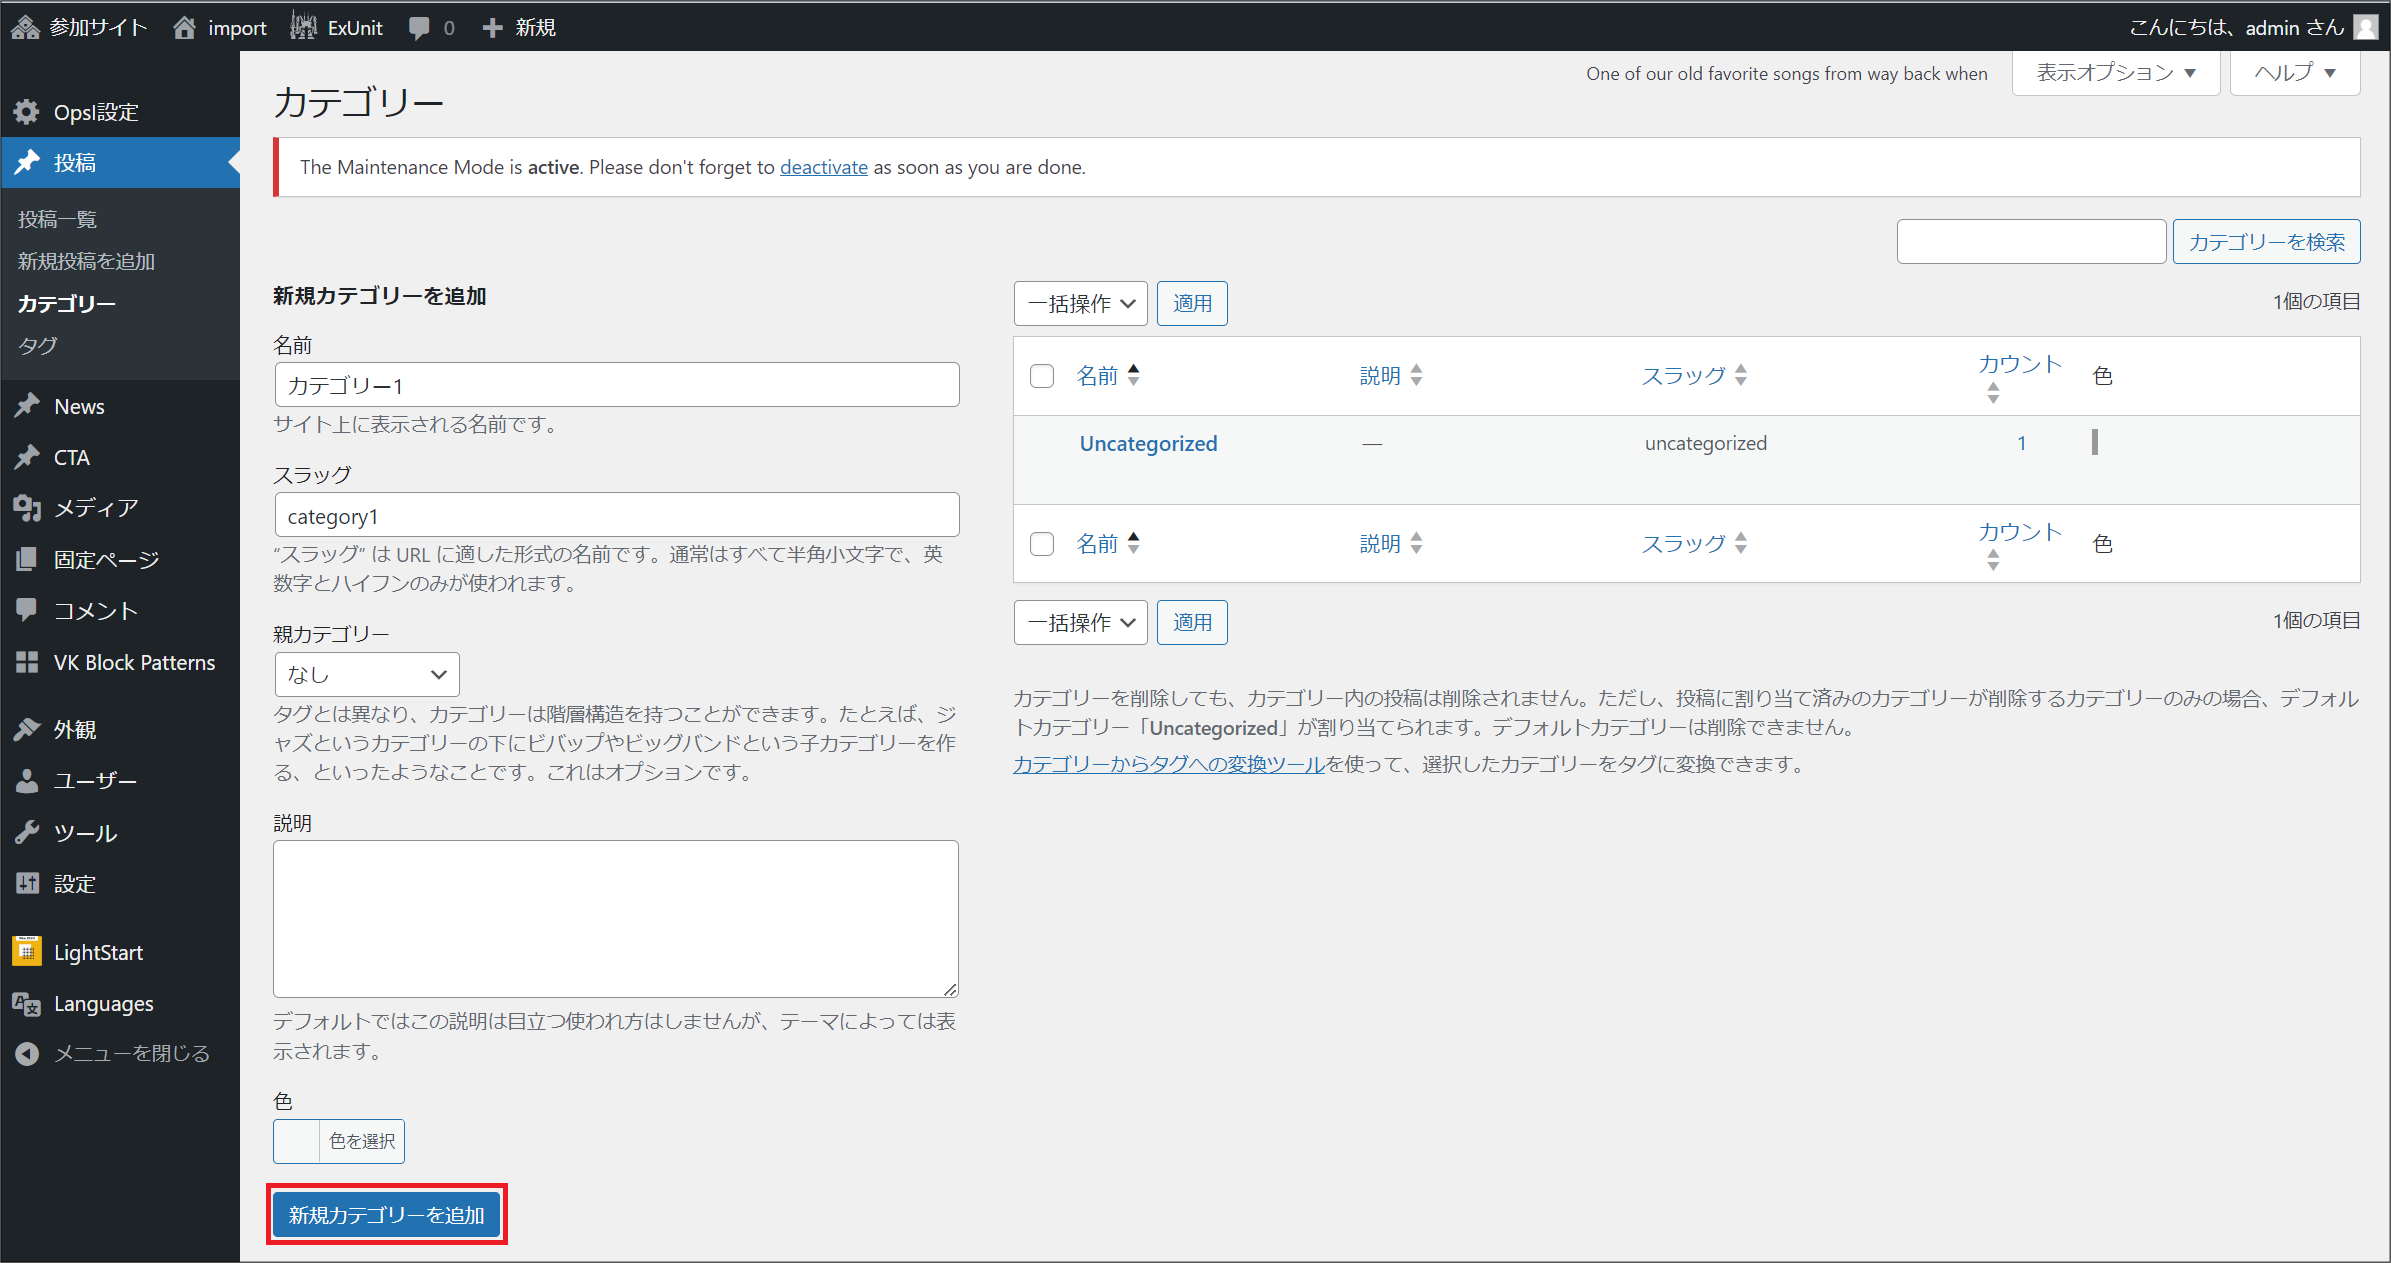
⑦ On the [Site Management] window of the migration destination, go to [Posts] - [Categories] and add one or more categories of your choice.
⑧ On the [Site Management] window in the migration destination, open the settings window for the site to be migrated. From [Tools] - [Import], click [WordPress] - [Run Importer], select the XML file you exported in Step 1 to import it.

On the window that appears after uploading the file and clicking the [Import] button, select the user you want to assign as the contributor for [Posts] or [Page] and import it.
⑩ On the [Site Management] window of the migration source, open the settings window for the site to be migrated. Display the General tab of [LightStart] and check [Deactivated]. Click [Save Settings] to disable maintenance mode.
[Fixing settings not supported for importing]
Some settings created within themes, pages, and posts, such as links (URLs), images, languages, theme and plugin settings, will need to be modified in the environment of the migration destination. The procedure is as follows.
① Correct the links (URLs) created within themes, pages, and posts to the URLs of the migration destination environment.
If you have imported a template site, follow the steps below to edit the links on the two pages [ホーム] (Japanese page) and [Home] (English page).
a. On the [Site Management] window of the migration destination, open the settings window for the site to be migrated.
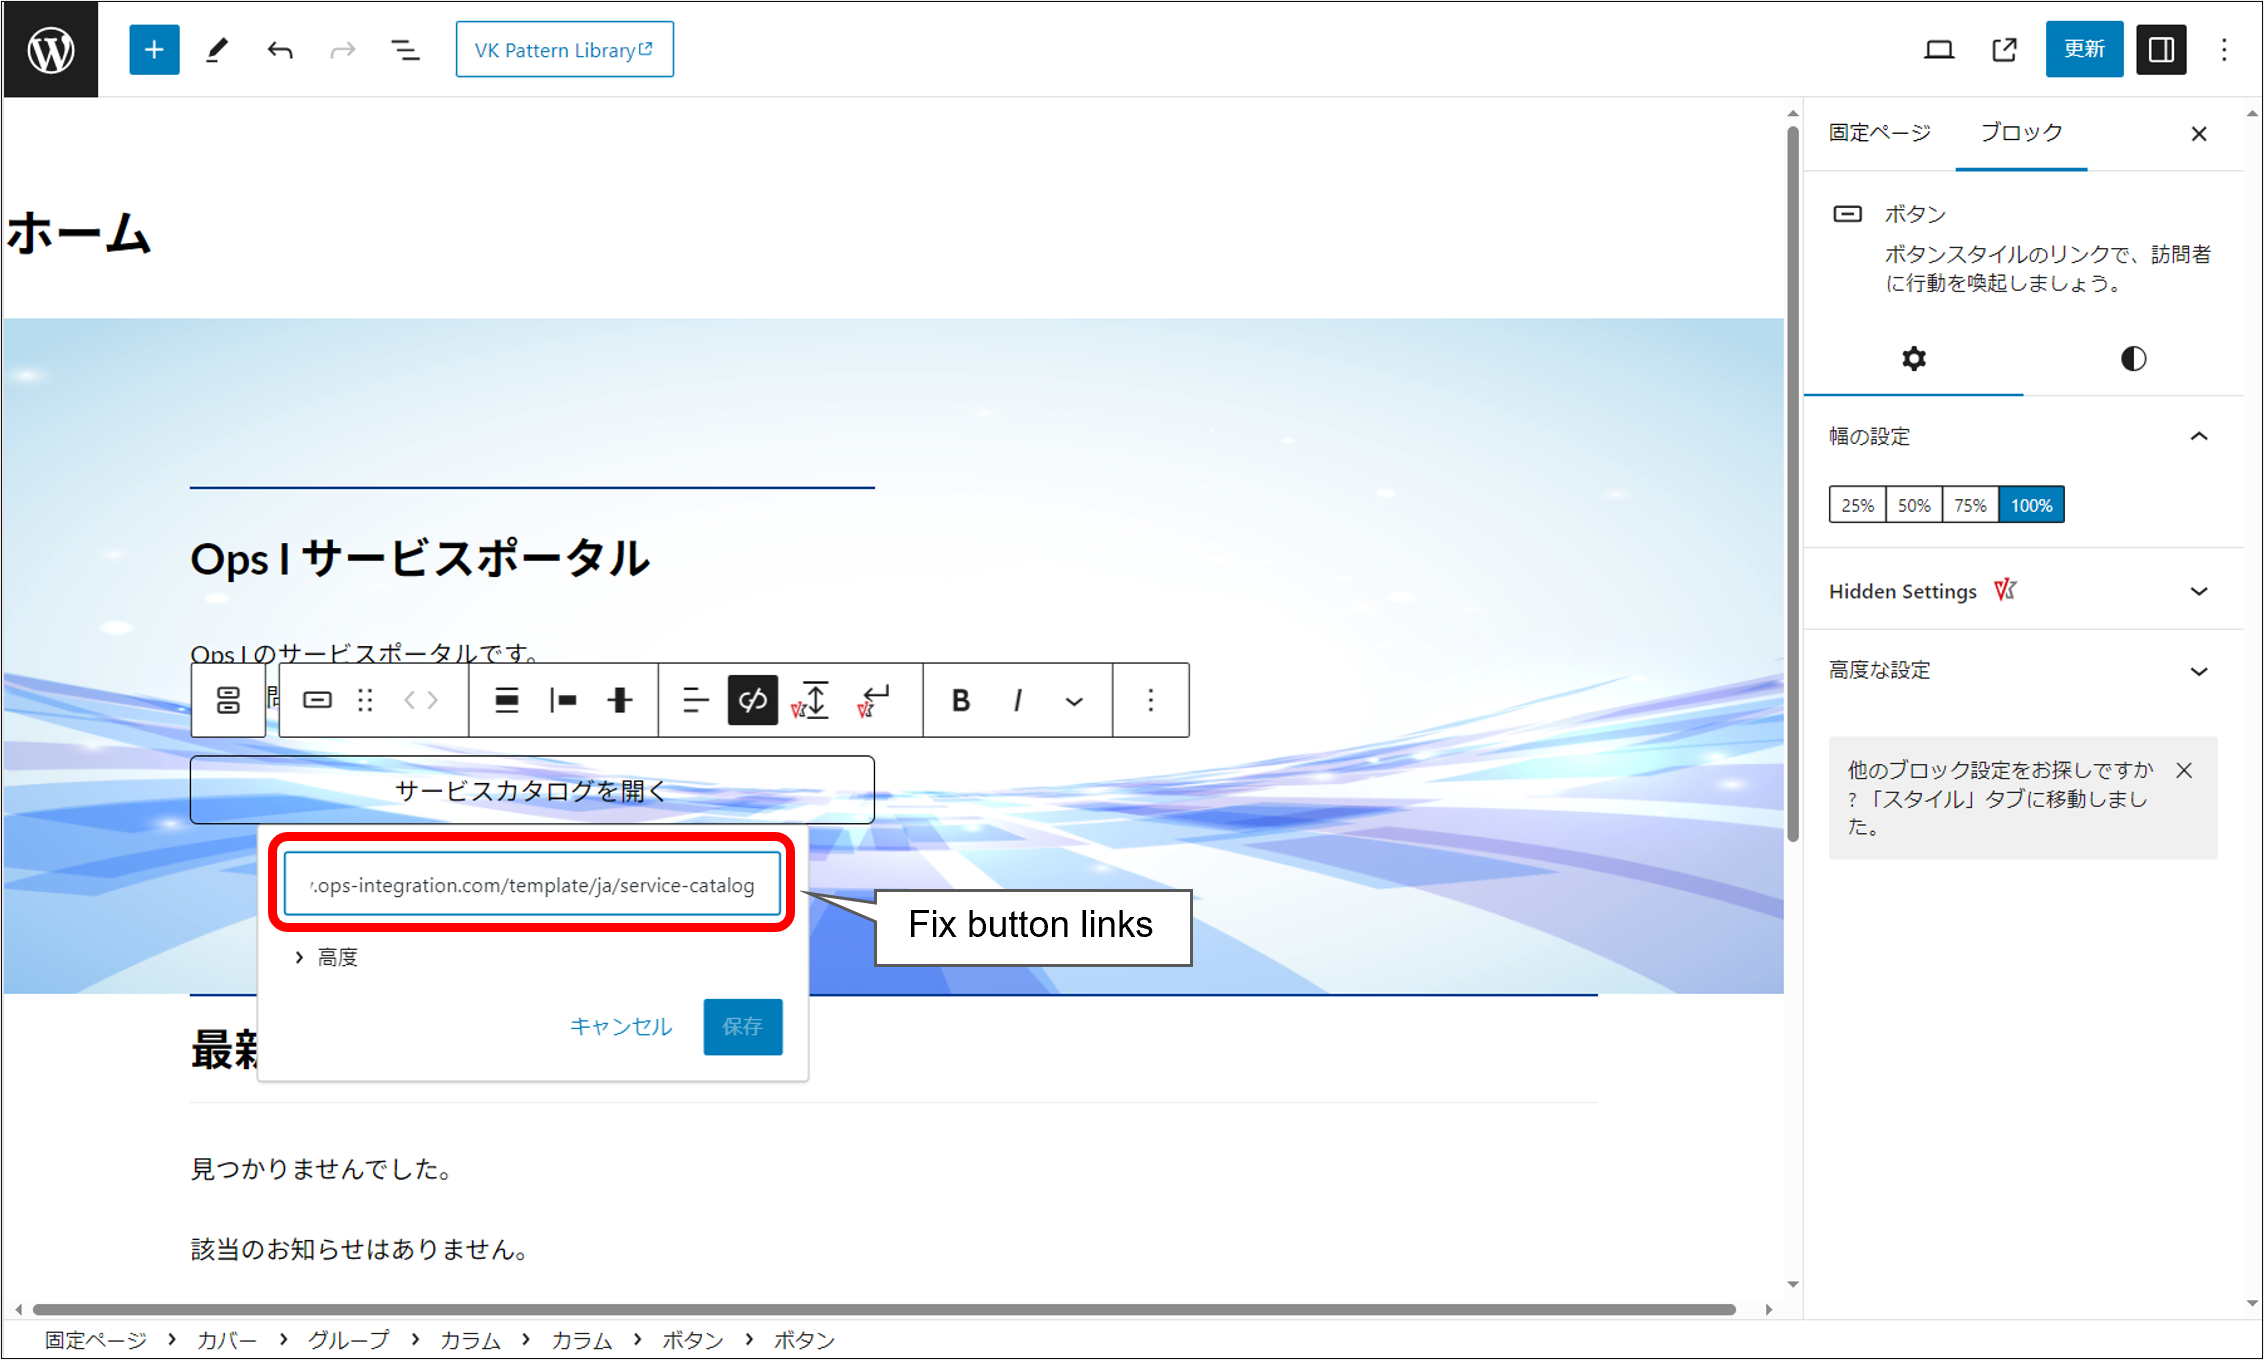
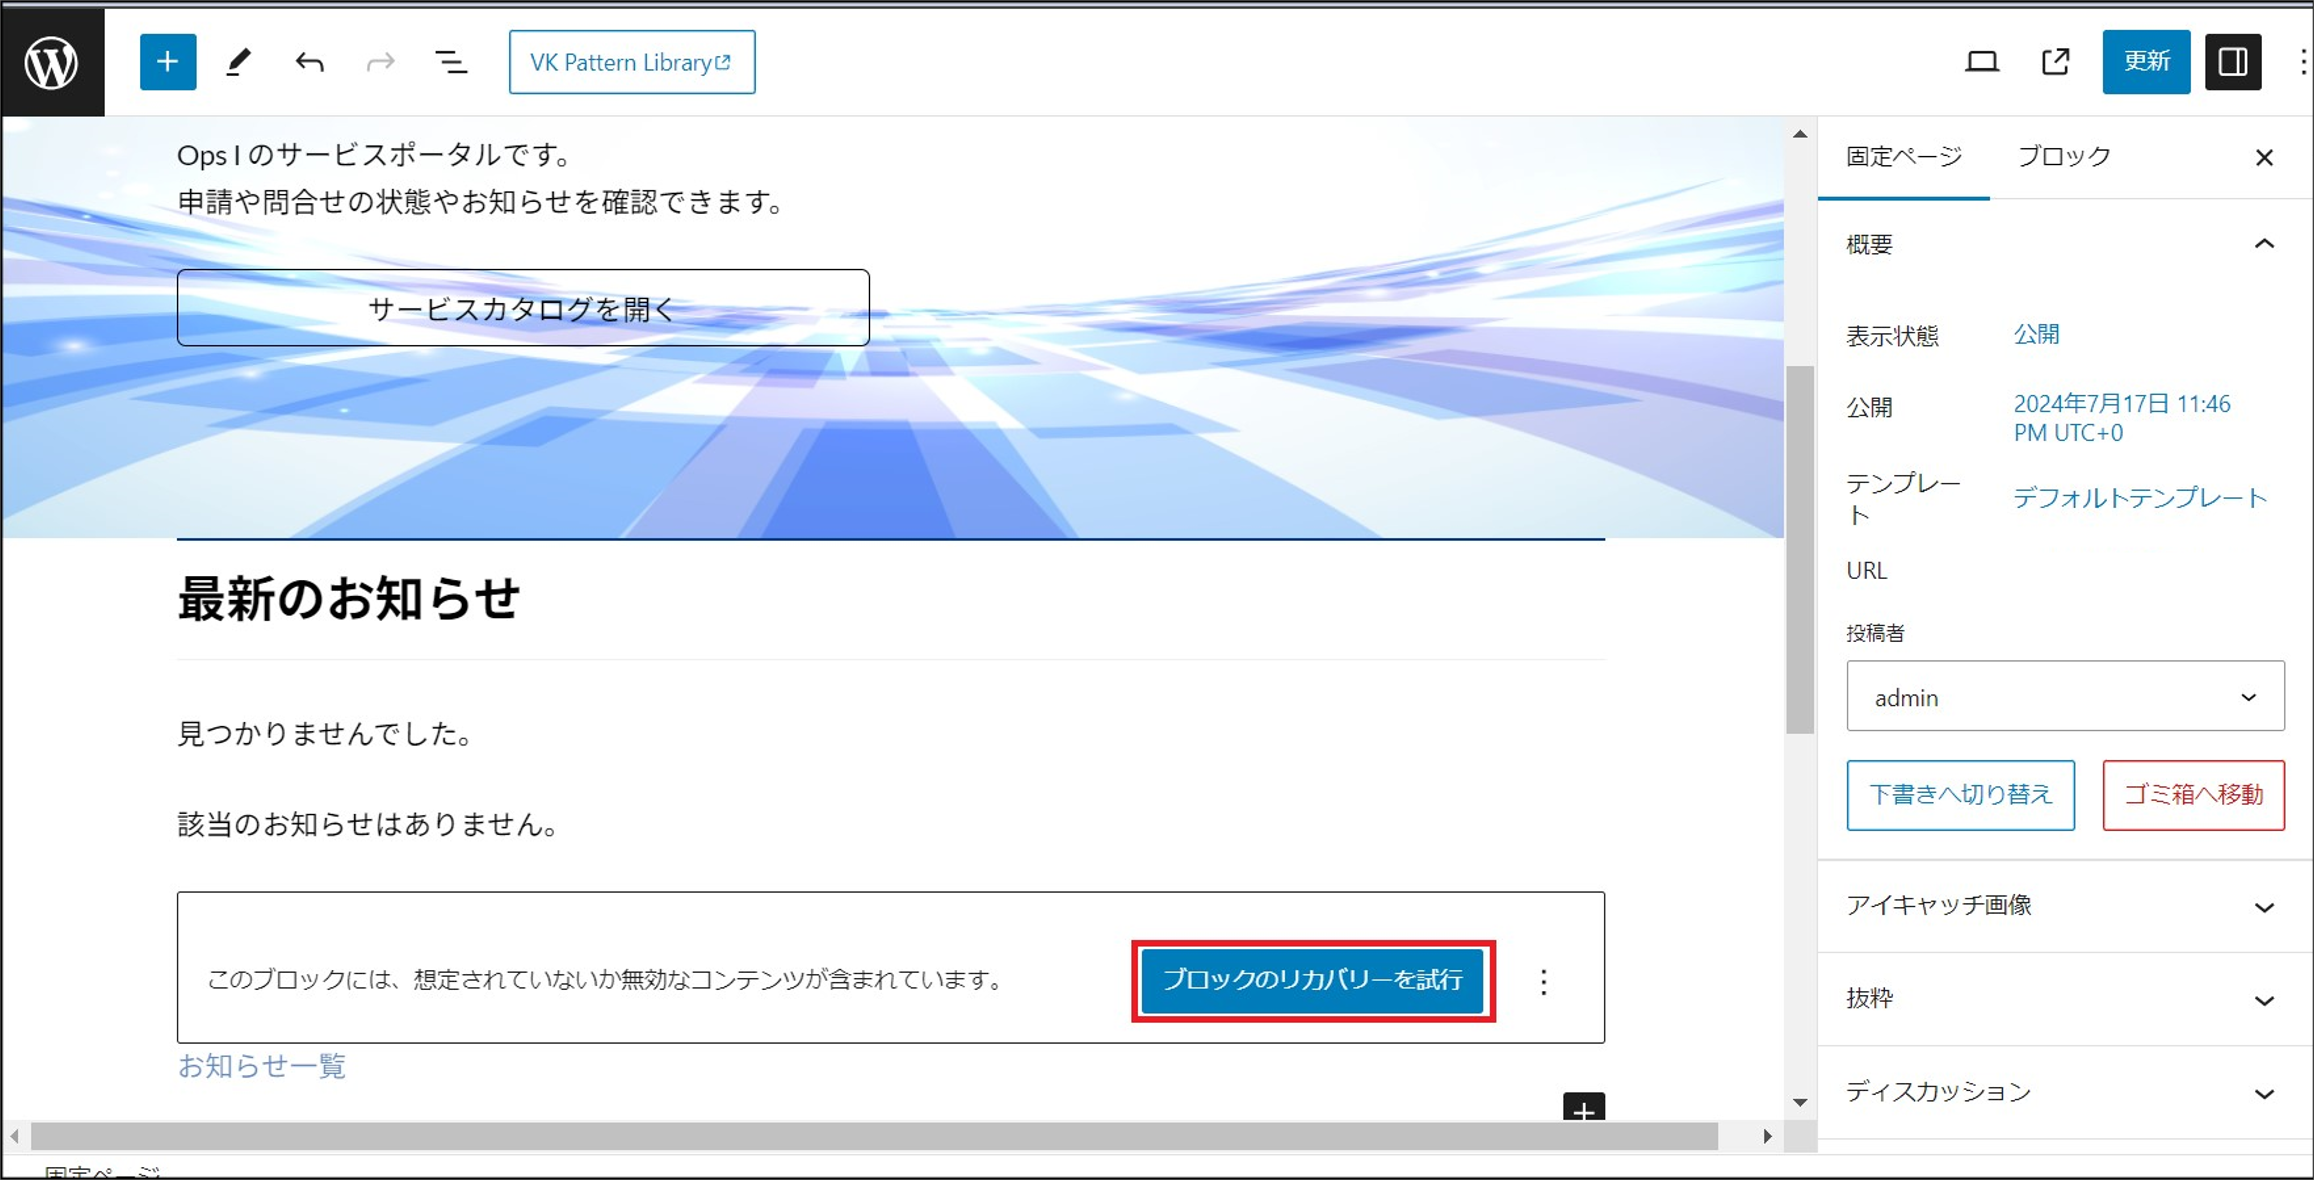
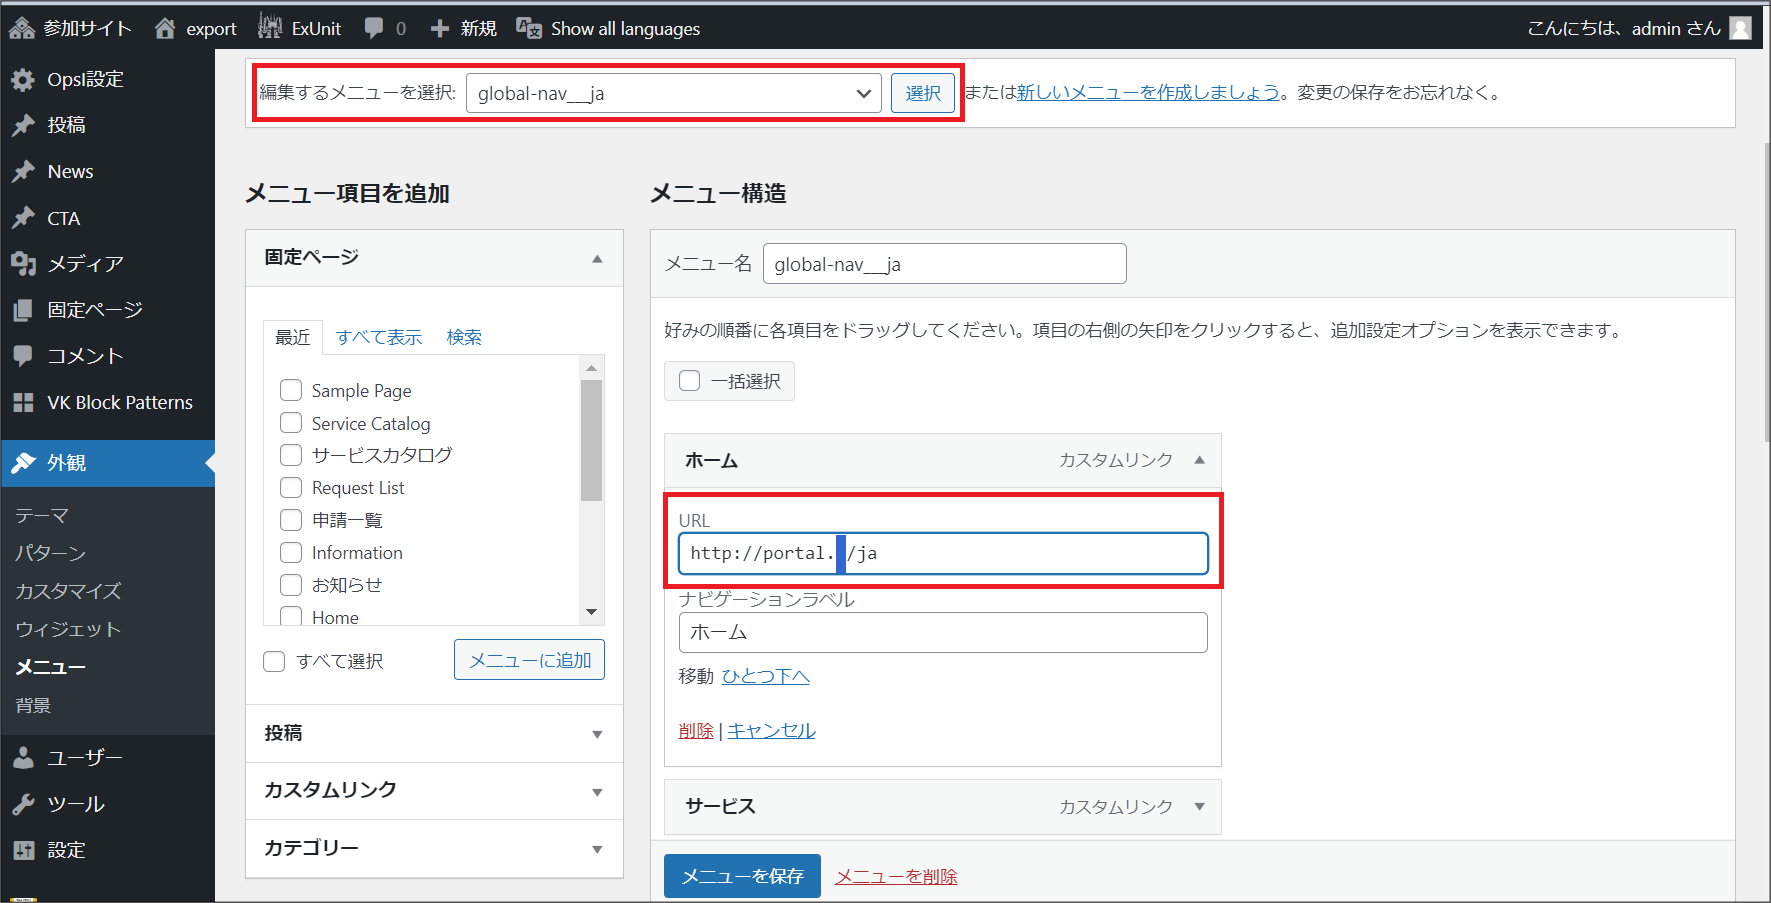
b. Open the edit window of the Japanese [ホーム] page from "Pages". Correct the URL of the link that appears when you click the [Attempt to Recover Block] button for the block that displays "This block contains unexpected or invalid content" with the URL tied to the [Open Service Catalog] button to the URL of the environment you are migrating to.
c. Correct the English [Home] page in the same way. On the English [Home] page, [サービスカタログを開く] is displayed as [Open Service Catalog].
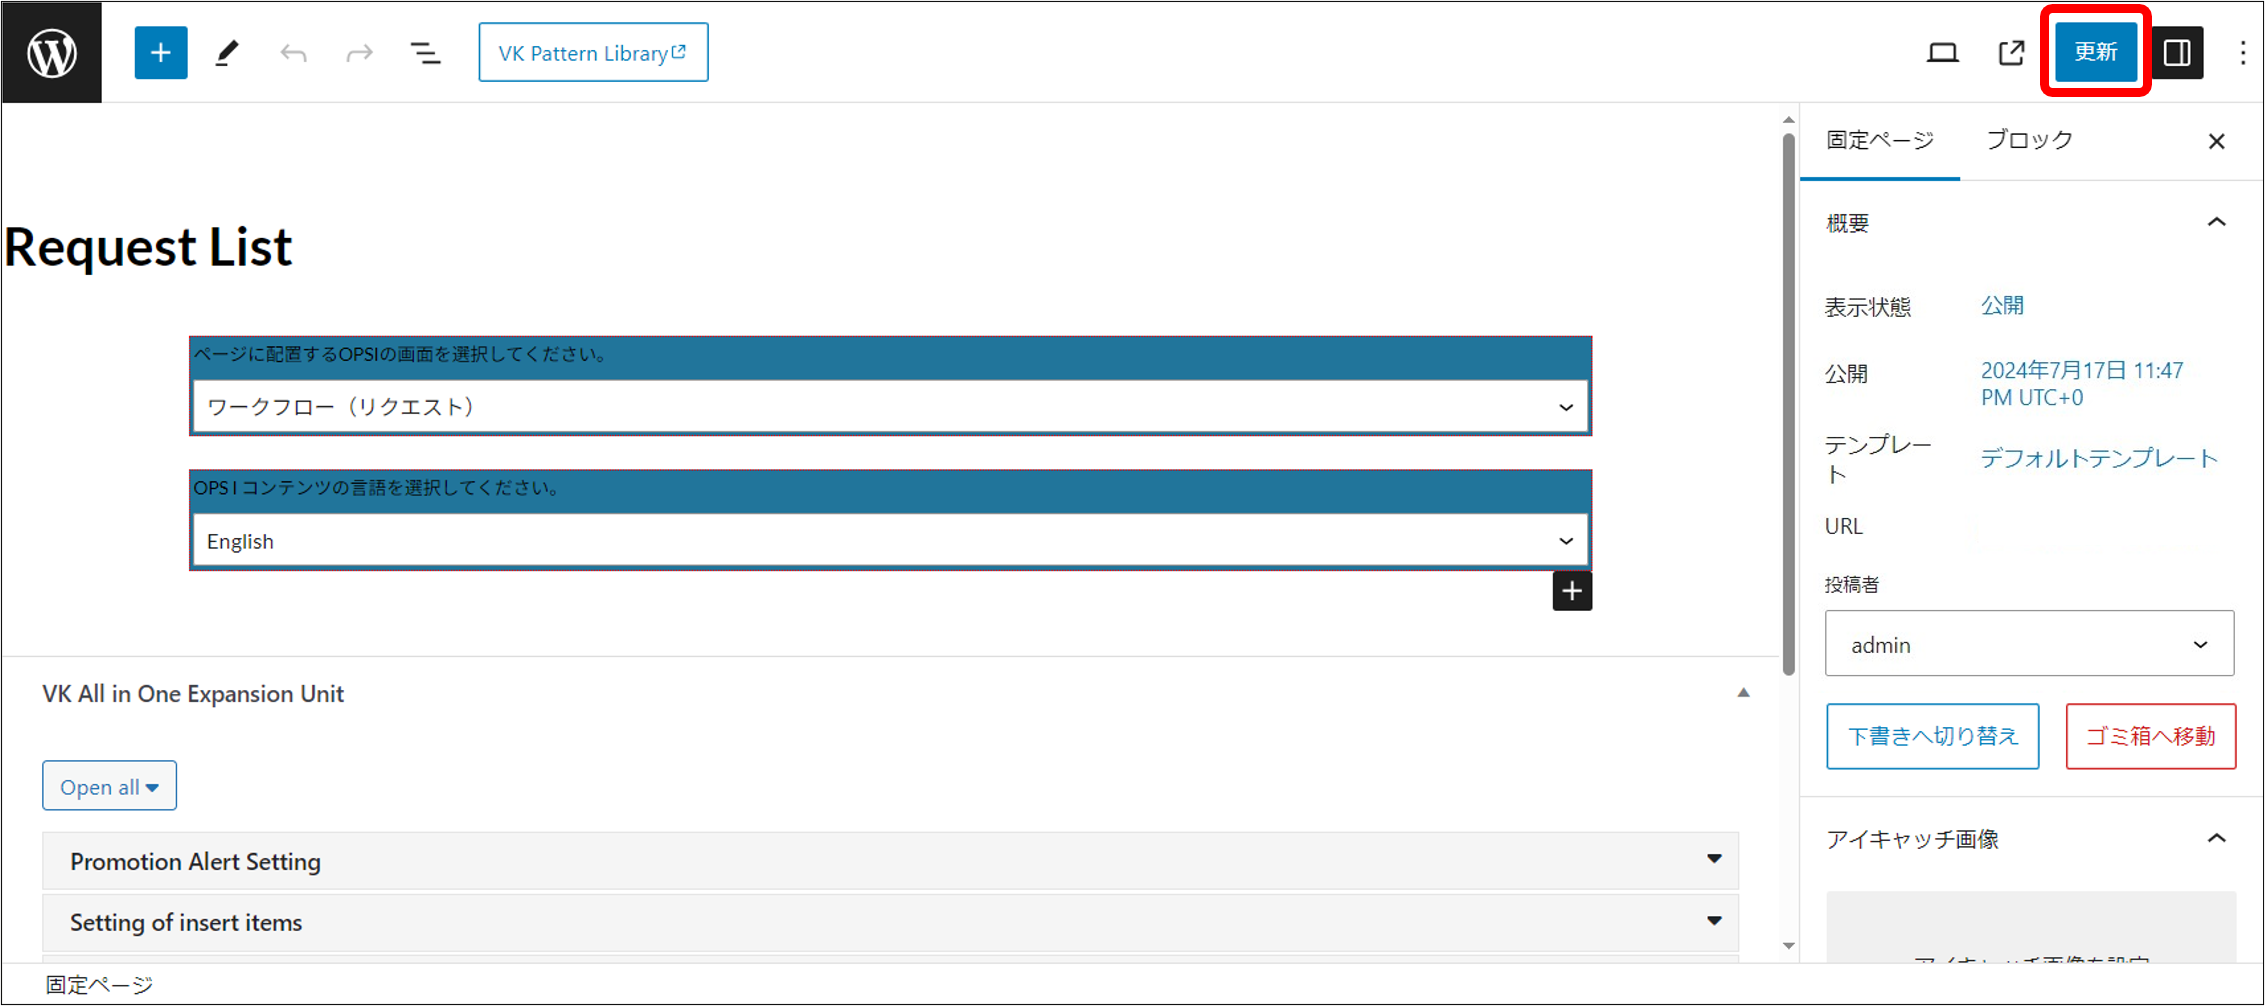
② To modify the [Ops I Block] placed on a page/post, open the edit window of all pages/posts where the [Ops I Block] was placed and click the [Update] button. If you are exporting and importing sites within the same environment, this step is not necessary.
If you imported a template site, [Ops I Block] is located on page 8 below.
- Request List
- Service Catalog
- Service Desk - Contact
- Service Desk - Contact List
- Request List
- Service Catalog
- Service Desk - Contact
- Service Desk - Contact List
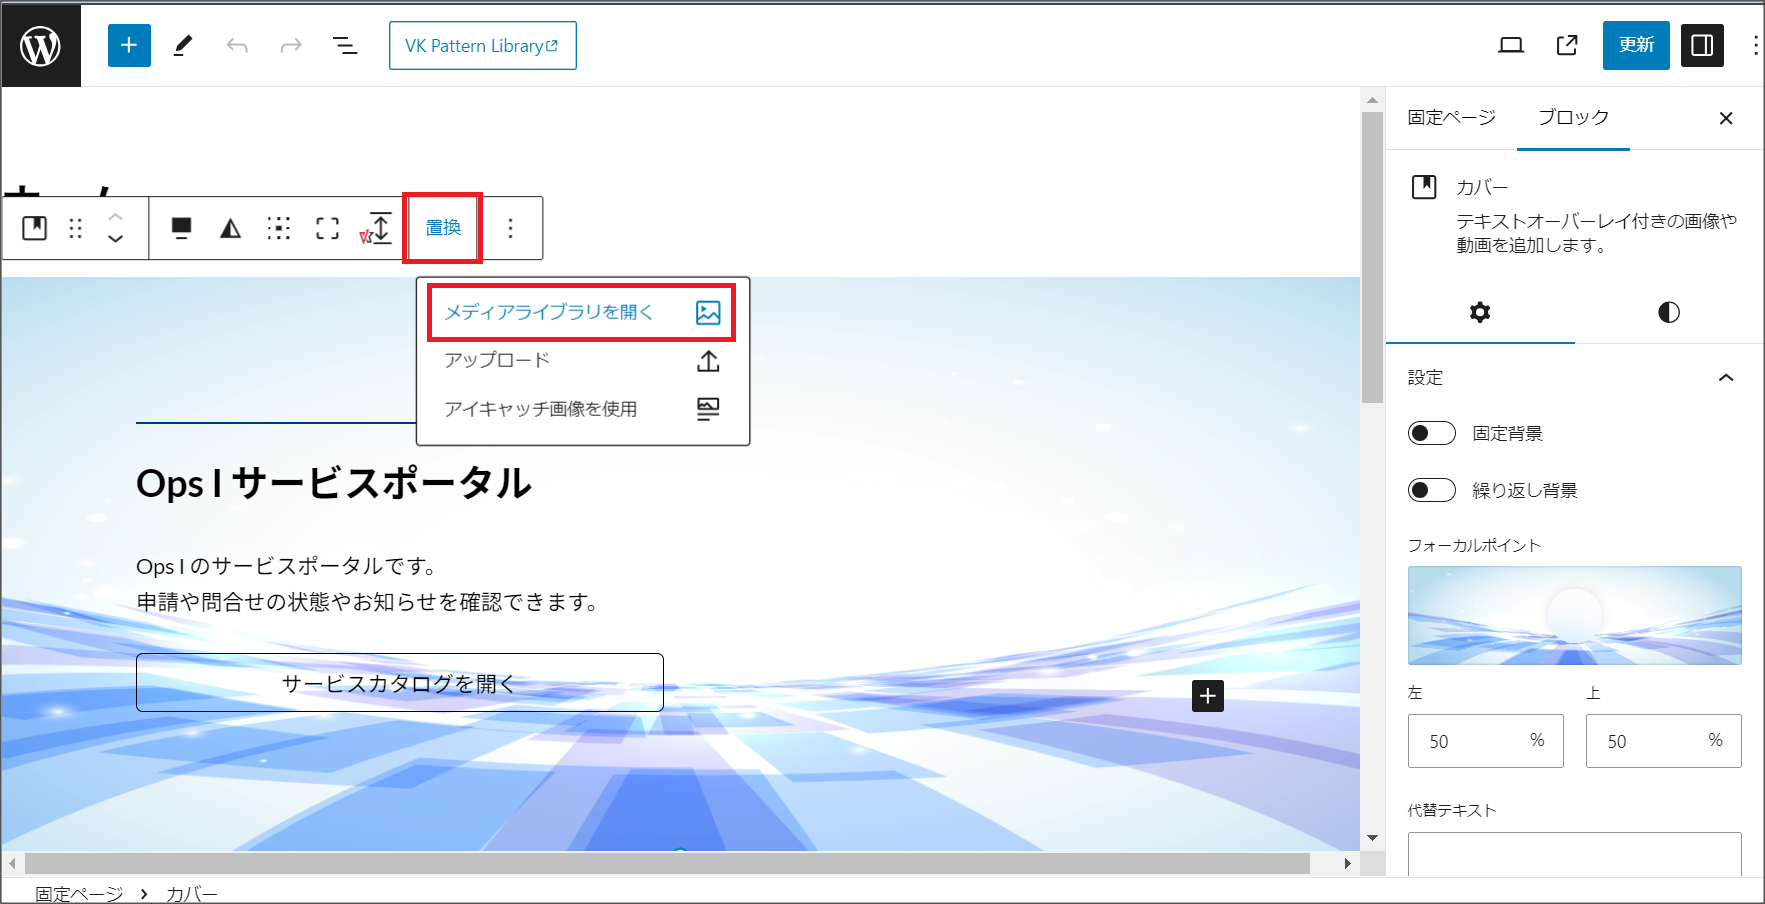
③ Replace images placed within themes, pages, and posts with images uploaded to the migration destination site.
If you have imported a template site, follow the steps below to replace the images on the two pages [Home] (Japanese page) and [Home] (English page).
a. On the [Site Management] window of the migration destination, open the settings window for the site to be migrated.
b. Open the edit window of the Japanese [Home] page from "Pages". Select the image at the top of the page and choose [Replace]-[Open Media Library]. A dialog box for selecting images will appear. Open the Media Library tab, select the file uploaded in step 4. of the "
Site migration procedure" and update it.
c. Correct the English [Home] page in the same way.
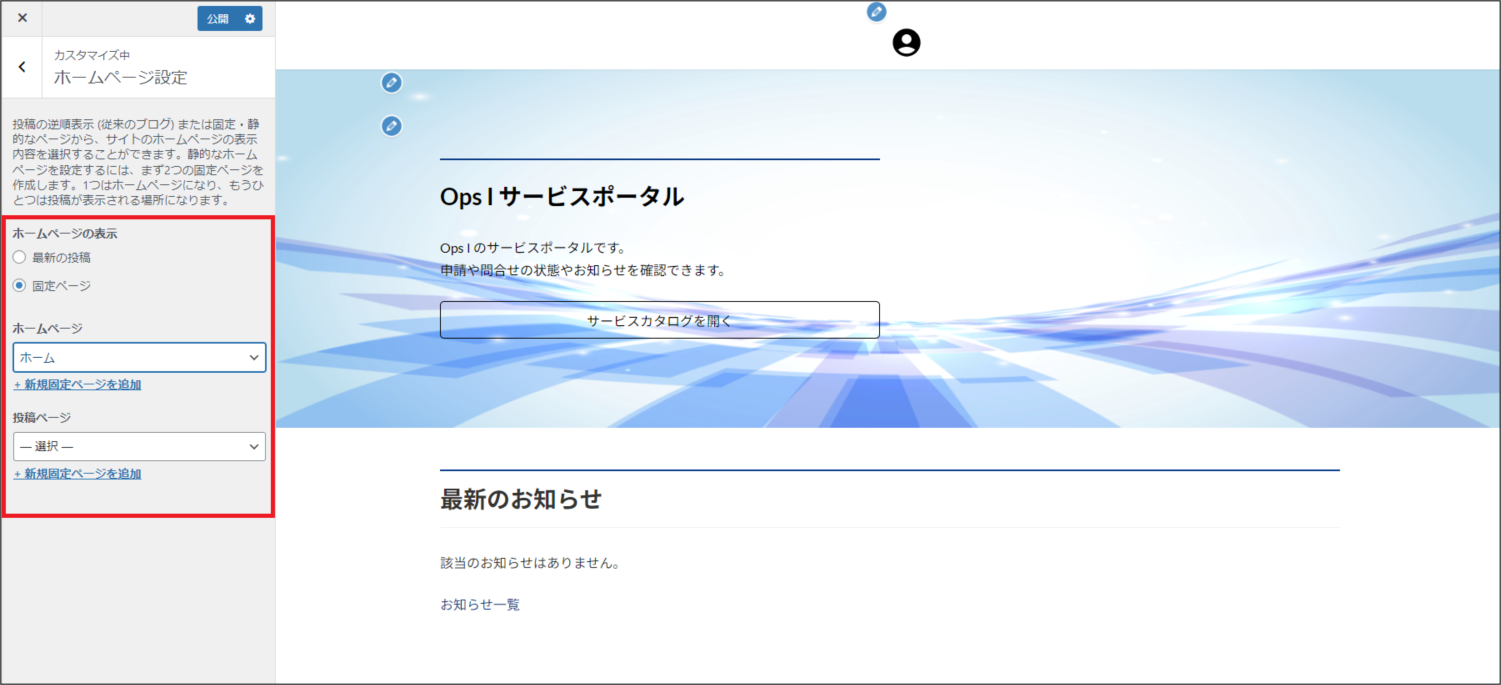
④ Correct the theme settings and menus as follows.
a. If you have imported a template site, correct the settings under [Appearance].
First, in the [Site Management] window of the migration destination, open the settings window for the site to be migrated.
Next, go to [Appearance] - [Customize], open the [Home Page Settings] menu, and enter the same values as in the migration source.
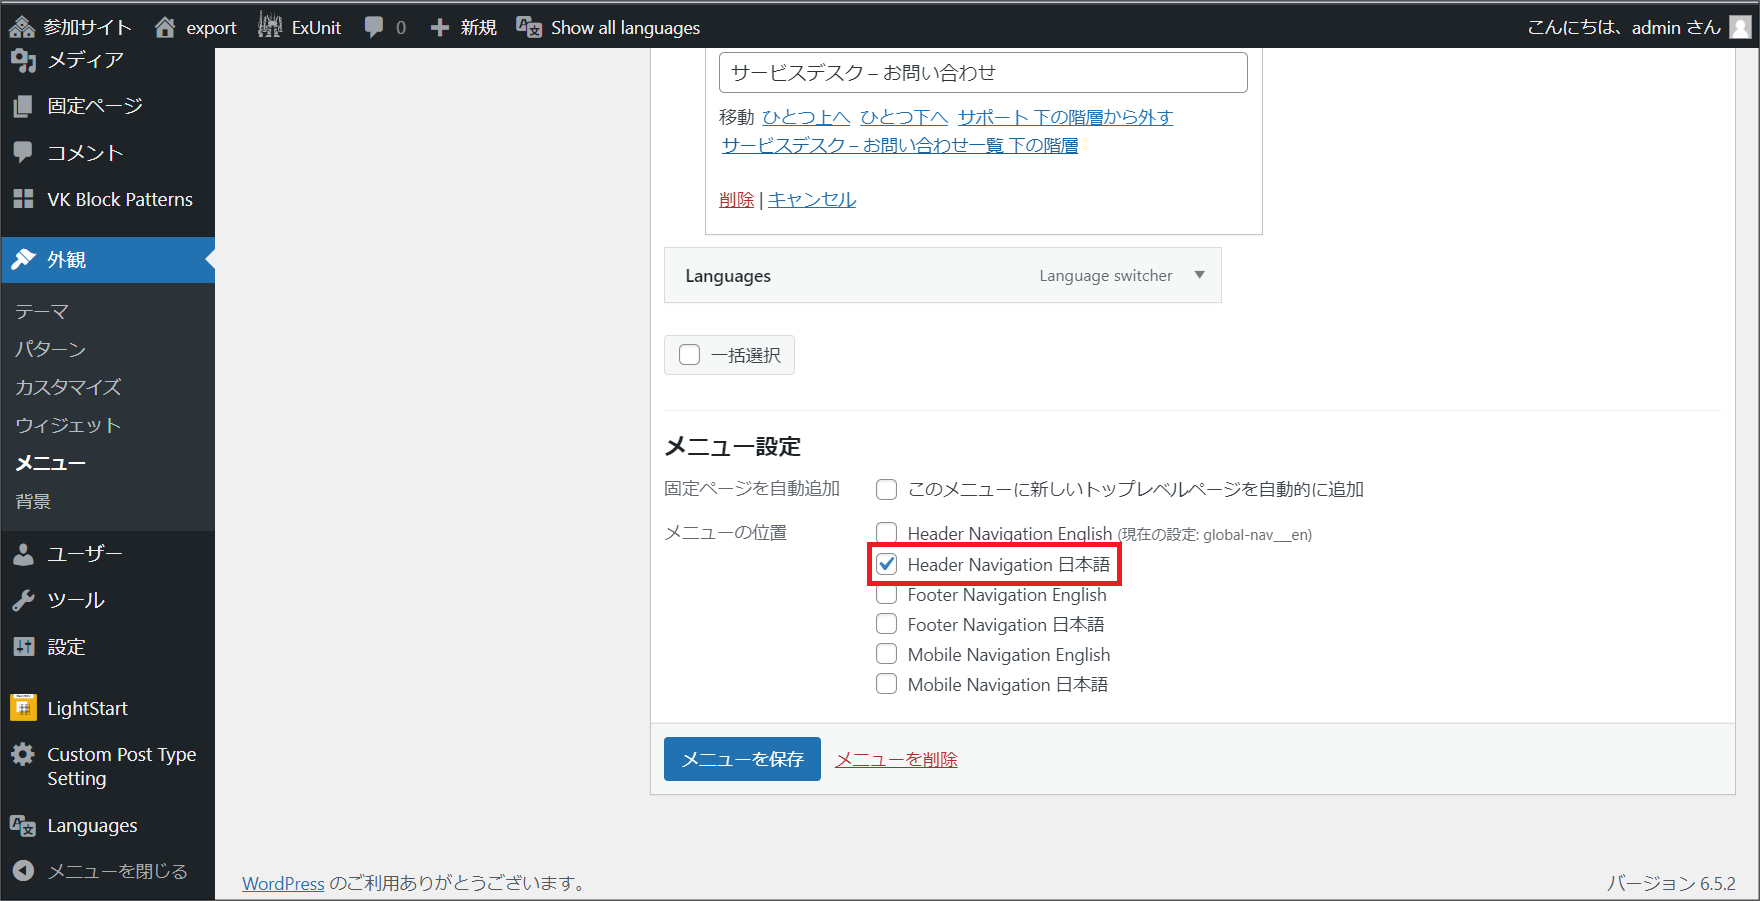
b. From [Appearance]-[Menus], correct the URLs assigned to the custom links for each menu displayed in the menu structure.Also, set the [Menu Settings] to the same settings as the migration source.
If you have imported a template site, please modify it for two menus, one in Japanese and one in English.
⑤ Modify the language settings as follows.This step is not necessary if you have not configured the language settings in the migration source environment.
a. On the [Site Management] window of the migration destination, open the settings window for the site to be migrated.
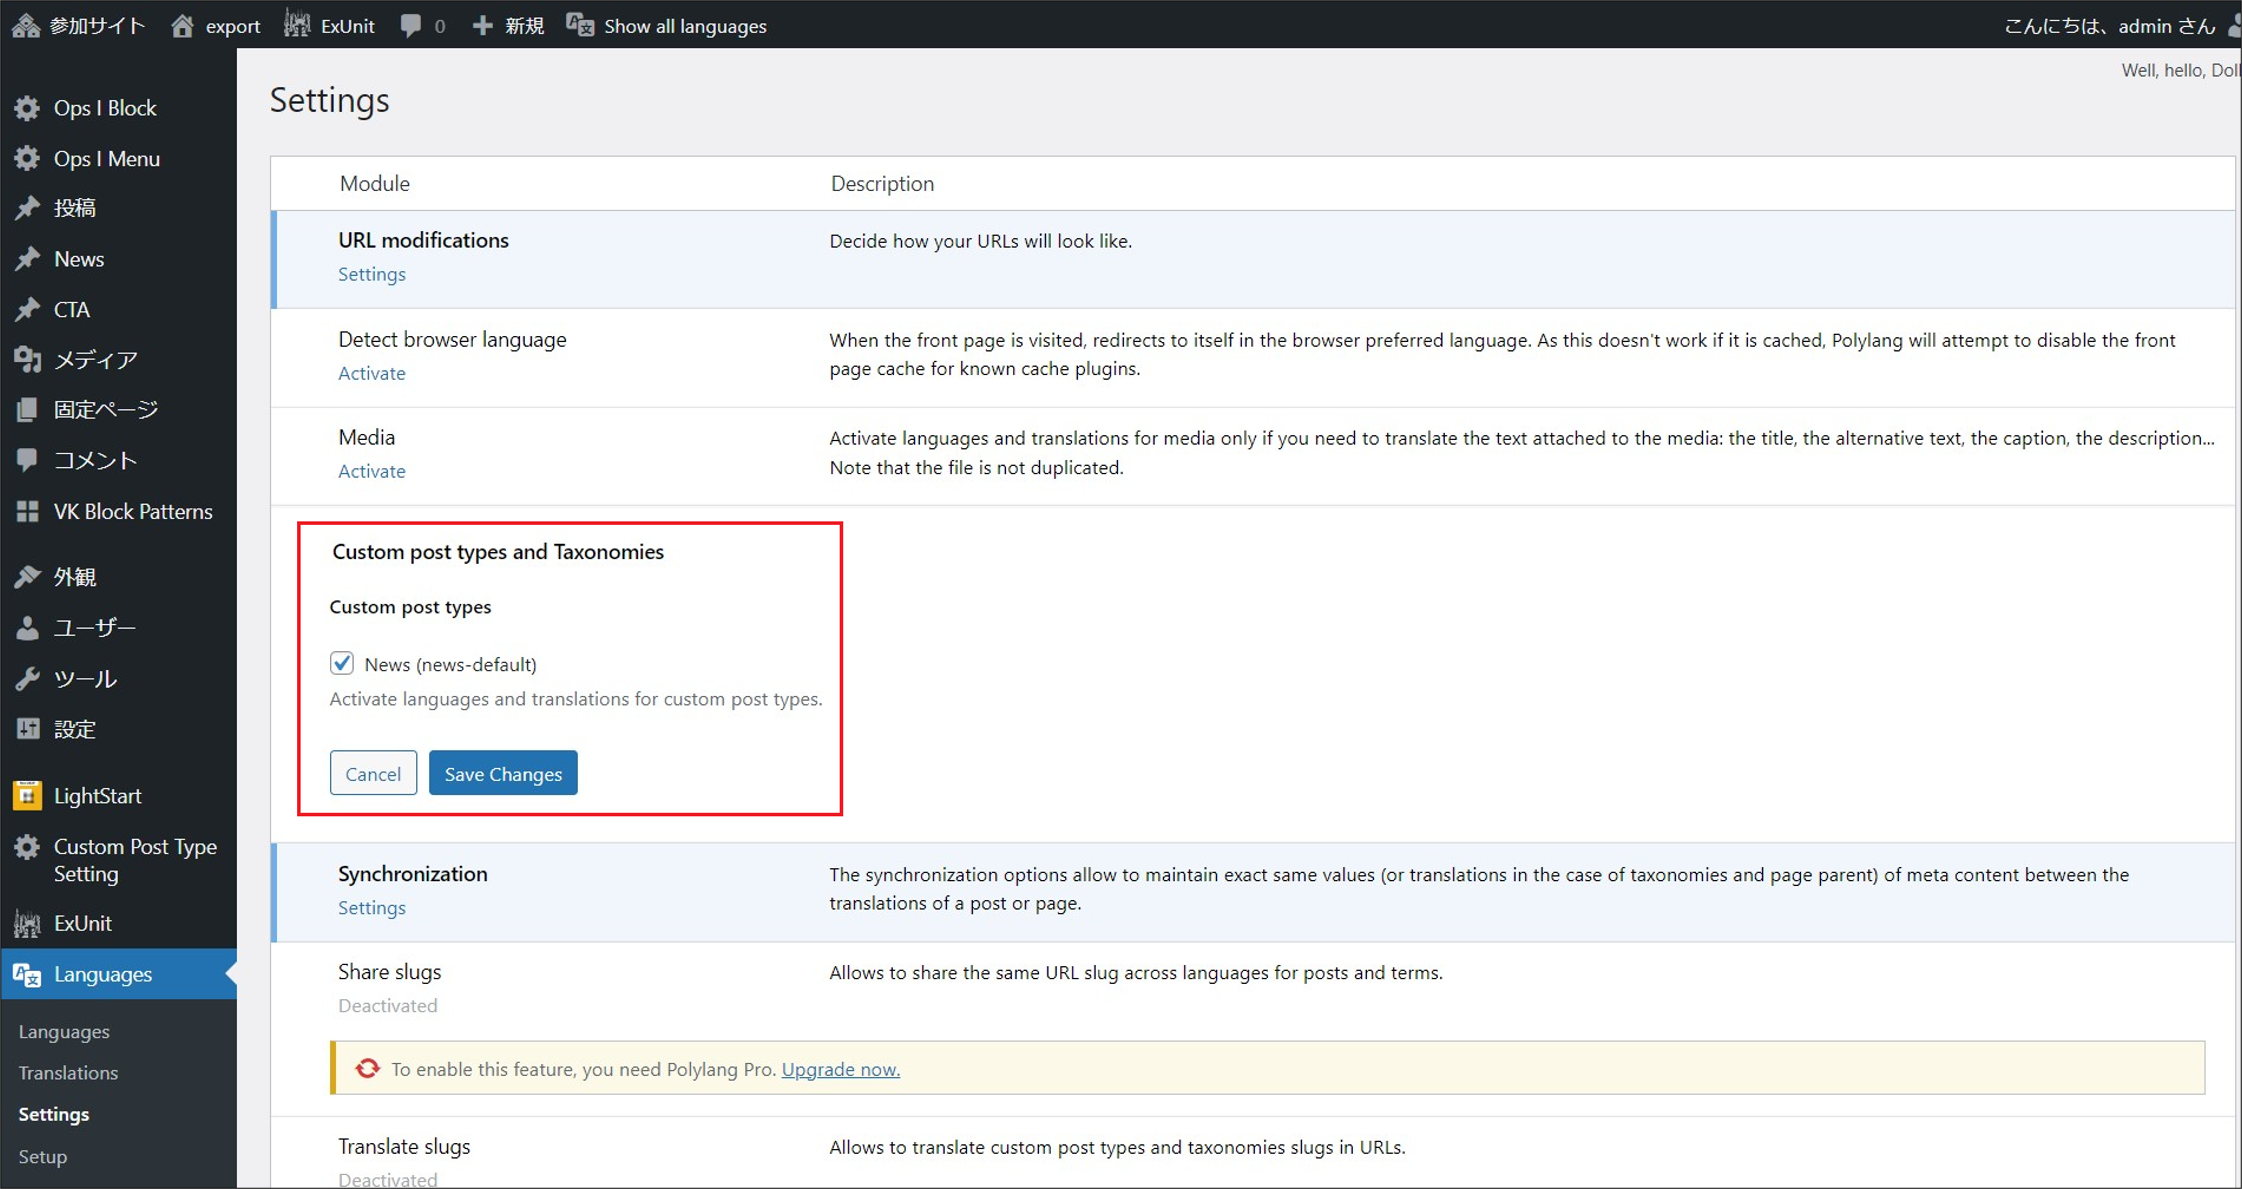
From [Languages]-[Settings], click [Settings] under [Custom post types and Taxonomies].Check the custom post types to be multilingualized and save them.
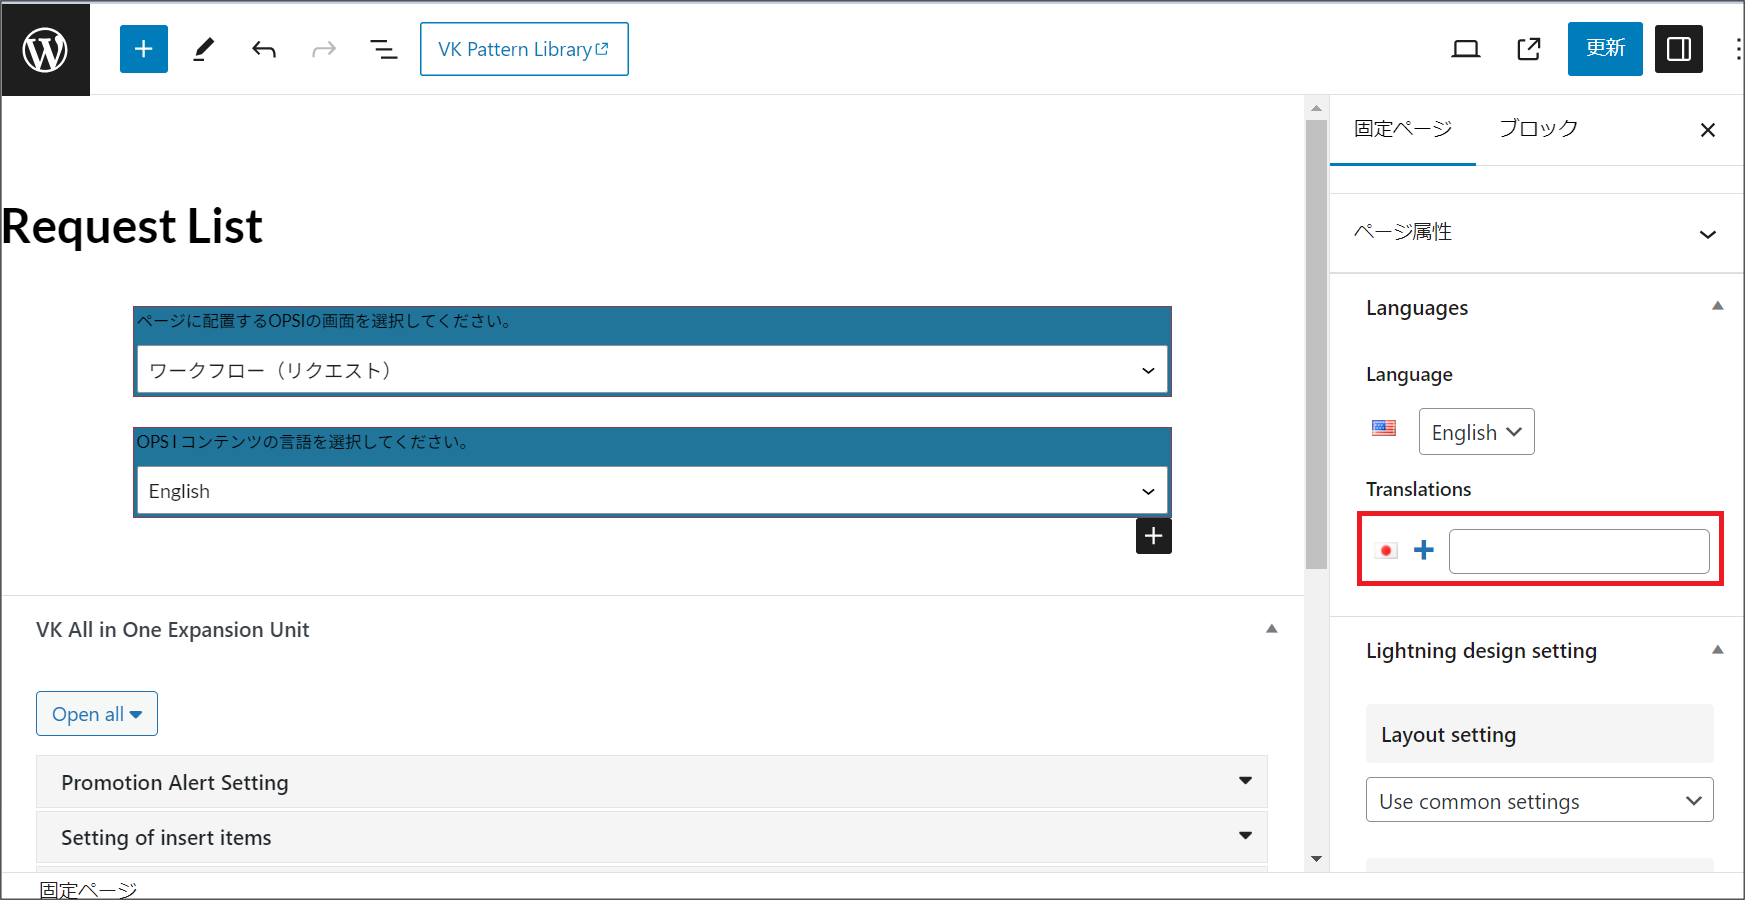
b. Open the page and post edit windows from [Pages] and [Posts].If it has been entered under [Translations] in the [Pages] menu on the right, delete it and click the Update button. Do this for all [Pages] and [Posts].
c. Open the edit windows of the pages and posts to be made multilingual from [Pages] and [Posts]. Assign the translated page to [Translations] in the [Pages] menu on the right and click the [Update] button.
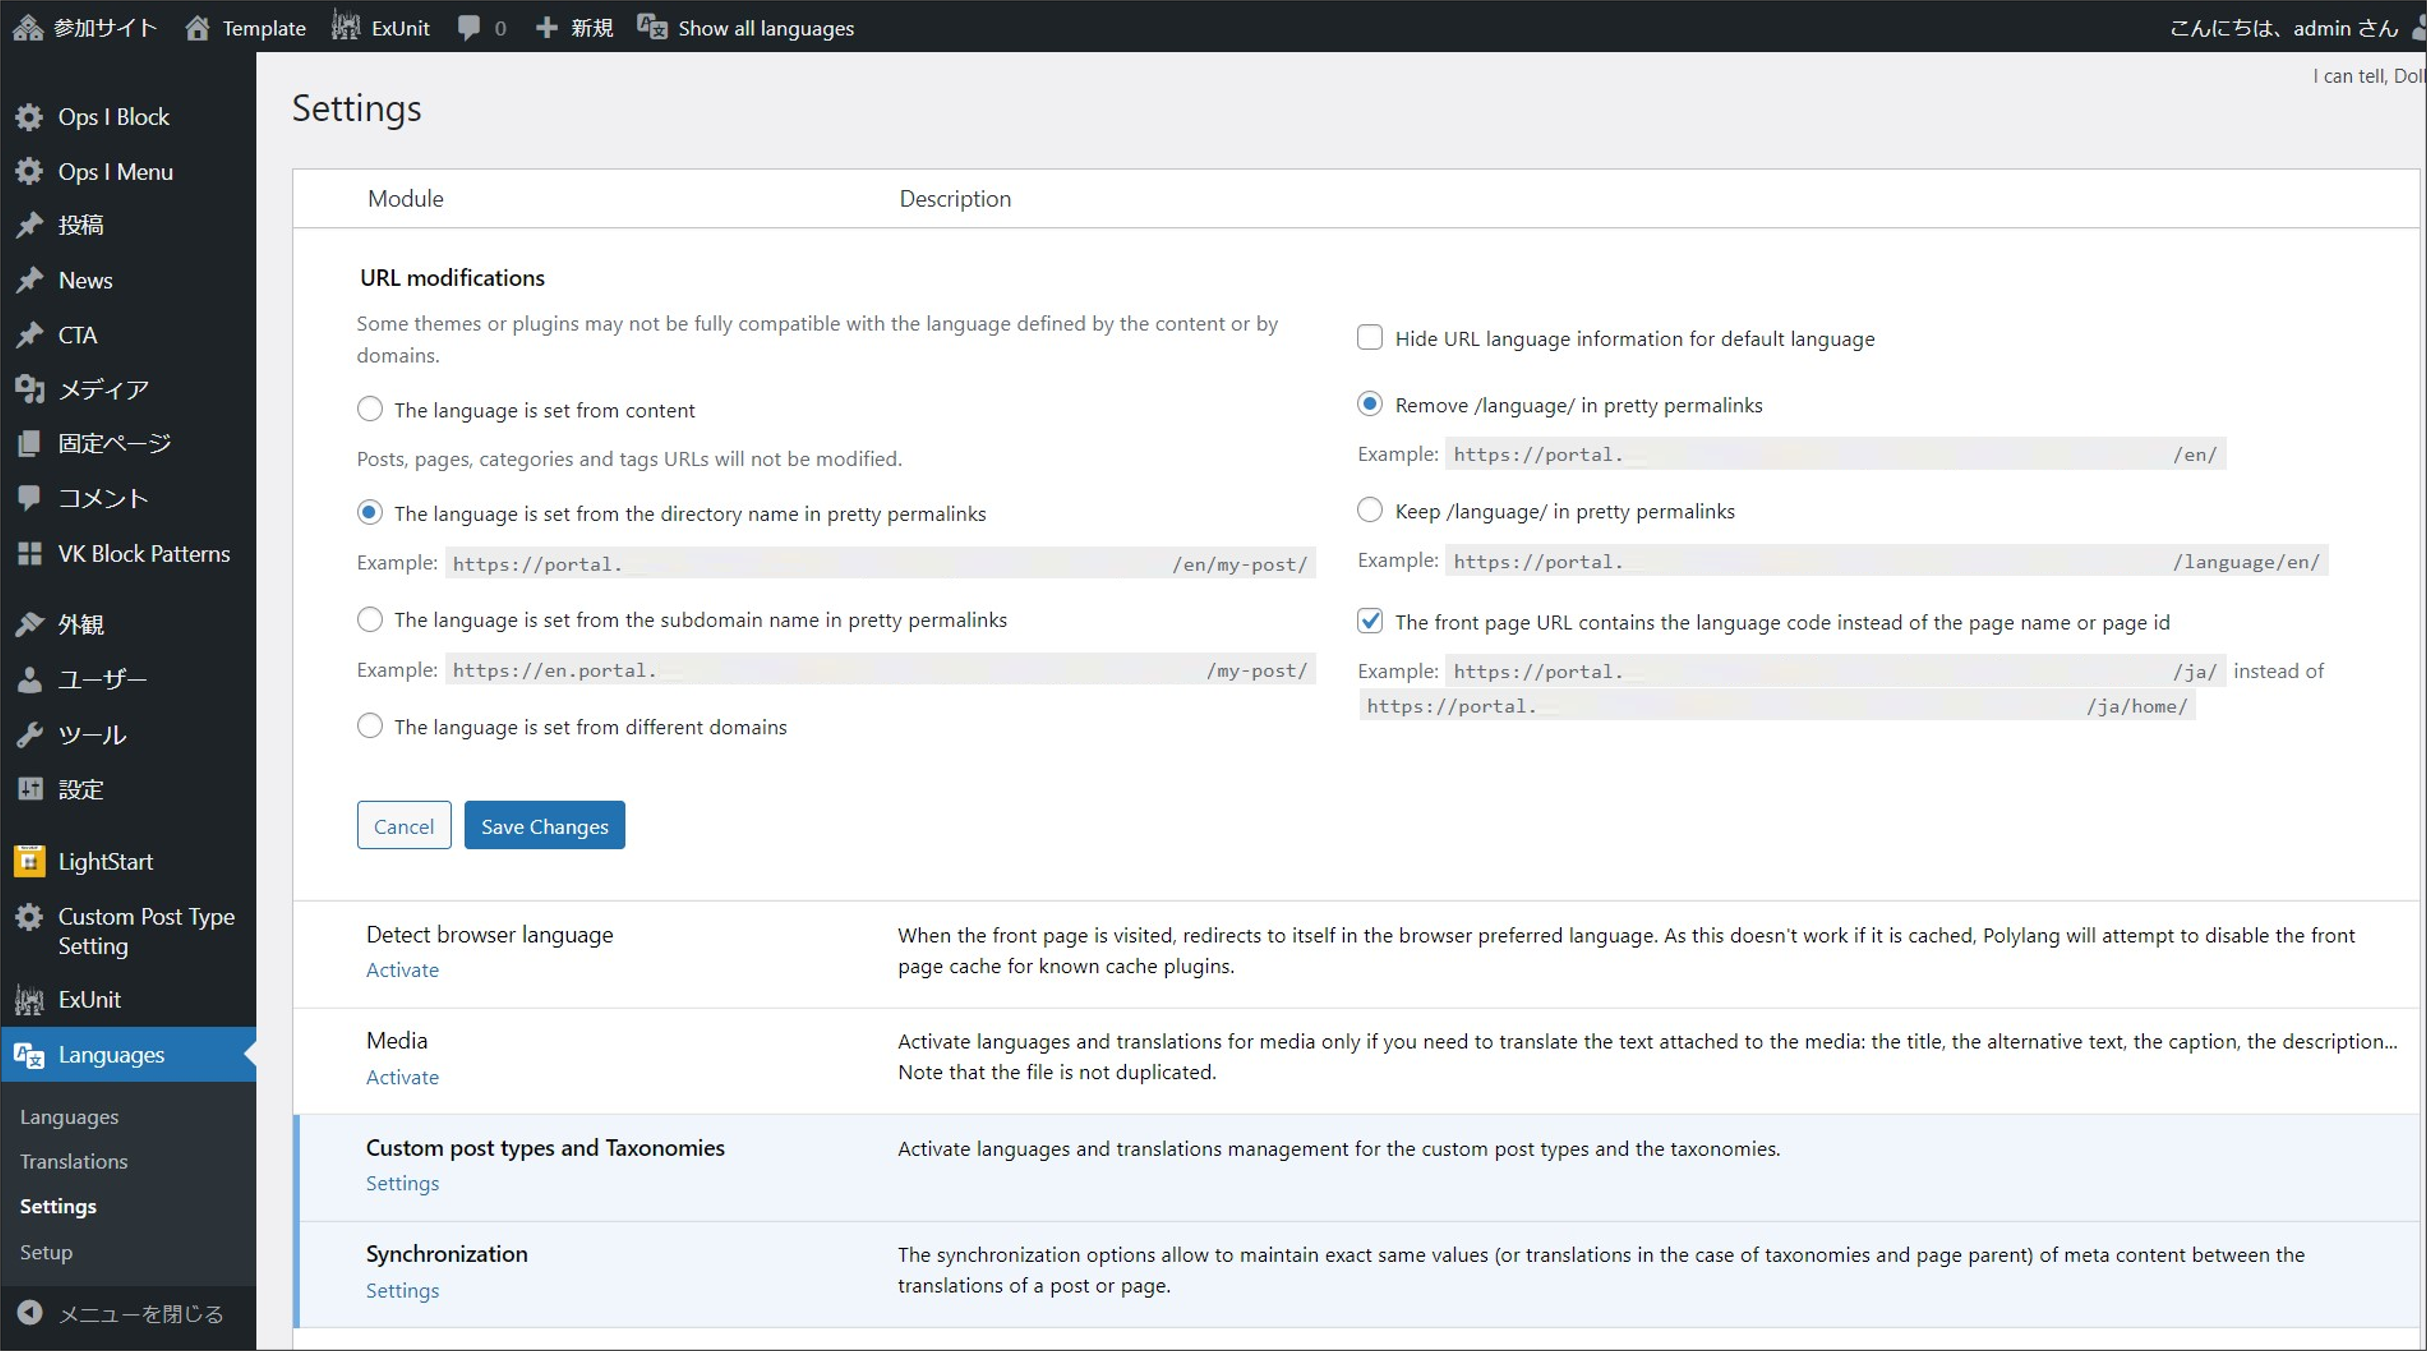
d. From [Languages]-[Settings], click [Settings] under [URL modifications].Uncheck "Hide URL language information for default language" and check "The front page URL contains the language code instead of the page name or page id", then save it.
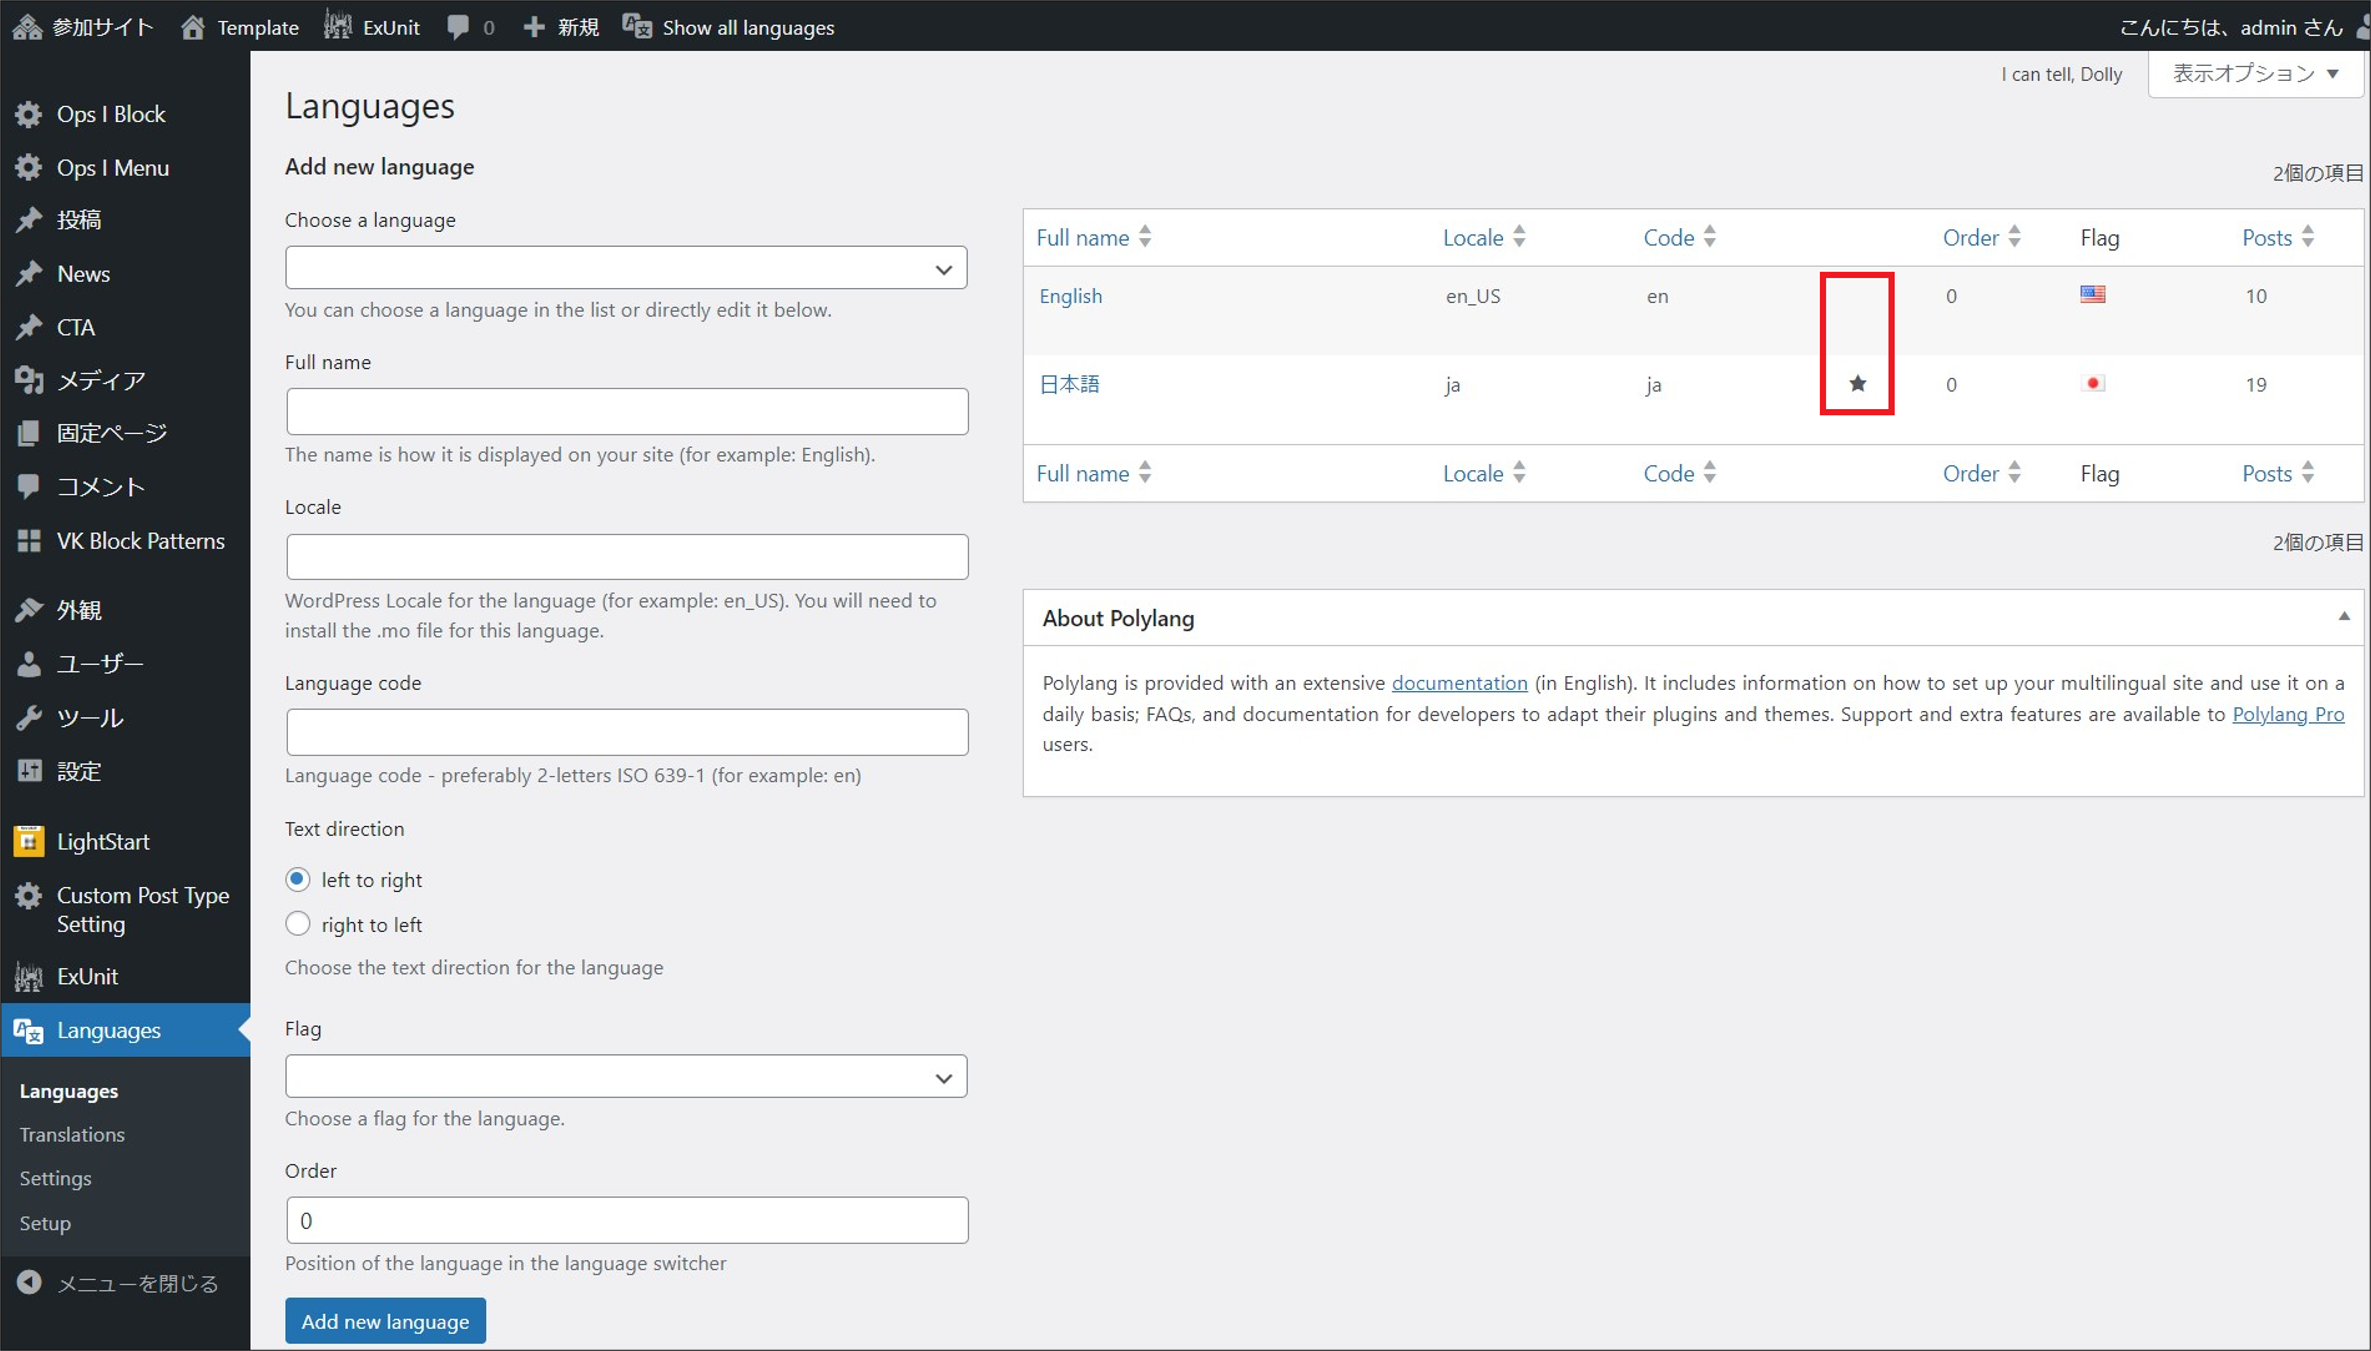
e. From [Languages]-[Languages], change the "★" in the list of languages displayed on the right side of the window to set the default language. This step is not necessary if you have not configured the multilingual settings in the pre-migration environment.
⑥ Remove duplicate custom post types by following these steps.
a. On the [Site Management] window of the migration destination, open the settings window for the site to be migrated.
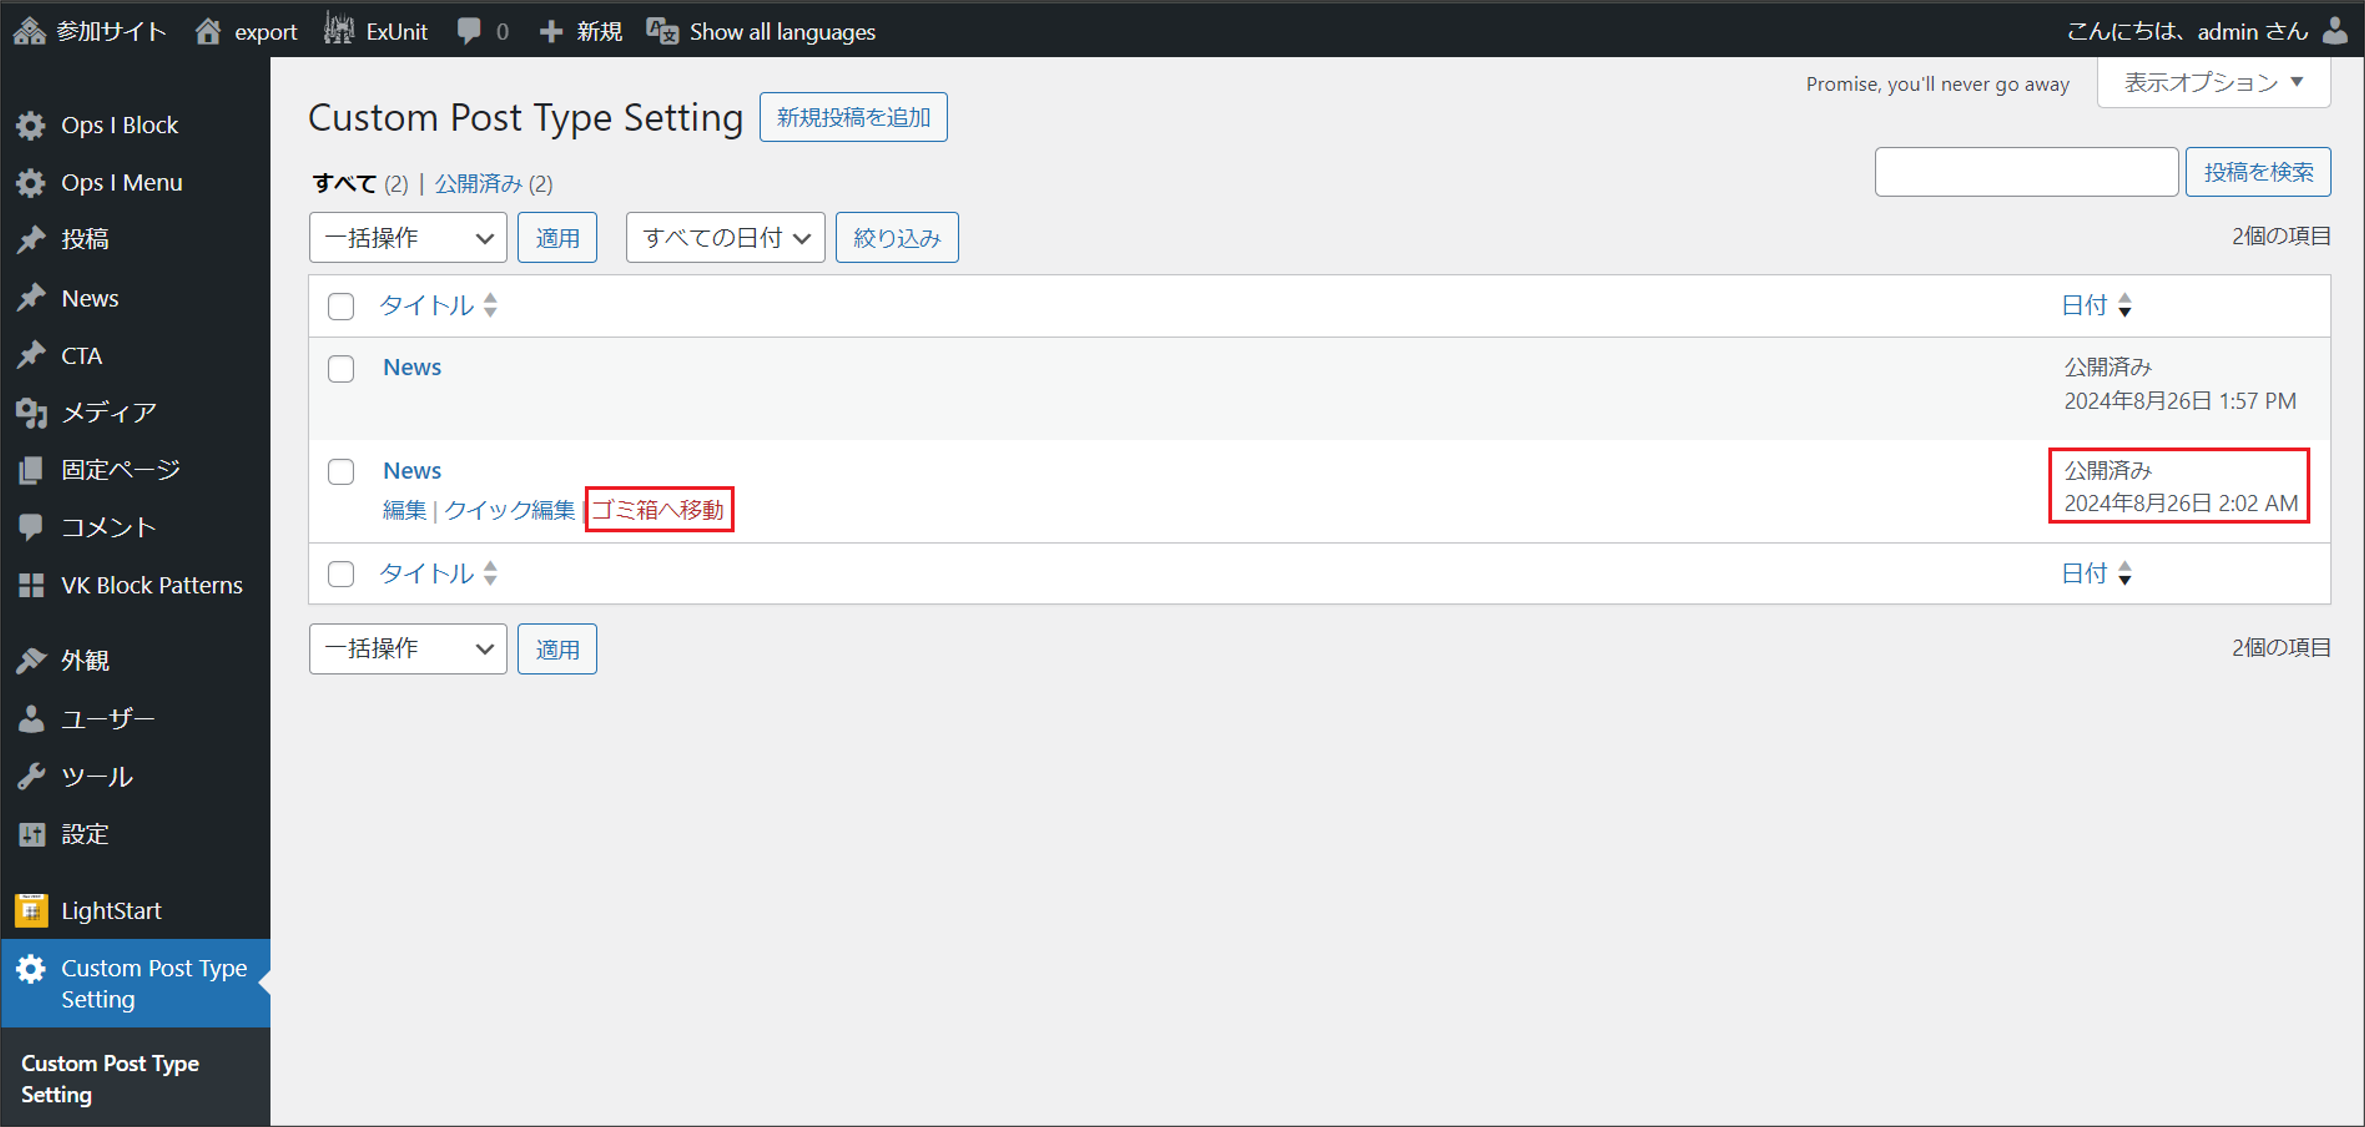
b. From [Custom Post Type Setting], check whether there are any duplicate custom post types. If there are duplicate custom post types, delete the custom post type with the oldest publication date.
⑦ If you have imported a template site, follow the steps below to correct the plugin settings.
a. On the [Site Management] window of the migration destination, open the settings window for the site to be migrated.
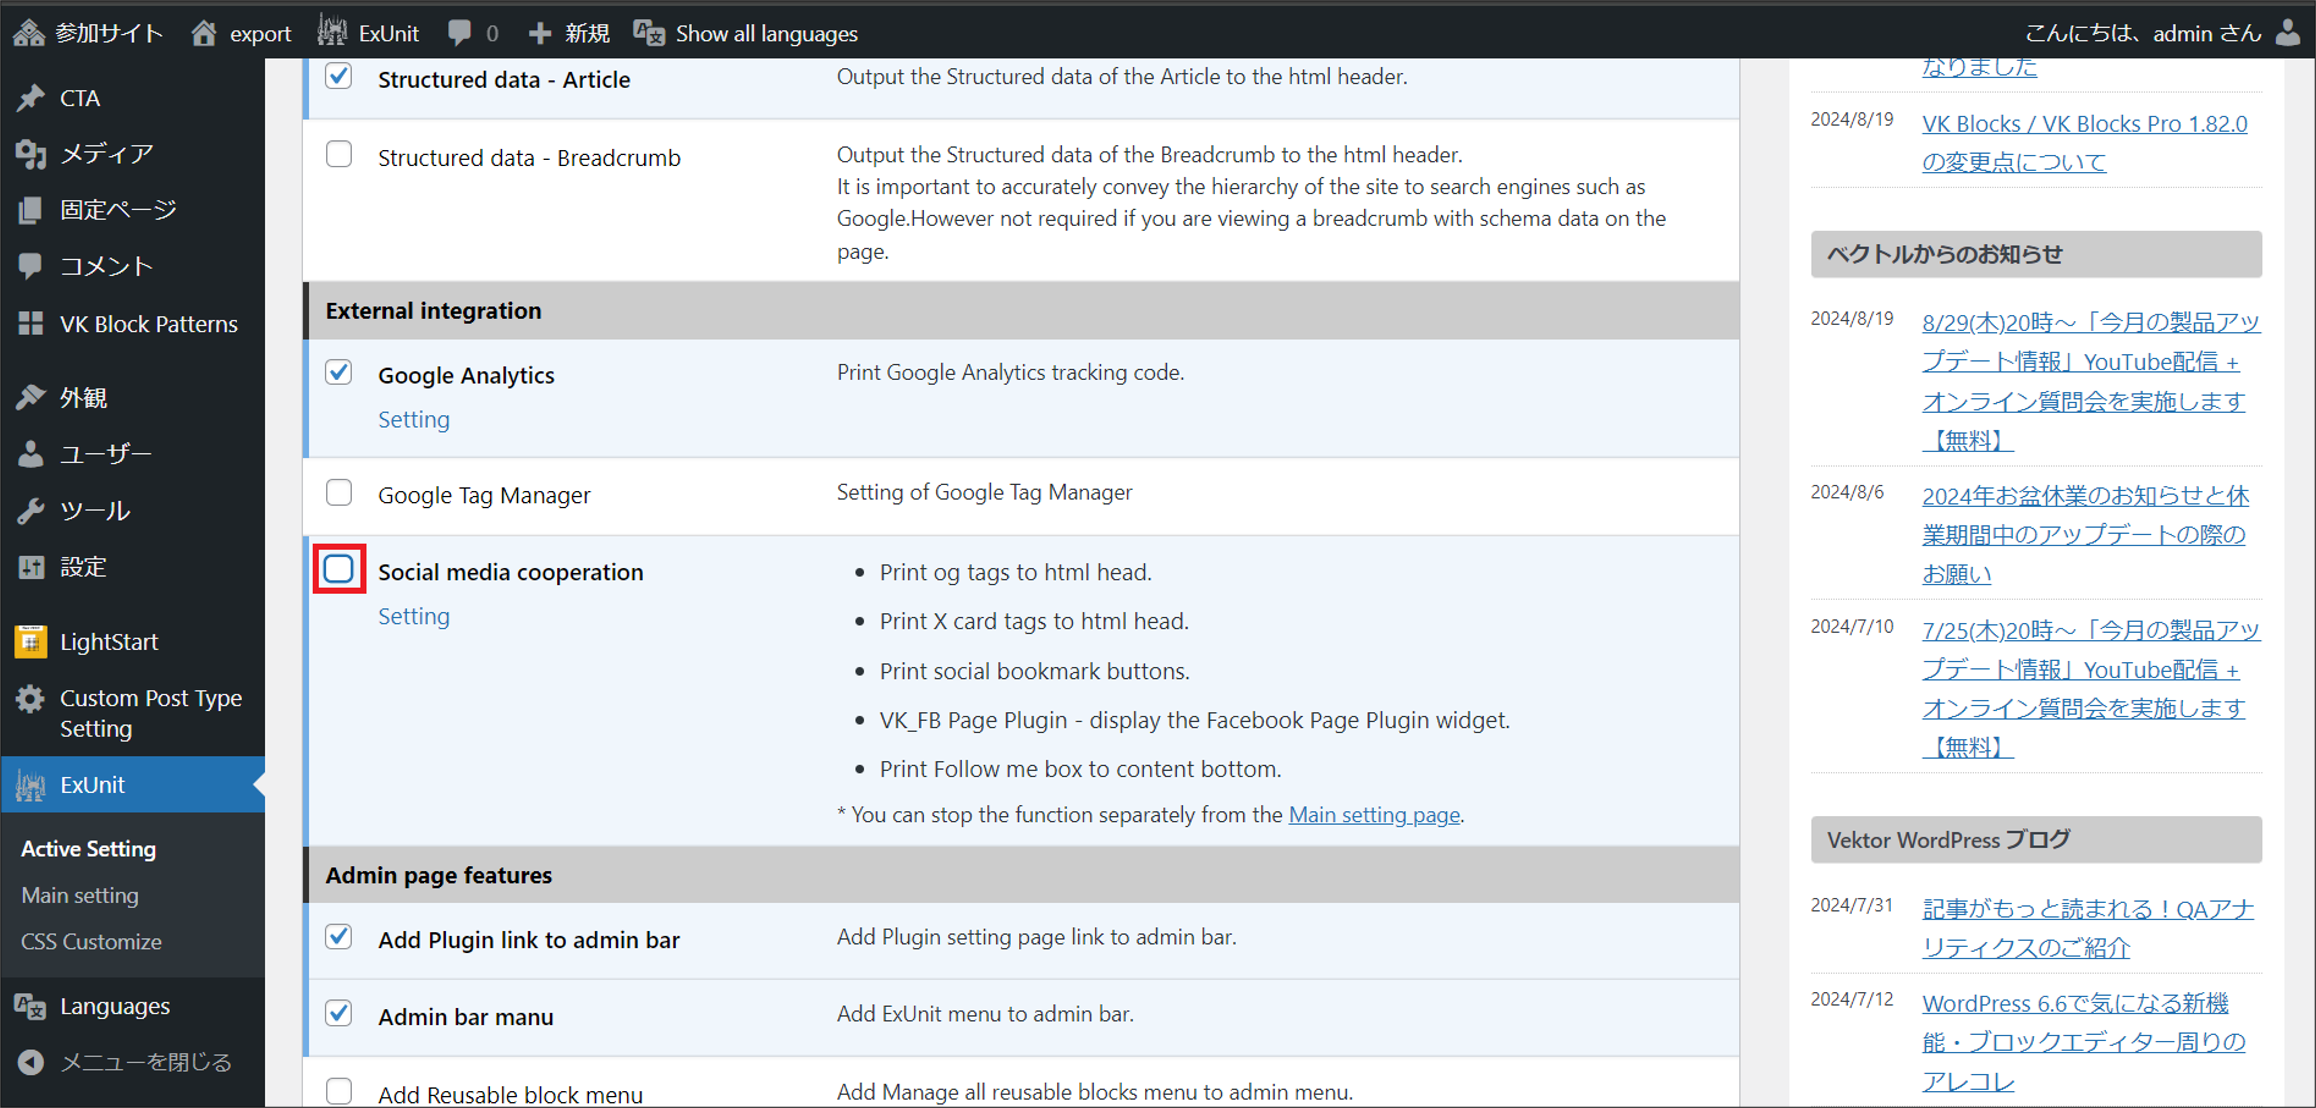
b. From [ExUnit] - [Active Setting], uncheck [Social media cooperation] and save the changes.
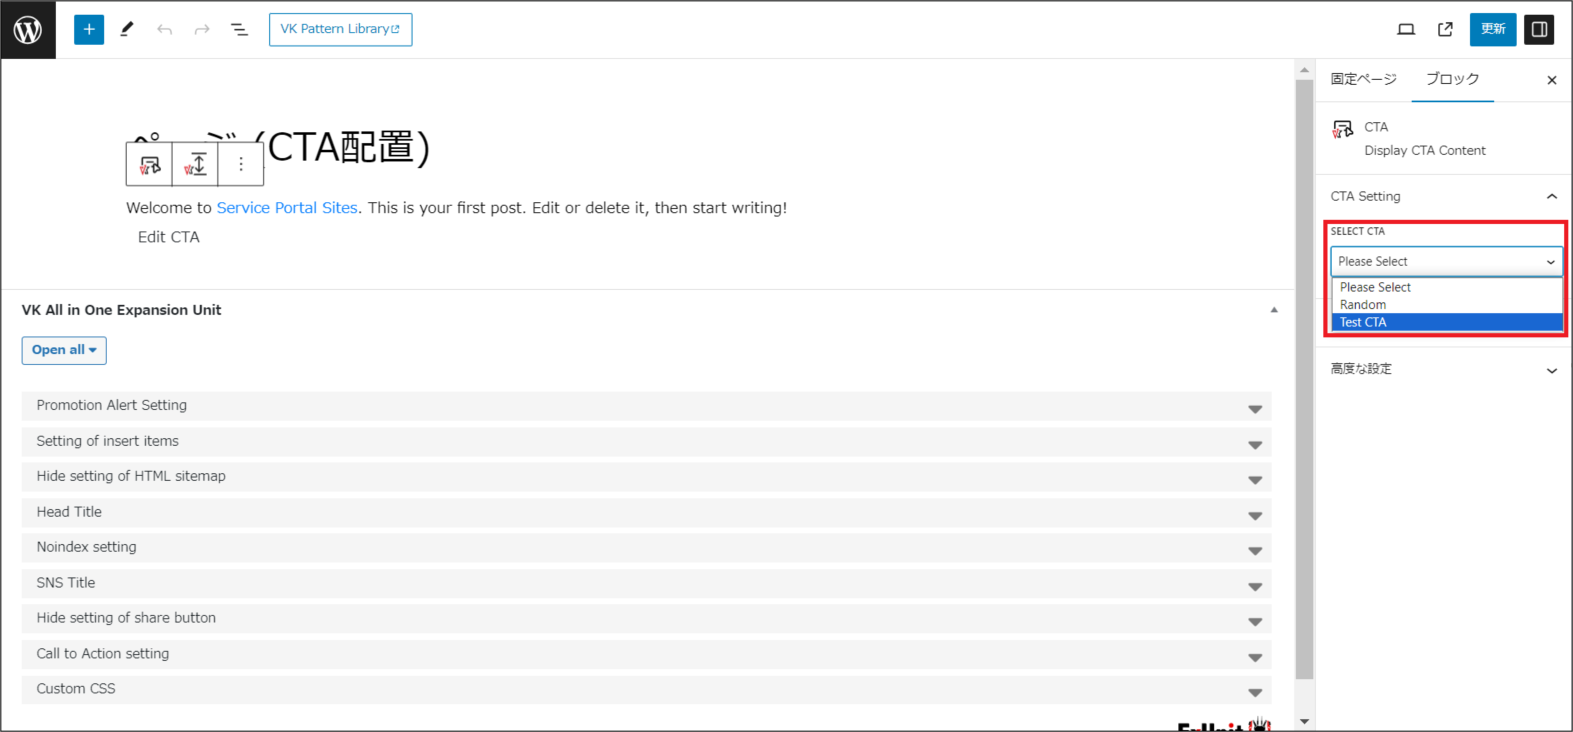
⑧ If you have created CTAs and placed them on pages and posts in the pre-migration environment, click on the appropriate pages and posts under [Pages] and [Posts] and modify the CTA assignments.
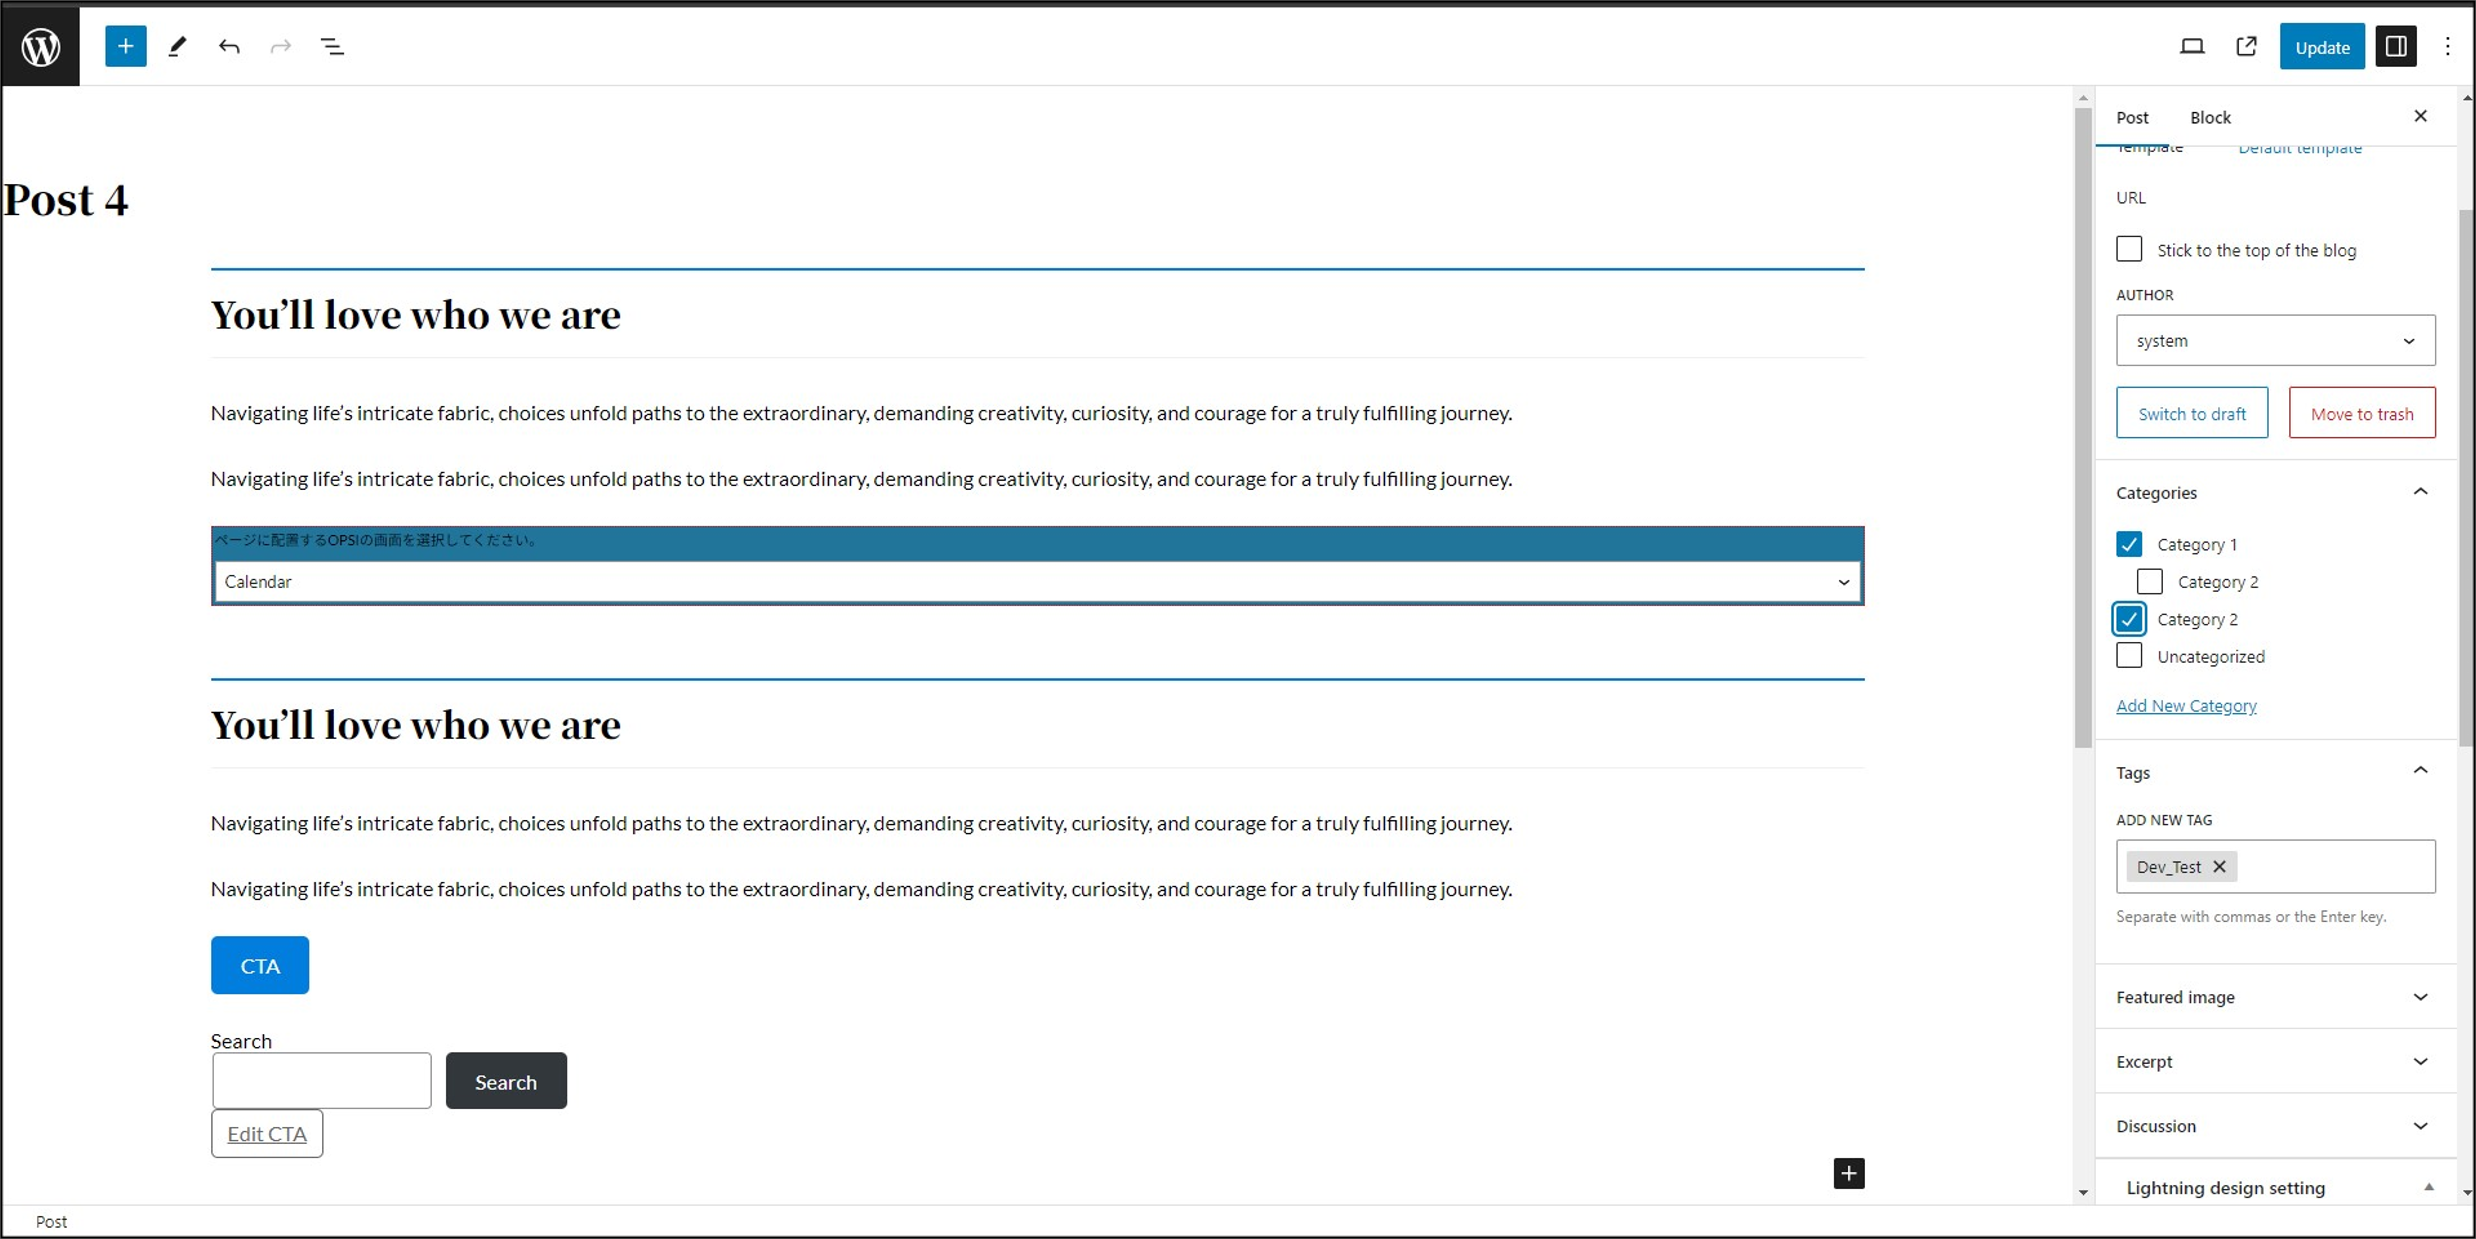
⑨ Correct categories for posts and custom posts if categories were set for posts or custom posts in the pre-migration environment.
From [Posts], click on the post for which you had set the category and correct the category assignment.
 Notes
Notes
- It is not possible to import templates with LightStart. To change pages during maintenance mode, create and set the pages.
- Ops I Content settings will not be imported. If necessary, please make the settings from the [Site Management] window - [Ops I Block].