4.9.1 JP1/AJS3
The linkage templates allow Ops I to be linked with JP1/AJS3 job management functions and execute JP1/AJS3 jobs from Ops I workflows.
For linkage with JP1/AJS3, Ops I provides the following. (These are hereinafter collectively referred to as “linkage templates”.)
- YAML files for the Workflow etc. that define what to execute for JP1/AJS3 jobs
- Provided Ops I components used for defining the Workflow
- Playbooks that implement linkage with JP1/AJS3
For information on the provided YAML files, see “Obtaining and registering linkage templates”. For information on playbooks, see Step 5 in “Registering authentication information and job templates with AWX”. The following is a list of the provided Ops I components.
(Table) Provided Ops I components (for JP1/AJS3 linkage)
| Provided Ops I component | Description |
|---|---|
| ajs.cancel_exec_schedule | Cancel Jobnet execution |
| ajs.change_hold | Change Jobnet hold attribute |
| ajs.change_start_time | Change job schedule |
| ajs.interrupt | Interrupt Jobnet |
| ajs.kill | Forcibly end Jobnet |
| ajs.register_fixed_exec | Register Jobnet fixed execution |
| ajs.register_immediate_exec | Register Jobnet immediate execution |
| ajs.register_planned_exec | Register Jobnet planned execution |
| ajs.rerun | Re-execute Jobnet |
| ajs.show | Obtain Jobnet execution information |
There are two types of parameters of the provided Ops I components: one that is defined in the workflow YAML file and one that is entered via the GUI when the workflow is executed. Follow the following instructions.
The flow of JP1/AJS3 linkage template execution is as follows.
(Figure) Flow of JP1/AJS3 linkage template execution
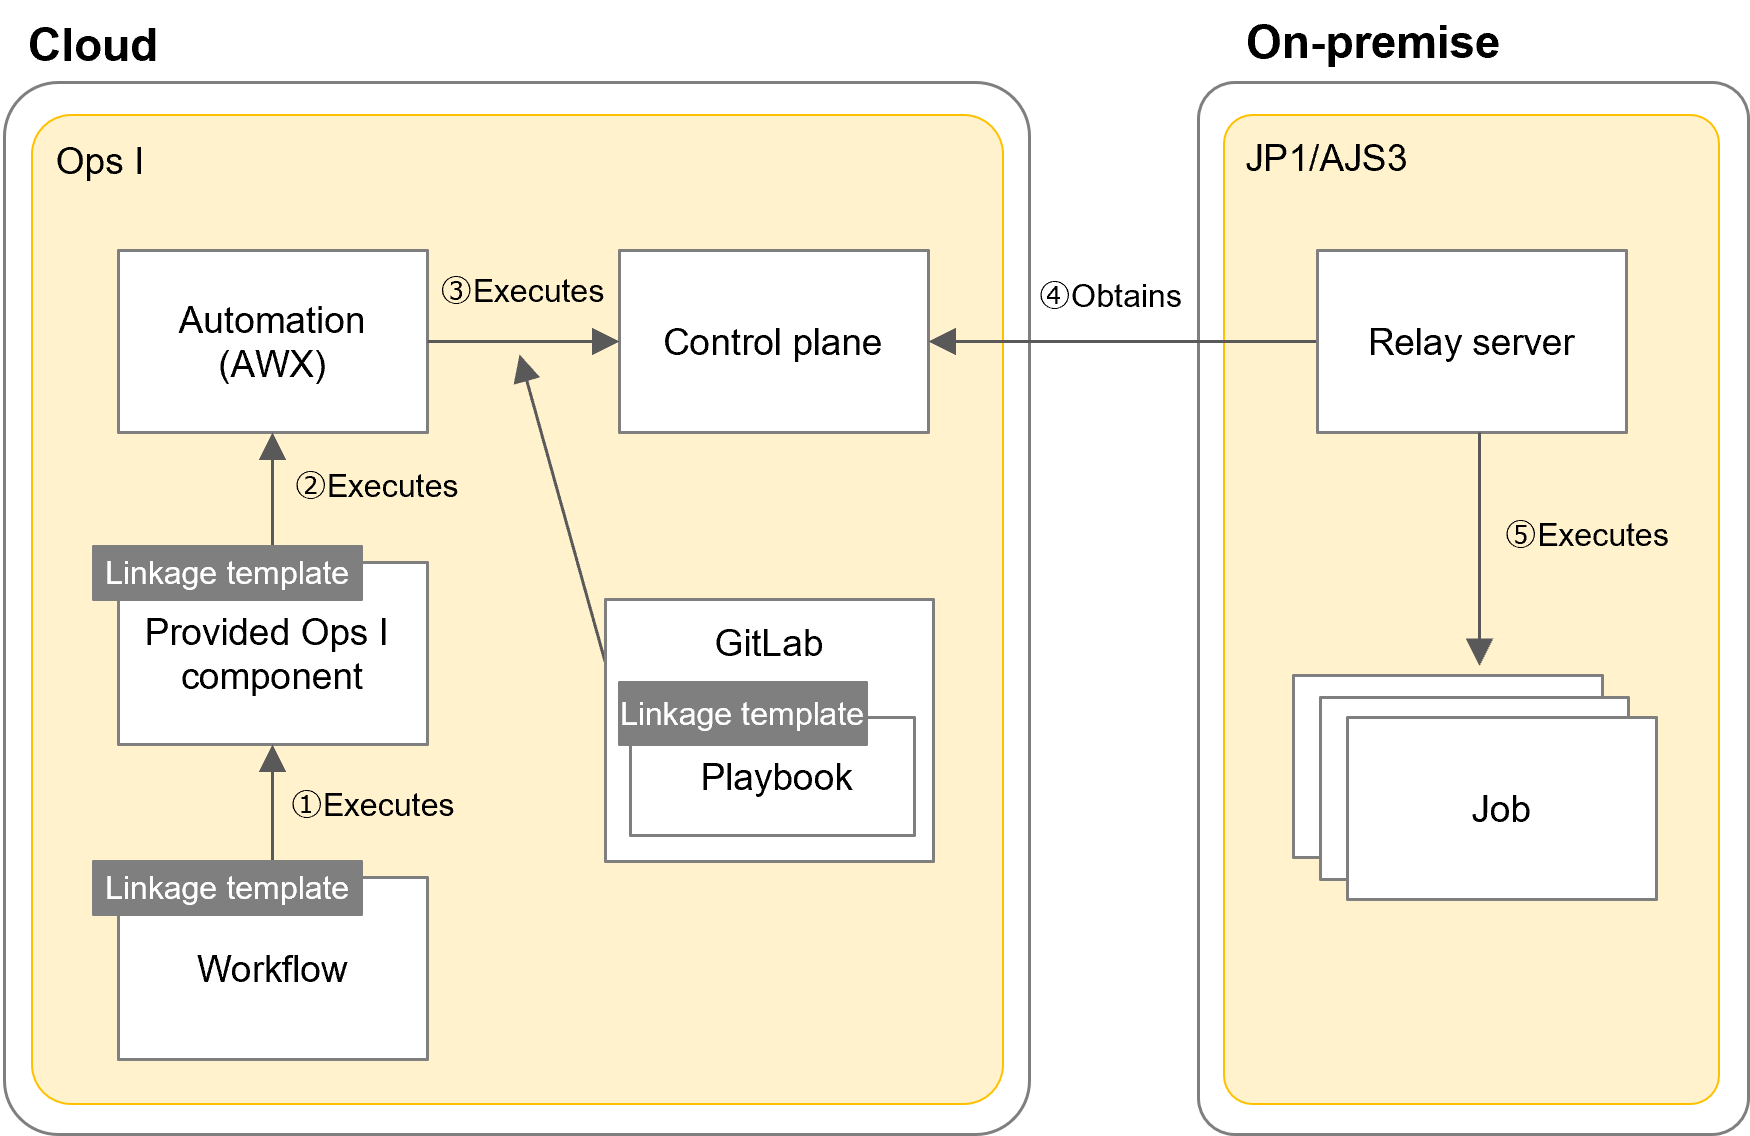
The flow of JP1/AJS3 linkage template execution is as follows.
For Steps ①, ②, and ③, the JP1/AJS3 linkage templates are used. The playbook for Steps ① and ③ can be customized according to what to execute.
The playbook is registered in the control plane.
(1) Prerequisites
Users who execute the linkage templates must be granted necessary roles.
For details on the Ops I roles, see “OPS I Roles”.
JP1/AJS3 must meet the following prerequisites. These prerequisites are the same as the linkage with JP1/IM “Monitoring deterrence”.
(Table) Prerequisites for JP1/AJS3 (on-premise)
| Supported OS | Prerequisites |
|---|---|
| Windows Server | ・Ops I relay servers can connect to JP1/AJS3 servers using WinRM.
・PowerShell 5.1 or later is installed.・.NET 4.0 or later is installed. |
(2) Settings for executing JP1/AJS3 linkage templates
The settings for JP1/AJS3 linkage template execution are as follows.
The following settings need to be made.
Configure the connection settings between the AWX instance group and the relay server. (See “Setting a relay server”.)
After the connection settings are configured, confirm that the status of the node for the relay server shows “Ready” on the node list window.
[b. Creating AWX “organizations”]
Create AWX “organizations” necessary to use AWX. (See “Organization management”.)
[c. Saving JP1/AJS3 connection/authentication information in Secret Management]
First, obtain authentication information for accessing the Secret from Automation (AWX). See “Obtaining authentication information for accessing the Secret from Automation” for how to create it.
Next, register secret information required to run the provided Ops I components for the organizations created at “Creating AWX “organizations””. The following shows the secret information settings required for each application.
For information on creating secrets engines and secrets, see the following.
- Secrets engine: “Creating a secrets engine”.
- Secret: “Creating a secret”
Set the following keys.
- access_token (Access token to access the GitLab repository. For details on GitLab access tokens, see "Obtaining GitLab access tokens".)
Set the following keys.
- password (Ops I password to access AWX)
- user_name (Ops I user name to access AWX)
Set the following keys.
- jp1_user_name (JP1 user name)
- logical_host_name (logical host name) *arbitrary
- manager (IP address where JP1/AJS3-Manager is running)
- password (OS password used to log in to the JP1/AJS3 server)
- user_name (OS user name used to log in to the JP1/AJS3 server)
Because the secret version must always be 1, when updating the secret, delete the secret first and then recreate it.
Set the following keys.
- username (The User Name for obtaining Ops I access tokens)
- password (The user password for obtaining Ops I access tokens)
- domain (Ops I FQDN (Example: "tenant name.ops-integration.com"))
[d. Registering authentication information and job templates with AWX]
Configure the following AWX settings required to execute the JP1/AJS3 linkage templates. (See “Automation”.)
Authentication information type "HashiCorp Vault Secret Lookup"
Authentication information type "Source Control"
Authentication information type "AJS Credential type"
For the name, use the path to the JP1/AJS3 secret registered at Step 3 in "Saving JP1/AJS3 connection/authentication information in Secret Management". (Example: secrets/ajs/host0001)
For the details of the type, specify the Vault authentication information registered at ①, similarly to ②. For other fields, see "(Table) List of external secret management system metadata to enter". The value of "logical_host_name" is arbitrary.
See "Using a relay server".
When the optional checkbox "Revision update on startup" is selected and the playbook is updated, the updated playbook is automatically executed.
---
ansible_connection: winrm
ansible_ssh_port: 5986
ansible_winrm_transport: basic
ansible_winrm_server_cert_validation: ignore
ansible_user: "{{ lookup('env','ajs_user_name') }}"
ansible_password: "{{ lookup('env','ajs_password') }}"
The items to enter to register job templates are as follows.
(Table) Items to enter to register job templates
| Item | Description | ||||||||||||||||||||||
|---|---|---|---|---|---|---|---|---|---|---|---|---|---|---|---|---|---|---|---|---|---|---|---|
| Name | Enter an arbitrary name. The default values defined for the provided Ops I components are as follows. When changing the job template name, ensure that it matches the job template name defined in the Workflow YAML file for each component.
The following job template is provided for checking Jobnet execution results, etc. and is defined in the Workflow YAML file of each component by default. Job template name: AJS Show |
||||||||||||||||||||||
| Job type | Select "execution". | ||||||||||||||||||||||
| Inventory | Click the  icon and select the inventory registered at Step 3 above. icon and select the inventory registered at Step 3 above. |
||||||||||||||||||||||
| Project | Click the icon and select the project registered at Step 2 above. |
||||||||||||||||||||||
| Execution environment, instance group, and authentication information | Make settings referring to "Using a relay server". | ||||||||||||||||||||||
| Playbook | Set the playbook for the JP1/AJS3 job template for the provided components that you wish to execute, which is registered in the "system" repository for the "system" group. Make settings referring to the playbook name in "(Table) List of actions (provided Ops I components for JP1/AJS3 coordination)". When customizing the playbook, download it from the "system" repository for the "system" group, customize it, push it to any repository in Ops I (for which YAML file management is enabled), and then set the customized playbook as the job template. |
||||||||||||||||||||||
| Startup prompt | Select the [Authentication Information] and [Variables] checkboxes. |
(3) Obtaining and registering linkage templates
To execute the JP1/AJS3 linkage templates, obtain the templates and register them in the repository. For the JP1/AJS3 linkage templates, a zip file containing the YAML files for the Workflow, Catalog, UI, and Datamodel are stored in GitLab. Each of the YAML files defines what to execute for JP1/AJS3 jobs. Users can customize jobs to execute, secret information, etc. as needed.
[Obtaining the JP1/AJS3 linkage templates]
Obtain the JP1/AJS3 linkage templates from the following location in GitLab. The “system” repository appears in the [Explore] tab of the Git application.
(Table) Location and file name of the JP1/AJS3 linkage templates
| Group | Repository | Directory | File name |
|---|---|---|---|
| system | system | integration templates/JP1 | JP1_integration_templates.zip |
[Definitions in the Workflow YAML file]
To execute the provided Ops I components from the workflow, define the provided Ops I components for “action” and parameters for “input” in the Workflow YAML file as follows. For each parameter, define the secret information created in “Creating a secret”. Always use the latest version of the secret.
For details on the provided Ops I components and parameters, see “(Table) List of actions (provided Ops I components for JP1/AJS3 coordination)”.
(Table) Definitions of “action” and “input” for the Workflow
| Label | Description | |
|---|---|---|
| action: | Provided Ops I components for JP1/AJS3 to be executed | |
| input: | For each parameter, enter the following values set in "Saving JP1/AJS3 connection/authentication information in Secret Management". | |
| awx_vault_... | For the parameters starting with "awx_vault_...", define the secrets engine name and path to the secret to access AWX. | |
| ajs_vault_... | For the parameters starting with "ajs_vault_...", define the secrets engine name and path to the secret to access the JP1/AJS3 server. | |
| job_template_... | For the parameters starting with "job_template_...", define the AWX job template information. | |
[Registering the YAML files in the repository]
Register the Workflow YAML file that defines the provided Ops I components to execute and the obtained Catalog, UI, and Datamodel YAML files in any repository. YAML file management must be enabled for the repository. For information on YAML file management in repositories, see “Repository management”. The directories in the destination repository must be the same as the folder structure of the obtained JP1/AJS3 linkage templates. The directory structure of the repository is as follows.
(Figure) Directory structure of the repository for linkage with JP1/AJS3
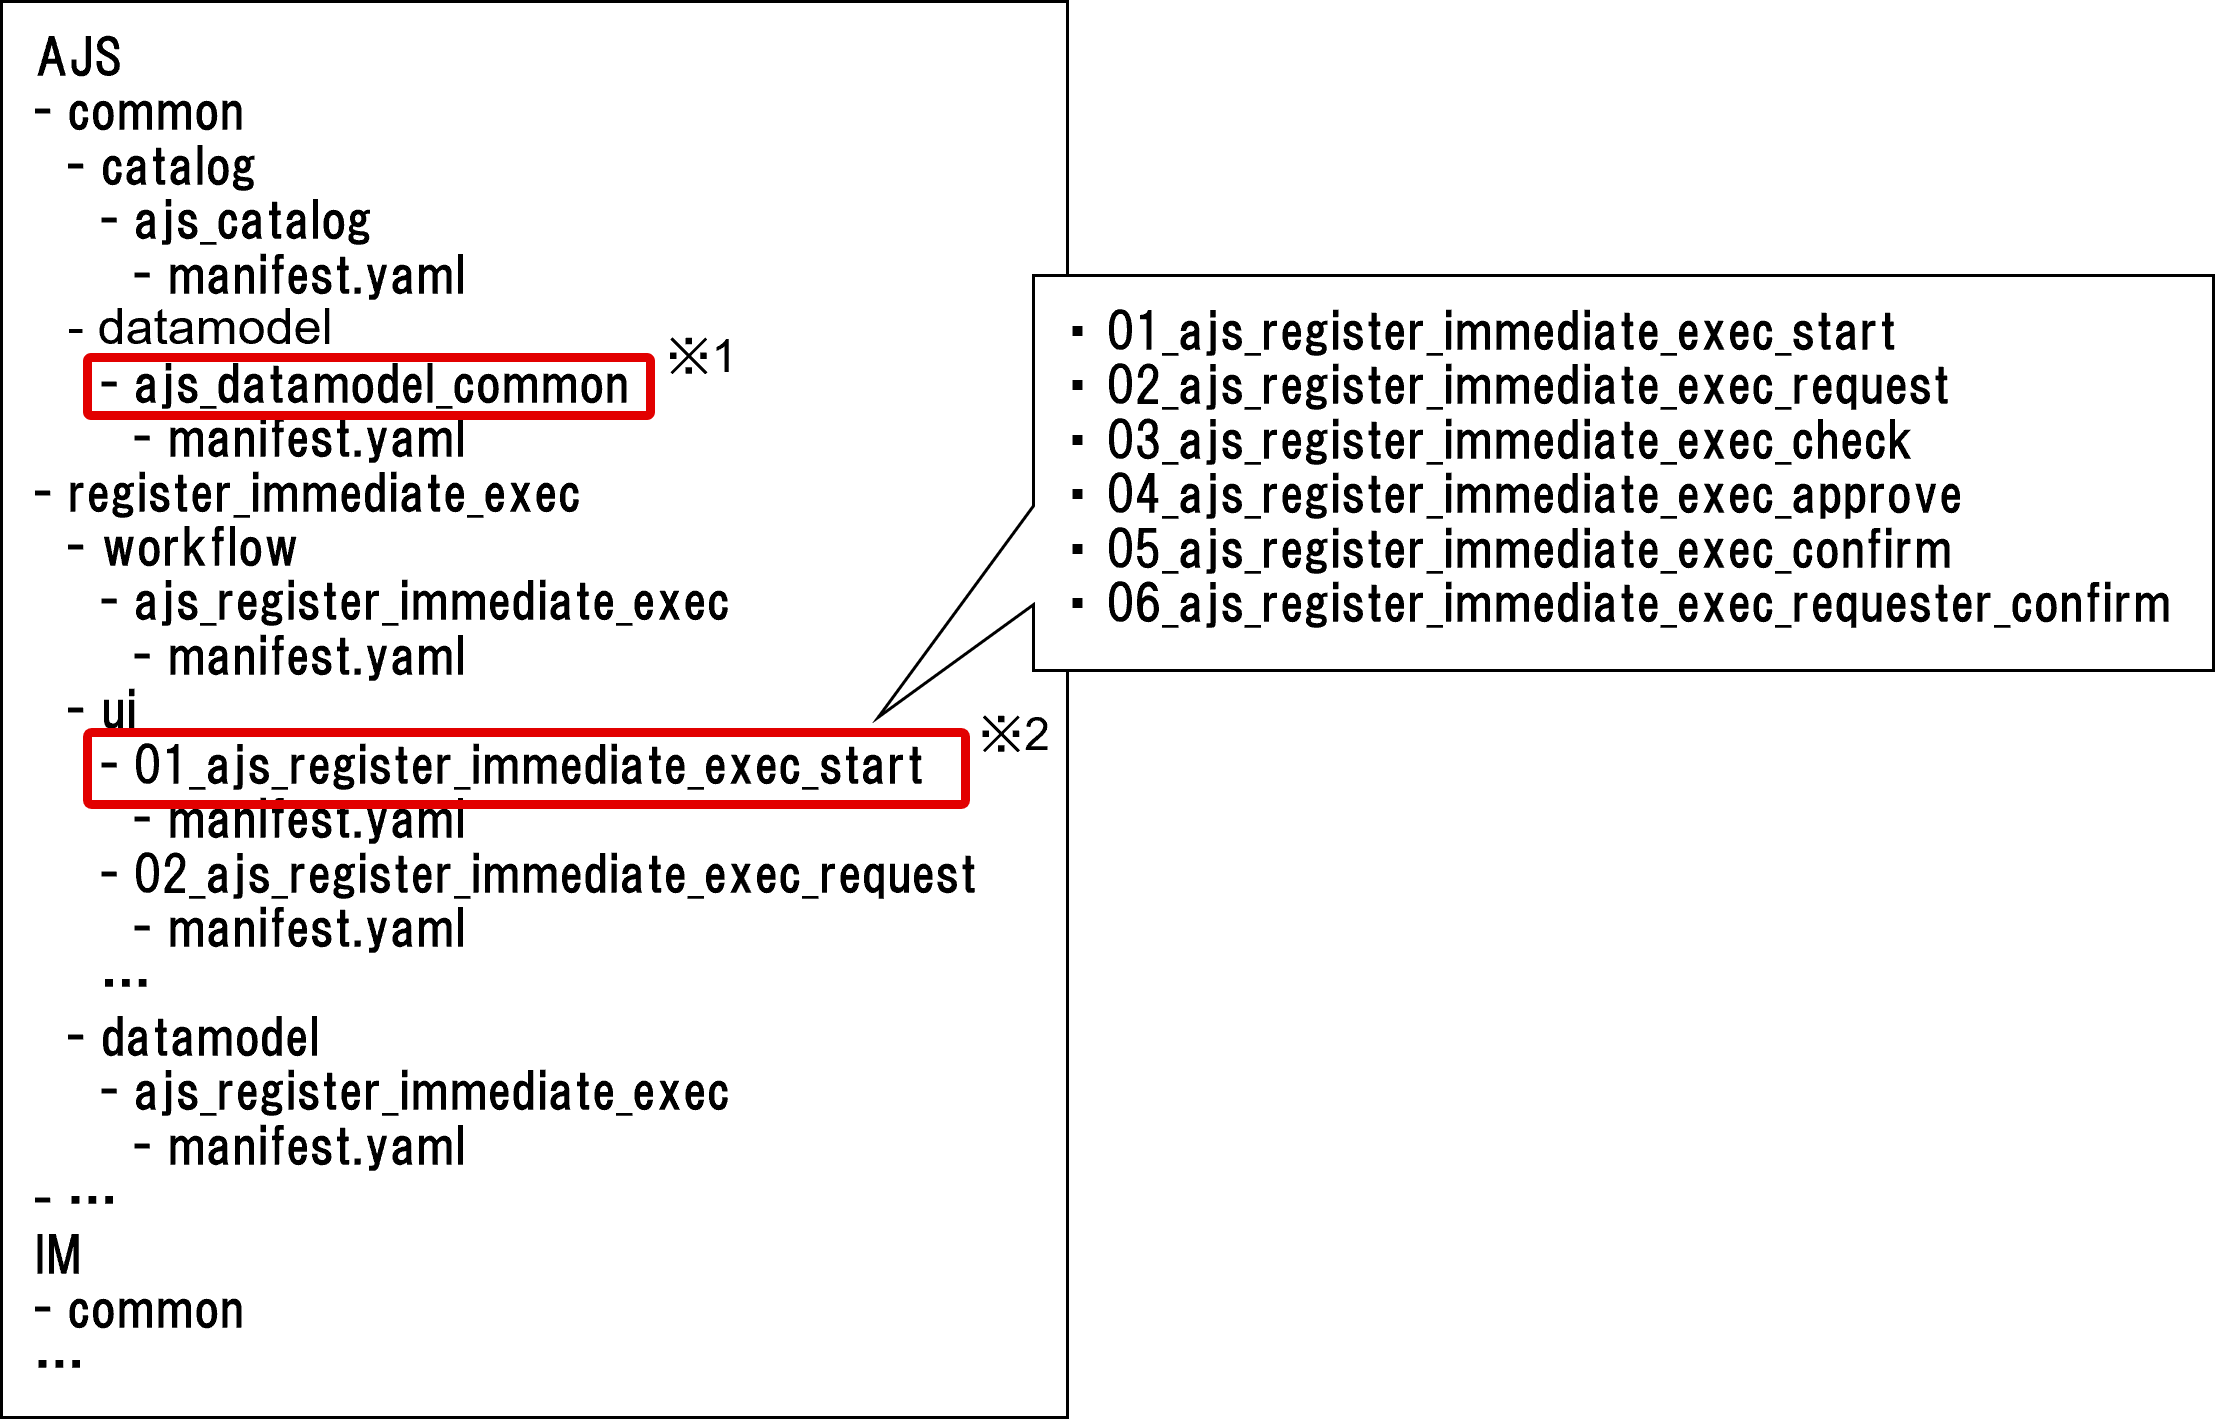
The YAML files to be registered have dependencies. When you register all the YAML files in GitLab at the same time, you do not have to be careful about the dependencies, but when you register the YAML files one at a time, register the Script, Datamodel, UI, Workflow, and Catalog YAML files in that order. The word "register" here refers to "commit" via GUI and "push" via CUI.
(4) Executing linkage templates and checking results
Execute the JP1/AJS3 linkage templates from the service catalog registered in “Obtaining and registering linkage templates”.
The details of each execution step are shown below, using the case of “Registering Jobnet immediate execution” as an example. For details on the information to input and information displayed, see “Input fields on workflow details window”.
(Table) Details of each execution step
| Step | Worker | Description | |
|---|---|---|---|
| 1 | Start the service catalog | Requester | Click the catalog item in which the JP1/AJS3 job is defined. |
| 2 | Start the workflow | Requester | The guidance window for the workflow is displayed. Confirm the displayed information and click the [Start Request] operation button. |
| 3 | Enter request information | Requester | In the request window for the workflow, enter request information and click the [Request] operation button. |
| 4 | Review request information | Operations agent | Review the request information and click [Confirmed] or [Rejected] operation button depending on the result of the review. |
| 5 | Approve request information | Operation manager | Review the request information and click [Approved] or [Rejected] operation button depending on the result of the review. When the [Approved] operation button is clicked, the JP1/AJS3 job is automatically executed. |
| 6 | Review results after completion of workflow | Requester | Review the results of Steps 1 to 5 and click the [Confirmed] operation button. |
(5) Input fields on workflow details window
The input items on the workflow details window are as follows. In these input fields, the parameters for the provided Ops I components are displayed.
Depending on the provided Ops I component or step to be executed, the displayed items vary and the fields become editable or uneditable.
Details of the items that the requester enters are as follows.
(Table) Input fields for requester
| Item | Required | Description |
|---|---|---|
| JP1/AJS connection information | Yes | Specify the path to the secret to access the JP1/AJS3 server registered at Step 3-② in "Saving JP1/AJS3 connection/authentication information in Secret Management". |
| JP1/AJS scheduler service name | No | Specify the JP1/AJS3 scheduler service name as a string. (Example) AJSROOT1 |
| JP1/AJ unit name | Yes | Specify the JP1/AJS3 unit name as a string. (Example) /jobgroup/jobnet |
| JP1/AJS macro variable*1, *2, *6 | No | Specify a combination of the JP1/AJS3 macro variable name and information to communicate. (Example) AJS2AA:5,AJS2BB:test |
| Jobnet fixed execution date/time*2 | No | Specify the Jobnet execution date/time. |
| Planned number of generations of Jobnet*2 | No | Specify the number of generations to be executed next time and later. Set a number in the range of 1 to 99 (unit: generation). |
| Jobnet execution start date*2 | No | Specify the start date of the Jobnet execution. |
| Jobnet execution end date*2 | No | Specify the end date of the Jobnet execution. |
| Whether to execute while the scheduler service is stopped*1, *2 | Yes | Specify whether to execute while the scheduler service is stopped. |
| JP1/AJS execution registration number*3, *4, *5, *7, *8, *9 | No | Specify the JP1/AJS3 execution registration number in the format of YYYYMMDDNNN. |
| Re-execution method*3 | Yes | Select the re-execution method. |
| Whether to set the hold status*3 | Yes | Select whether to set the hold status. |
| Whether to make changes after termination with warning detected*3 | Yes | Select whether to make changes after termination with warning detected. |
| Hold attribute after change*4 | Yes | Select the hold attribute. |
| Schedule change operation*5 | Yes | Select the schedule change operation. |
| Execution start date*5 | No | Specify the start date of the Jobnet execution. |
| Execution start time*5 | No | Set the start time of the Jobnet execution. |
| Whether to cancel next scheduled execution*5 | Yes | Select whether to cancel the next scheduled execution. |
| Whether to change the start date/time of subordinates*5 | Yes | Select whether to change the start date/time of subordinate Jobnets in the specified Jobnet. |
| Comments to operations agent and manager | No | Enter comments to operations agent and manager. |
Details of other items are as follows.
| Item | Required | Description | |
|---|---|---|---|
| Reason for rejection | - | Field for the operation agent or manager to enter the reason for rejection. | |
| Reason for rejection (for operation agent) | No | Field for the operation agent to enter the reason for rejection. | |
| Reason for rejection (for operation manager) | No | Field for the operation manager to enter the reason for rejection. | |
| Obtained pre-execution information | - | Displays the status of the job or Jobnet before the JP1/AJS3 job is executed. This is for reference only. | |
| Status | No | Displays the status. | |
| Execution result | No | Displays the execution result. Nothing is displayed when the status is "Successful". | |
| Job URL | No | Displays the job URL. | |
| Immediate execution registration* | - | Displays the execution result of the JP1/AJS3 job. This is for reference only. | |
| Status | No | Displays the status. | |
| Execution result | No | Displays the execution result. Nothing is displayed when the status is "Successful". | |
| Job URL | No | Displays the job URL. | |
| Obtained post-execution information | - | Displays the status of the job or Jobnet immediately after the JP1/AJS3 job is executed. This is for reference only. | |
| Status | No | Displays the status. | |
| Execution result | No | Displays the execution result. Nothing is displayed when the status is "Successful". | |
| Job URL | No | Displays the job URL. | |