2.6.3 Email-based ticket creation
Tickets can be created from received emails.
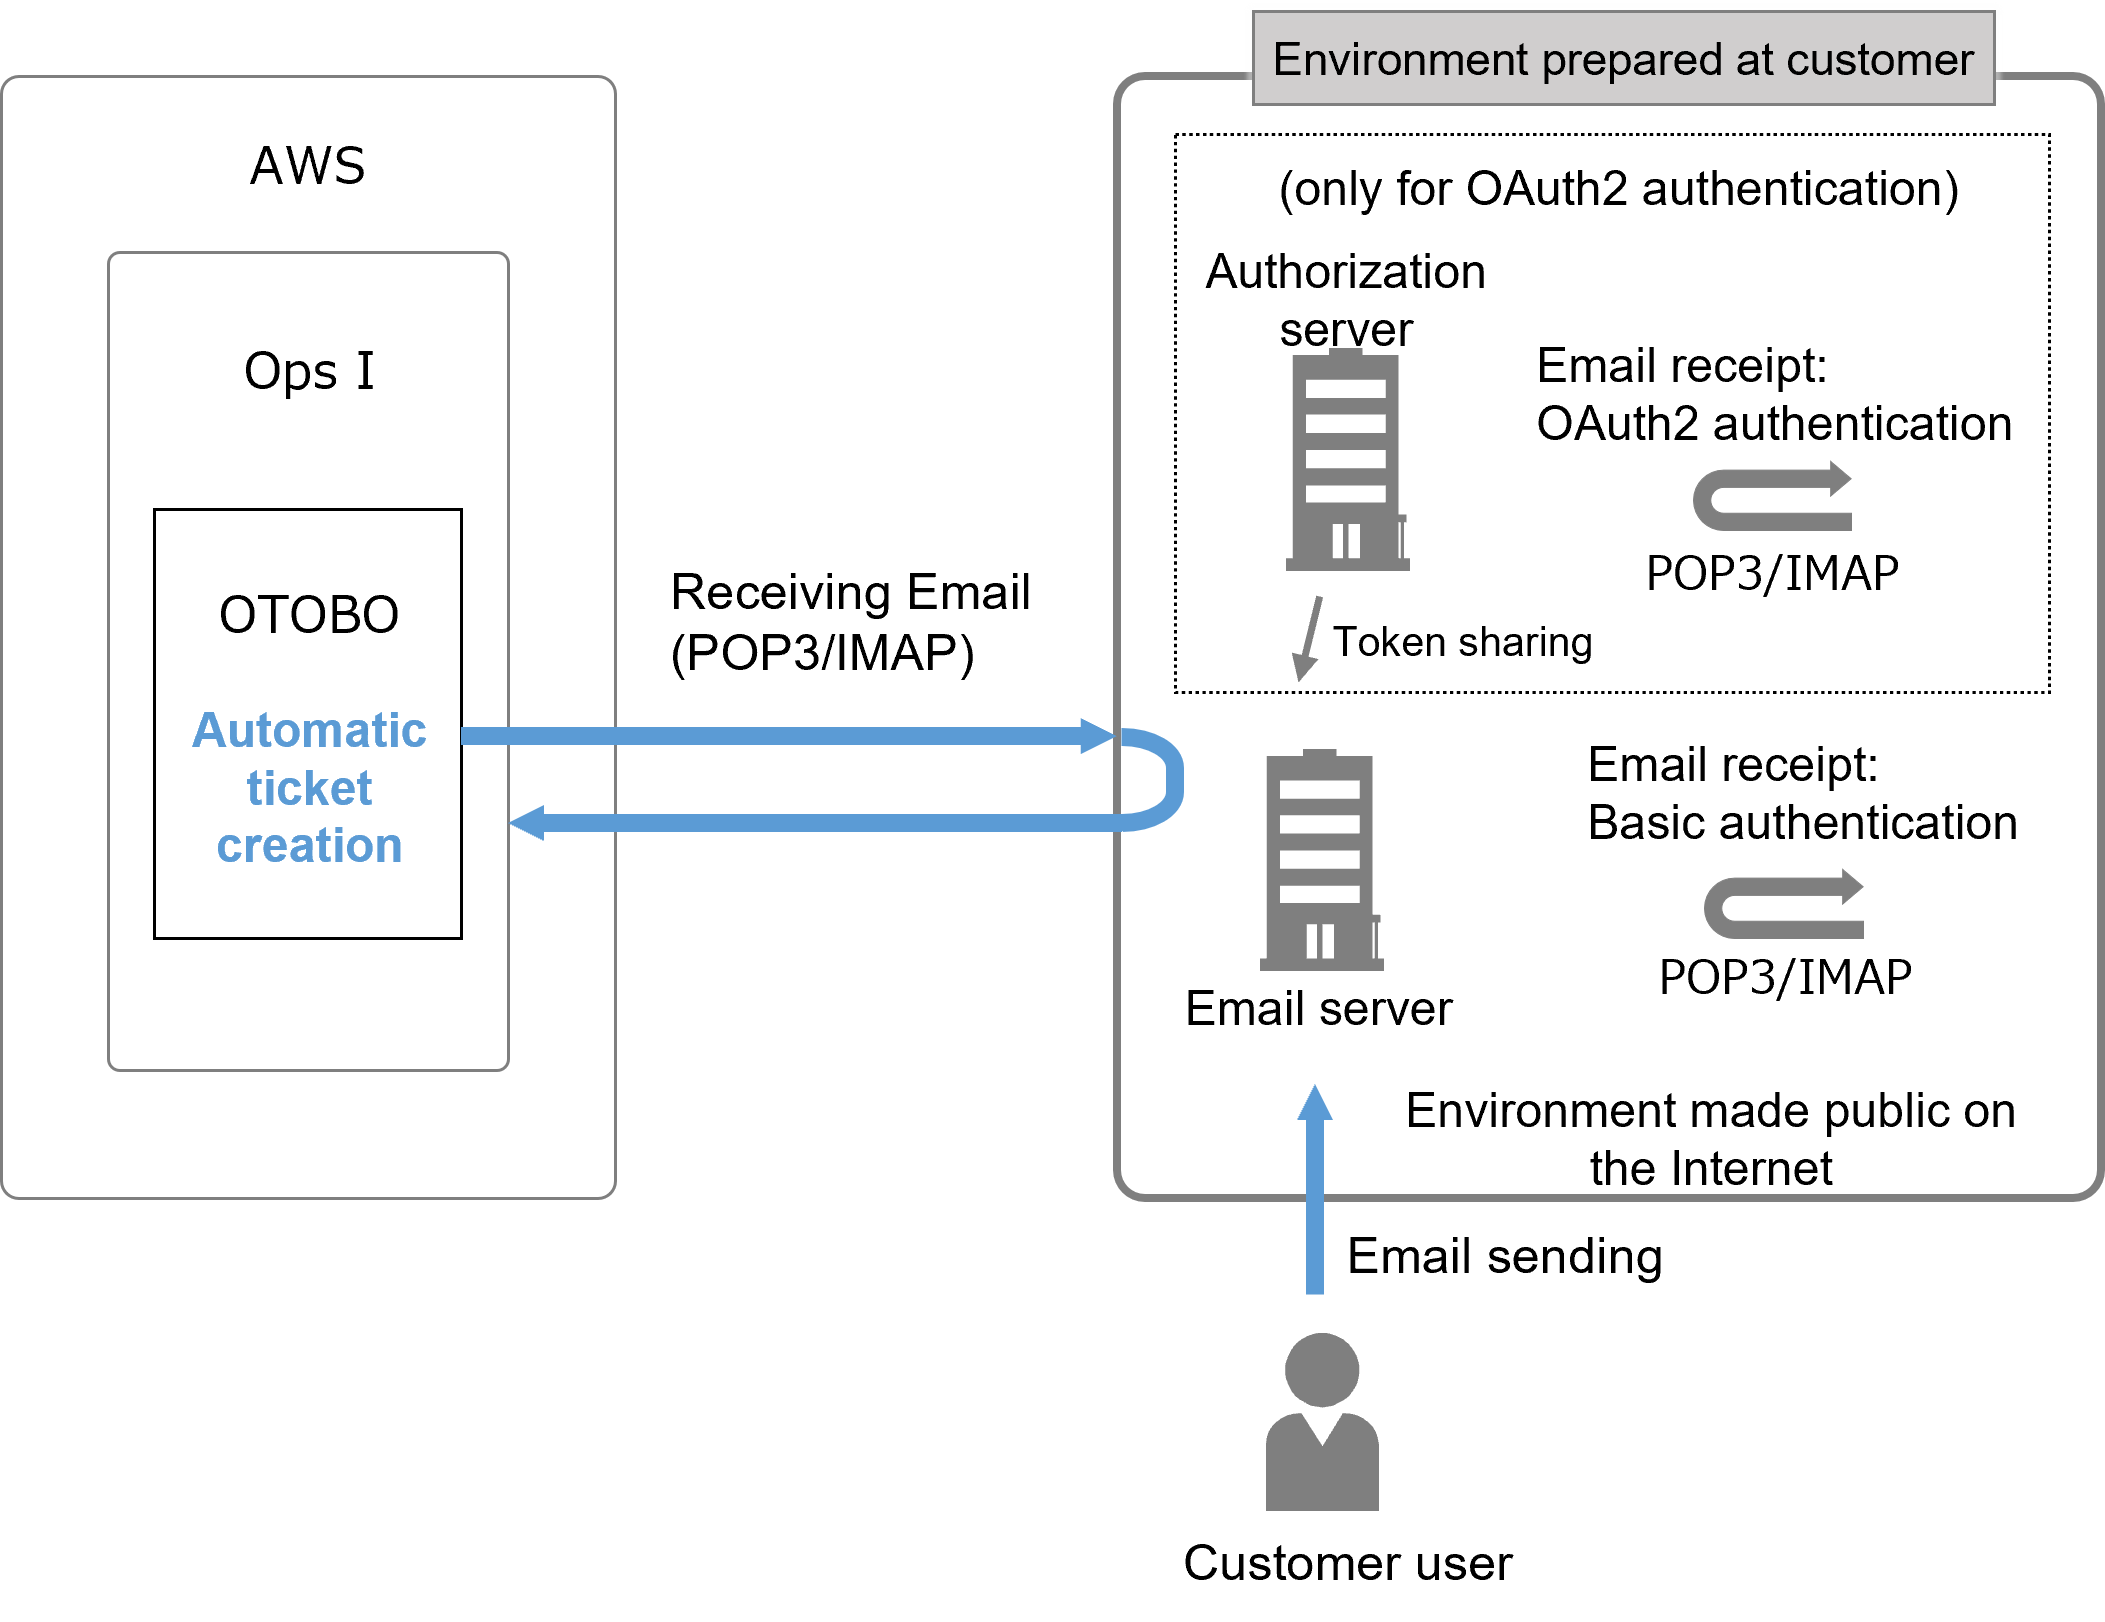
(Figure) Configuration of the “Email-based Ticket Creation” function
The prerequisites and setting items are as follows.
[Prerequisites]
To use the “Email-based Ticket Creation” function, an email receiving environment is required.
In addition, one of the following functions is also required to use the “Auto Response” function.
- Ops I notification function: See “Ops I notification function settings”.
- Function using an email server: See “Setting an SMTP server”.
■ Environment preparation
The mail server must be in an environment open to the Internet with connectivity from Ops I.
 Note
Note
- The port number used for each protocol cannot be changed.
- In order to communicate from Ops I to the email server or authorization server, it is necessary to set the information (IP address and port number) of the connection destination when building the Ops I environment.
In the hearing sheet provided by us, please provide information on the mail server or authorization server to be connected from Ops I. - For email servers and authorization servers connected from OTOBO, it is necessary to allow communication from Ops I.
Information (IP address, etc.) used for communication from Ops I is configured when the Ops I environment is built, so please inquire about the information after the environment is built.
■ Prepare an email account (email address)
[Setting items]
To receive emails, configure the settings for the following items. Setting is performed by a user with the role of System Administrator or Site Reliability Engineer.
(Table) Email receipt setting items
| Setting items | Description | Required |
|---|---|---|
| Setting OAuth2 | This setting registers an authorization server when OAuth2 is used for receiving email. | Optional |
| Register email account (for OAuth2 authentication) Register email account (for Basic authentication) |
This setting registers an email account to be polled by OTOBO. | Required | Register system address | This setting registers the email address to be used by OTOBO. You can specify the queue to which tickets are created when you register your email address in your email account to receive email. It also registers the email address to be designated as the sender of the auto response reply email. | Optional |
| Create rules for sorting tickets to be created when receiving emails | This creates a ticket when OTOBO is able to receive the email. | Optional |
| Setting auto responses | This setting issues automatic responses to incoming email. | Optional |
The queue is the “Contact person” in Ops I ticket management. For details on creating and editing queues, see “Create and edit the contact person”.
(1) Setting OAuth2
■ Preparation (user environment)
Register OTOBO as a client application to the OAuth2 authorization server, and configure it to be able to connect from OTOBO.
Also, check the specifications of each authorization server for how to register as a client application.
In this case, set the following for the redirect URI to be specified when registering the client application.
・client id*
・client secret (handle with care as it is equivalent to a password)*
・Authentication URL of the authorization server*
・Token URL of the authorization server*
・Host name of the POP3 or IMAP server
・Scope of OAuth2 Authentication*
*The format and contents vary depending on the authorization server.
・A password is required for authentication.
・Browsing a mailbox in a poll deletes the email in the mailbox.
■ Configuring OTOBO
(Table) OAuth2 setting fields (provider)
| Field | Value |
|---|---|
| AuthURL | Specify the authorization URL of the authorization server. |
| IMAP-Host | If IMAP is used, specify the host name of the IMAP server. |
| IMAP-Scope | If IMAP is used, specify the scope of OAuth2 authentication. |
| Name | Enter any name. It is specified in the profile described later. |
| POP3-Host | If POP3 is used, specify the host name of the POP3 server. |
| POP3-Scope | If POP3 is used, specify the scope of OAuth2 authentication. |
| TokenURL | Specify the token URL of the authorization server. |
(Table) OAuth2 setting fields (profile)
| Field | Value |
|---|---|
| ClientID | Specify the client Id obtained in advance. |
| ClientSecret | Specify the client secret obtained in advance. |
| Name | Enter any name. This will be used to register an email account. |
| ProviderName | Specify the widget name for the provider setting selected in "Select the provider setting widget [OAuth2::MailAccount::Providers###Custom?] (?: any value between 1 and 3)". |
(2) Register email account (for OAuth2 authentication)
When registering an email account, the Web screen switches to the authorization server for authentication. Because it is necessary to return to the URL specified in the redirect URI after authentication, please access “https://itsm.Ops I domain” to register your email account.
■ Configuring OTOBO
If an authentication screen appears when the [Save] button is clicked, the registered user name will be used for authentication.
(Table) Edit fields for email account (for OAuth2 authentication)
| Field | Value |
|---|---|
| Type | Specify "IMAPOAuth2" (when using IMAP) or "POP3OAuth3" (when using POP3). |
| Profile | From the select box, select the profile registered in "Configure the profile settings required for OAuth2 authentication.". |
| Username | Specify the username of the email account on the email server. |
| IMAP Folder | IMAP folder name "INBOX" will be displayed. Modify this only if you want to retrieve email from folders other than "INBOX". |
| Trusted | Specify "No". |
| Dispatching | Specify how to sort the queue to create tickets. Specify "Dispatching by email To: field." or "Dispatching by selected Queue.". When "Dispatching by email To: field." is specified, the queue settings configured for the system address are used for sorting. When "Dispatching by selected Queue." is specified, the queue settings specified for the mail account are used for sorting. |
| Validity | "valid": Specify this if you wish to use this email account to receive email on a regular basis. "invalid" or "invalid-temporarily": Specify this if you want to stop receiving email for this email account. |
Note
- If the authorization server performs two-factor authentication or authentication that redirects the user to another server during authentication, the user might not be redirected from the authorization server and might not be able to register correctly during authentication. In this case, perform OAuth2 authentication on your browser and then register your email account on the same browser.
- For Ops I (OTOBO) client applications registered with the authorization server, permission for use by the user might be requested at the time of initial authentication. Registration of email accounts might fail when setting permissions for use from OTOBO. In this case, register your email account again. You can also register an email account after setting permissions for its use by the user in advance.
- Some Ops I (OTOBO) client applications registered on the authorization server have a usage period depending on your environment. Make sure to re-create the client application and re-register before the usage period expires.
- OTOBO will attempt to receive email using the token information issued by your authorization server. The token information might have a usage period. Check the usage period and re-create your email account before the period expires.
(3) Register email account (for Basic authentication)
■ Preparation (user environment)
*It is recommended that you prepare a dedicated OTOBO account.
・A password is required for authentication.
・Browsing a mailbox in a poll deletes the email in the mailbox.
■ Configuring OTOBO
If an authentication screen appears when the [Save] button is clicked, the registered user name will be used for authentication.
(Table) Edit fields for email account (for basic authentication)
| Field | Value |
|---|---|
| Type | When using IMAP: Specify either "IMAP," "IMAPS", or "IMAPTLS". When using POP3: Specify either "POP3," "POP3S", or "POP3TLS". |
| Username | Specify the username of the email account on the email server. |
| Password | Specify the password for the email account. |
| Host | Specify the host name of the email server. |
| IMAP Folder | IMAP folder name "INBOX" will be displayed. Modify this only if you want to retrieve email from folders other than "INBOX". |
| Trusted | Specify "No". |
| Dispatching | Specify how to sort the queue to create tickets. Specify "Dispatching by email To: field." or "Dispatching by selected Queue.". When "Dispatching by email To: field." is specified, the queue settings configured for the system address are used for sorting. When "Dispatching by selected Queue." is specified, the queue settings specified for the mail account are used for sorting. |
| Validity | "valid": Specify this if you wish to use this email account to receive email on a regular basis. "invalid" or "invalid-temporarily": Specify this if you want to stop receiving email for this email account. |
Similarly, "Click [List] - [Fetch mail] and confirm that you can receive emails.".
From the main menu, select [Admin] and open [Communication & Notifications] - [Communication Log]. Similarly, "Receiving emails can be confirmed from the main menu by selecting [Admin], then [Communication & Notifications] - [Communication Log].".
(4) Register system address
■ Preparation (user environment)
Register the following email addresses.
You can also specify an email address for each queue, so you can register multiple email addresses.
Register the following value depending on the notification function:
・Ops I notification function: "noreply.opsi@itg.hitachi.co.jp"
・Function using an email server: The email address to be used for receiving emails can be used.
■ Configuring OTOBO
(Table) Edit fields for system email address
| Field | Value |
|---|---|
| Email address | Specify the following values:
|
| Display name | Specify the name of the system address that will appear in the sender name of the email. |
| Queue | Specify the queue from which tickets are created upon receiving the email specified in the To: header of the email. If "Dispatching by selected Queue." is specified in the "Dispatching" field of the Edit Mail Account field, the "Dispatching by selected Queue." setting takes precedence. *If only one system email address can be set, but you wish to assign it to multiple queues, register a sorting rule in the PostMaster Filter. See "Create rules for sorting tickets to be created when receiving emails". |
| Validity | Specify "valid," "invalid," or "invalid-temporarily". Because the system email address cannot be deleted, specify "invalid" when it is no longer needed. |
| Comment | Enter any comments. |
(5) Create rules for sorting tickets to be created when receiving emails
A ticket is created when OTOBO receives an email.
If you change the [Validity] setting of a queue, review the queue designated as the destination queue and save the setting again.
For details, see the OTOBO manual (PostMaster Filters).
https://doc.otobo.org/manual/admin/11.0/en/content/administration-area/communication-notifications/postmaster-filters.html
■ Configuring OTOBO
Multiple PostMaster filters can be specified to assign rules to each customer, etc.
(Table) Registration fields for email sorting rules
| Field | Value |
|---|---|
| Name | Specify the name of the PostMaster filter to be added. |
| Search header field | Select the header of the email. |
| for value | Specify the value of the condition. (Regular expressions can also be specified.) |
| Set email header | Select an OTOBO-specific header. |
| with value | Specify the value to be appended to the OTOBO-specific header. |
(6) Setting auto responses
(Table) Edit fields for auto response setting
| Field | Value |
|---|---|
| Type | Specify "auto reply". |
| Auto response from | Specify the following value depending on the notification function:
|
| Validity | This specifies whether the format can be used as an auto response format. |