3.6.1.1 Users
This section describes the following items.
- Adding users
- Viewing user details
- Deleting users
- Editing users
- Inheriting the OTOBO information of deleted users
Select “User” under “User Management” in the navigation area to manage users.
Clicking on a user name displayed in the configuration area will take you to the user details window.
There are two types of users: billing users and non-billing users, and these are displayed in a tree below “User”. The operation buttons, the contents displayed in the configuration area, and the possible operations are all the same for the users.
(Table) Tree information for the “User” window
| Item | Description |
|---|---|
| User | All users, including billing and non-billing users, are displayed. |
| Billing-User | Only users subject to billing who require an Ops I user license are displayed. |
| Non-Billing-User | Only users not subject to billing who do not require an Ops I user license are displayed. Non-billing user refers to a user with the Primitive role of free_user or a user who has been disabled. For details on roles, see "Correspondence between roles and support functions in Ops I". |
The types of operation buttons in the "User" window are as follows.
(Table) Types of operation buttons in the “User” window
| Item | Description |
|---|---|
| Add | Adds a user. Becomes inactive when the checkbox is checked. |
| Delete | Deletes a user. Becomes inactive when the checkbox is not checked. |
| Enable | Enables a user. Once enabled, that user can log in to Ops I. Becomes active when a user who has been disabled is selected. |
| Disable | Disables a user. Once disabled, that user cannot log in to Ops I. Becomes active when a user who has been enabled is selected. |
| Reset Password | Initializes the password. Clicking this button will send an e-mail to the user prompting them to re-enter their password. The password can be initialized by following the instructions in that e-mail. Only enabled users can be specified for initializing their passwords, and they can log in with their old passwords until the password has been reset. For information on the characters that can be used for passwords and restrictions on the number of characters that can be used, see "Notes on characters that can be entered". Becomes inactive when the checkbox is not checked. |
The “admin” user is registered by default. Because this is a reserved user required for the management of Ops I, please do not attempt to edit or delete it.
(1) Adding users
To add a new user, click the [Add] button in the “User” window. When the [Add] button is clicked, [Confirmation of handling of personal information] dialog box is displayed regarding the handling of personal information. Check the checkbox and click the [OK] button to go to the “Add user” window. Alternatively, clicking the [Cancel] button returns you to the “User” window.
 Notes
- To check the checkbox, scroll to the end of the text box.
- If you check the checkbox, the full name of the user who clicked the [Add] button will be automatically entered as the administrator's name
- The [OK] button will be activated when the following criteria are met.
- There is a check in the checkbox
- "Administrator's name" is not blank
In the “Add user” window, set the information in the user profile area and the related resources area, and click the [Save] button to register a new user. For information on the characters allowed for each item, see “Notes on characters that can be entered”.
(a) User profile area
When a new user is created, a password setting e-mail will be sent to the e-mail address that was entered. New users should set their initial password from the URL provided in the password setting e-mail. If a disabled user is created, the password setting e-mail will not be sent. For information on the characters that can be used for passwords and restrictions on the number of characters that can be used, see “Notes on characters that can be entered”. Passwords are salted and hashed via the algorithm “Argon2” and then saved; stretching is performed five times.
The items displayed in the user profile in the “Add user” window are shown below.
(Table) Items displayed in the user profile
| Item | Required | Description |
|---|---|---|
| User Name*1*2*3 | Yes | The user name. You cannot register a user name that has already been registered. |
| E-mail*1 | Yes | E-mail address. You cannot register an e-mail address that has already been registered. |
| First Name | Yes | Given name |
| Last Name | Yes | Family name |
| Enabled | Yes | Enable/Disable status |
| OTP Configured | No | Enable/Disable the one-time code setting. When the checkbox is checked, the one-time code setting is enabled. For details on one-time code setting, see "Setting one-time code". |
| Company | No | Affiliated company name |
| Department | No | Affiliated department name |
| Address | No | Address |
| PhoneNumber1 | No | PhoneNumber1 |
| PhoneNumber2 | No | PhoneNumber2 |
| Memo | No | Free space |
| Customer | No | Enter the customer. For customer users, you must always enter the customer to which they belong. Clicking the  icon displays the "Customer" window where a customer can be selected. Entry is not required for anything other than customer users. |
| Timezone | Yes | Specify the time zone. |
- User name: system
E-mail address: system.opsi@example.com - User name: jp1cs_user
E-mail address: jp1cs.opsi@example.com
If the same user name or e-mail address as the deleted user is specified, you must select whether to inherit the user information. For details of the criteria under which inheritance occurs, see “Inheriting the OTOBO information of deleted users”.
(b) Related resources area
Assigning of roles and groups can be performed in the related resources area. Details in the related resources area tabs are shown below. For the assignment procedure, see "Assigning groups and roles".
(Table) Related resources area tabs (“Add user” window)
| Item | Description |
|---|---|
| Groups | Displays a list of groups to which the user belongs. The displayed columns are as follows.
|
| Assigned Roles | Displays a list of the roles assigned to the user. The displayed columns are as follows.
|
You can assign groups that the user belongs to and roles to the user as follows:
- In the related resources area, select the [Groups] or [Assigned Roles] tab.
- Depending on the selected tab, click the [Edit Groups] or [Edit Roles] button to open the assignment dialog box.
- From the list, select the checkboxes for the groups or roles to be assigned.
 Tips
- You can narrow down the information in the list by specifying conditions using the filter
 .
- In "Rows per page", you can change the number of groups or roles displayed per page. If the number of groups or roles exceeds the display limit, you can navigate between pages by clicking "<" or ">".
- You can narrow down the information in the list by specifying conditions using the filter
- Assigned groups or roles are displayed as green chips, as shown below.
Example:

To remove assigned groups or roles, click the "×" on the right side of the chip, or clear the checkbox.Tips
If the content displayed spans multiple lines, click the icon to view all assigned items.
- Click the [OK] button to close the dialog box.
(2) Viewing user details
Use the “User details” window to confirm and edit user profiles.
Clicking on a user name displayed in the user list will take you to the “User details” window. In the “User details” window, the user profile area and the related resources area are displayed separately, one above the other. Edit buttons are also provided in each area.
The types of operation buttons available in the user profile area are as follows.
(Table) Types of operation buttons in the user profile area
| Item | Description |
|---|---|
| Edit | Edits user profile information. After modifying the user information, click the [Save] button to change the user registration information. |
| Delete | Deletes a user. |
| Unlock | Unlocks a user. Becomes active only when the "Locked" checkbox is checked. |
Details in the related resources area tabs are shown below.
(Table) Related resources area tabs (“User details” window)
| Item | Description |
|---|---|
| Groups | Displays a list of groups to which the user belongs. The displayed columns are as follows.
|
| Assigned Roles | Displays a list of the roles assigned to the user. The displayed columns are as follows.
|
| Effective Roles | Displays effective roles. The displayed columns are as follows.
|
| Credentials | Confirm, initialize, and delete passwords for Ops I. If the user has a password set for Ops I, the date and time the password was created will be displayed. It is not displayed if a password is not set.
|
| Token | Issue and delete tokens for Ops I. The "Issue Token" button is displayed for users who have not yet issued an Ops I token, and an Ops I token can be issued. The date and time that the token was issued is displayed for users who have already been issued an Ops I token. In addition, the "Revoke Token" button is displayed, and the Ops I token can be revoked. For details, see "API reference overview" > "Prerequisite knowledge" > "Obtaining Ops I tokens" in "JP1 Cloud Service/Operations Integration API Reference". |
| IdP | Confirms and removes IdP linking. For users linked to an IdP, the information for the linked IdP will be displayed in a list. If the IdP is checked in the list and the "Unlink" button is clicked, the link between the IdP and the user will be removed. The displayed columns are as follows.
|
(3) Deleting users
Clicking the [Delete] button in the “User” window while a user is selected, or in the “User details” window, displays the deletion confirmation dialog box. Click “OK” to delete the user.
It takes around 2 minutes for the e-mail address information for the deleted user to be deleted. If you want to reuse the same email address, please wait a little while before doing so.
If the deleted user is a customer user or a user who has accessed OTOBO, the user, the resources created by the user, and related information will remain on OTOBO.
After deleting a user linked to an IdP, if the user linked to the IdP tries to log in to Ops I, an Ops I user must be created and linked again. For details, see “Log in/log out”.
(4) Editing users
In the User details window, the user profile area and the related resources area can each be edited.
(a) User profile area
Clicking the [Edit] button in the User details window allows you to edit the user profile information.
The items displayed in the user profile area are shown below. The same items as in the Add user window are displayed, with an additional “E-mail Verified” checkbox.
If the user is linked to an IdP, the information will be updated each time the user logs in due to the mapping settings of the IdP, so “The edited content may change depending on the settings of the IdP.” is shown in the “Edit” window. For details on IdP mapping, see “Mapping attributes/groups/roles”.
(Table) Items displayed in the user profile area in the “Edit user” window
| Item | Description |
|---|---|
| User Name | The user name cannot be changed. |
| E-mail address. You cannot register an e-mail address that has already been registered. | |
| First Name | Given name |
| Last Name | Family name |
| Enabled | Enable/Disable status |
| E-mail Verified | This is checked if the entered e-mail address is correct. If the e-mail address is changed and saved, an e-mail will be sent to the user prompting them to authenticate their e-mail address. If the instructions in the e-mail are followed, the e-mail will be automatically authenticated (checked). If the e-mail address has been authenticated, it can also be checked manually. |
| OTP Configured |
Enable/Disable the one-time code setting.
|
| Company | Affiliated company name |
| Department | Affiliated department name |
| Address | Address |
| PhoneNumber1 | PhoneNumber1 |
| PhoneNumber2 | PhoneNumber2 |
| Memo | Free space |
| Customer | Enter the customer. For customer users, you must always enter the customer to which they belong. Clicking the icon displays the "Customer" window where a customer can be selected. Entry is not required for anything other than customer users. |
| Timezone | Specify the time zone. |
If the e-mail address is changed to the same address as a deleted user and the user is designated as a customer, it may be necessary to select whether the user information is to be inherited. For details, see “Inheriting the OTOBO information of deleted users”.
(b) Related resources area
You can edit the groups and roles assigned to the user as follows.
For details about editing credentials, tokens, or IdPs, see “(Table) Related resources area tabs (“User details” window)”.
- In the related resources area, select the [Groups] or [Assigned Roles] tab.
- Depending on the selected tab, click the [Edit Groups] or [Edit Roles] button to open the assignment dialog box.
- From the list, select the checkboxes for the groups or roles to be newly assigned. To remove assigned groups or roles, clear the corresponding checkboxes or click the "×" on the right side of the chip.
Tips
- You can narrow down the information in the list by specifying conditions using the filter.
- In "Rows per page", you can change the number of groups or roles displayed per page. If the number of groups or roles exceeds the display limit, you can navigate between pages by clicking "<" or ">".
- You can narrow down the information in the list by specifying conditions using the filter
- Check the chips displayed at the top of the dialog box to confirm the assignment results. The meanings of the chip colors are as follows:
- Green: Newly added assignment
- Gray: Existing assignment
- Red: Removed existing assignment (to cancel the removal, click the "+" on the right side.)

Tips
If the content displayed spans multiple lines, click the icon to view all assigned items. - Clicking the [Save] button closes the dialog box and saves and applies the changes.
(5) Inheriting the OTOBO information of deleted users
Even if a customer user or a user who has accessed OTOBO is deleted from Ops I, the relationship between that user and the resources created by that user will not be deleted and will remain on OTOBO as a user who existed in the past. Therefore, when adding a new user or editing an existing user, if the same user name or e-mail address as the deleted user is set, you must select whether or not the information of the deleted user should be inherited. In addition, if the “Customer” designation is repeatedly assigned and removed for the same user, a screen is displayed prompting you to select whether to inherit the user information.
If the user information is to be inherited, you can confirm the tickets created by that user prior to deletion in the Ticket tab for the task or request application.
This can be useful if someone who used a deleted user starts using Ops I again with the same user name. On the other hand, if a different person from the one who used the deleted user uses Ops I, there is no need to inherit the user information.
If the user information is not inherited, the user name and e-mail address of the deleted user will need to be changed according to the following procedure. In this case, the user name and e-mail address on the tickets associated with the deleted user will also be automatically replaced with the changed content.
If the following case applies, a window will appear to select whether to inherit the user information. If not inherited, a window will appear to change the information for the deleted user who would be the source of the information.
(Table) Cases in which information can be inherited
| Case | Criteria | Duplication with the user who is the source of the information | When information is not inherited | |
|---|---|---|---|---|
| User name | ||||
|
The deleted user is not a customer user | Yes | Ignored | Change the user name of a deleted user: Window A→Window E |
|
The deleted user is a customer user of an arbitrary customer | Yes | No | Change the user name of a deleted user: Window A→Window E |
| No | Yes | Change the deleted user's e-mail address: Window B→Window F |
||
| Yes | Yes | Change the deleted user's user name and e-mail address: Window C→Window G If the user name and e-mail address each overlap with a different deleted user, you can choose to inherit the information of either user, or not inherit either user's information, and change the information of the user whose information is not inherited: Window D→Window E or Window F or Window H |
||
|
When removing the "Customer" designation multiple times for the same user (designation → removal → re-designation → re-removal, or no designation → designation → removal) | Yes | Ignored | Change the deleted user's user name: Window A→Window E |
|
When "Customer" is designated multiple times for the same user (designation → removal → re-designation) | Yes | Ignored | Change the deleted user's user name: Window A→Window E |
After selecting an option in the “Selection” window and “Change” window, or entering the required information, “Next” or “OK” will be activated.
[Selection window details]
(Figure) Window A: When the user names overlap
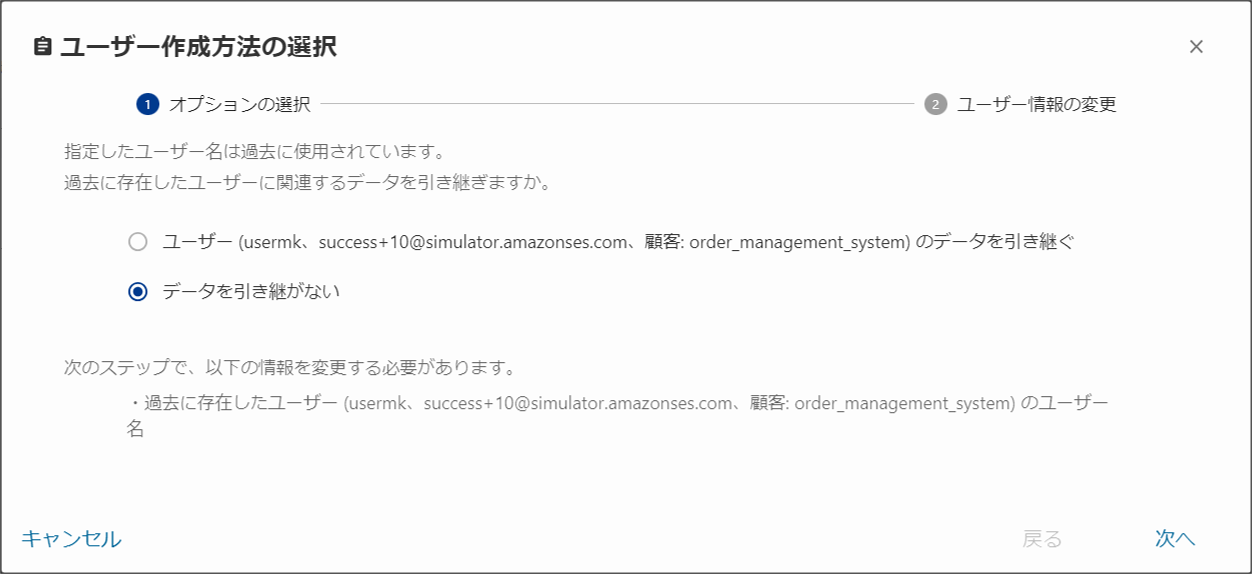
If the user name is the same as that of the deleted user, select whether to inherit the user information and click [Next].
- Inherit user data: The user data is inherited. In this case, the e-mail address of the deleted user will automatically be replaced with the e-mail address of the inheriting user.
- Not inherit data: Go to Window E
(Figure) Window B: When the e-mail addresses overlap
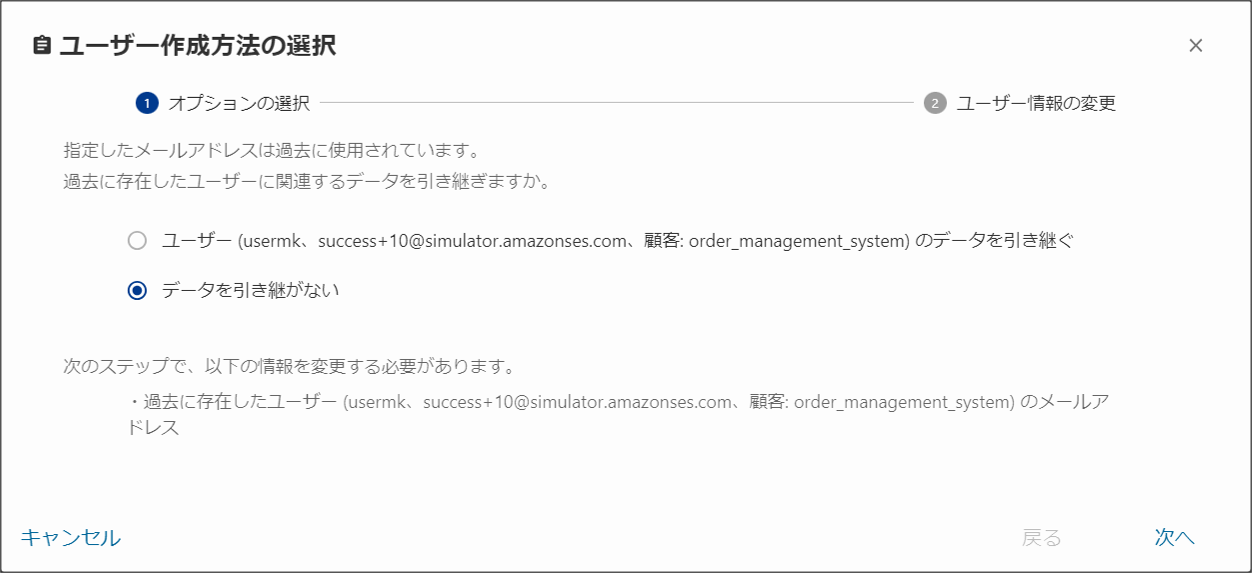
If it is a customer user and the e-mail address is the same as that of the deleted user, select whether to inherit the user information and click [Next].
- Inherit user data: The user data is inherited. In this case, the user name of the deleted user will automatically be replaced with the user name of the inheriting user.
- Not inherit data: Go to Window F.
(Figure) Window C: When both user names and e-mail addresses overlap
(Both the user name and e-mail address are the same as those of the same deleted user)
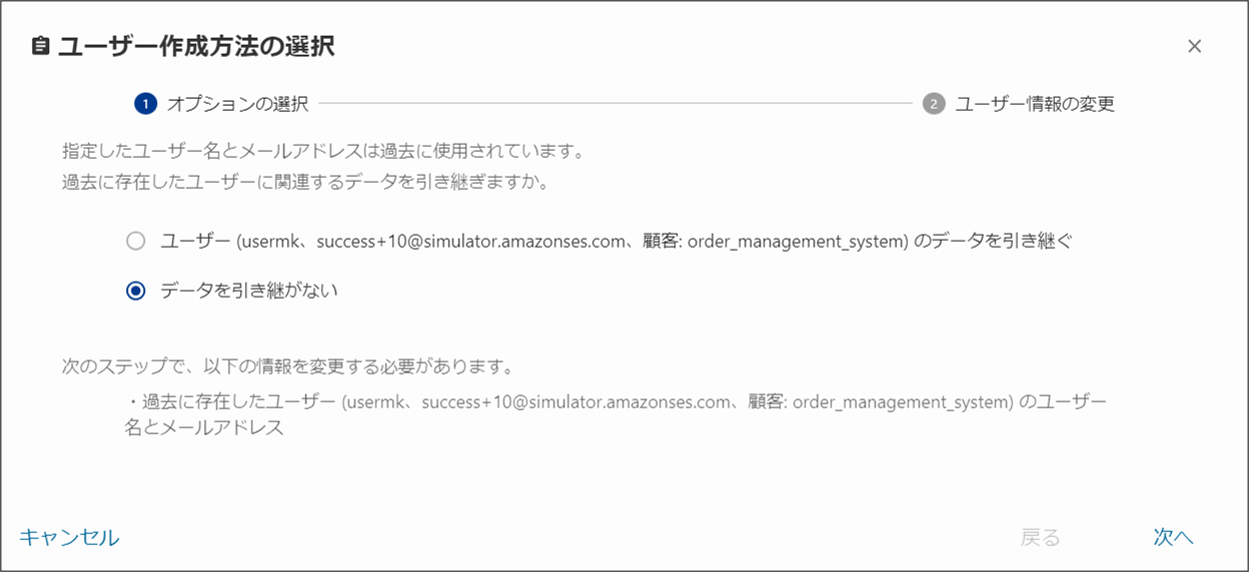
When registering as a customer user, if both the user name and e-mail address are the same as those of a deleted user, select whether to inherit the user information and click [Next].
- Inherit user data: The user data is inherited.
- Not inherit data: Go to Window G.
(Figure) Window D: When both user names and e-mail addresses overlap
(The user name and e-mail address are the same as those of separate deleted users)
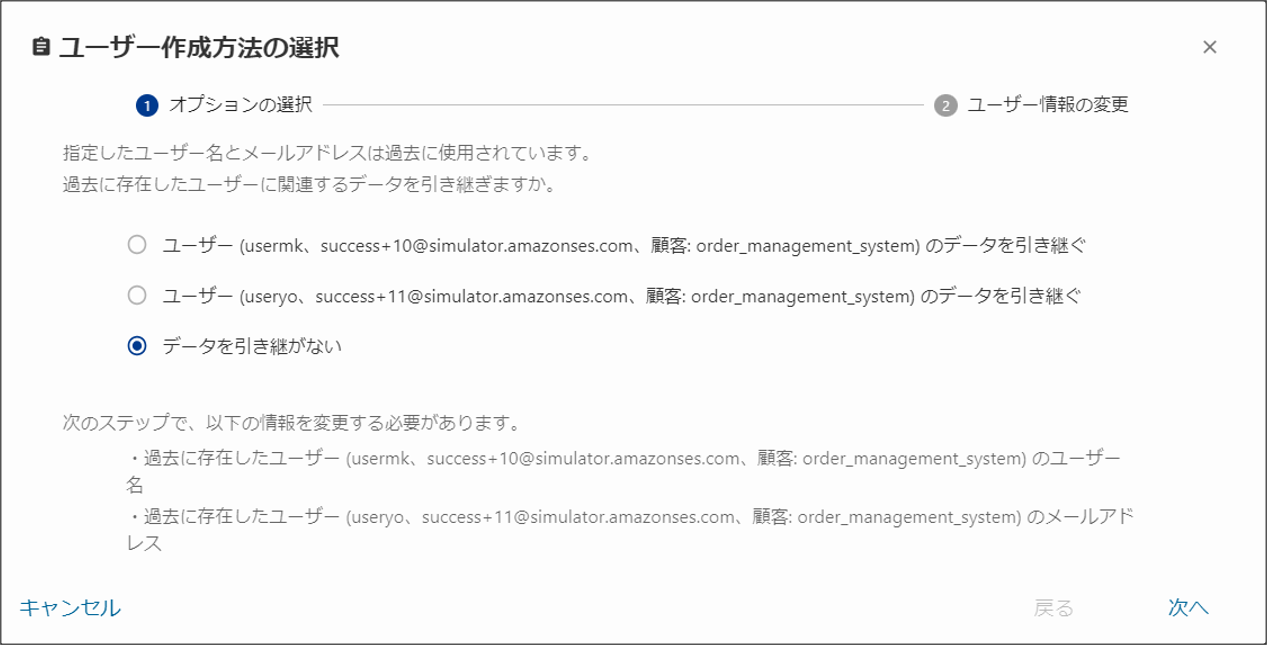
When registering as a customer user, if both the user name and e-mail address are the same as those of separate deleted users, select whether to inherit the user information and click [Next].
- Inherit user (same user name) data:
User information is inherited from the user with the same user name. In this case, the e-mail address of the deleted user who is the source of the information will automatically be replaced with the e-mail address of the inheriting user.
Also, you will be taken to Window F to change the e-mail address of the deleted user with the same e-mail address. - Inherit user (same e-mail address) data:
User information is inherited from the user with the same e-mail address. In this case, the user name of the deleted user who is the source of the information will automatically be replaced with the user name of the inheriting user.
Also, you will be taken to Window E to change the user name of the deleted user with the same user name. - Not inherit data: Go to Window H.
[Change window details]
(Figure) Window E: Change user name
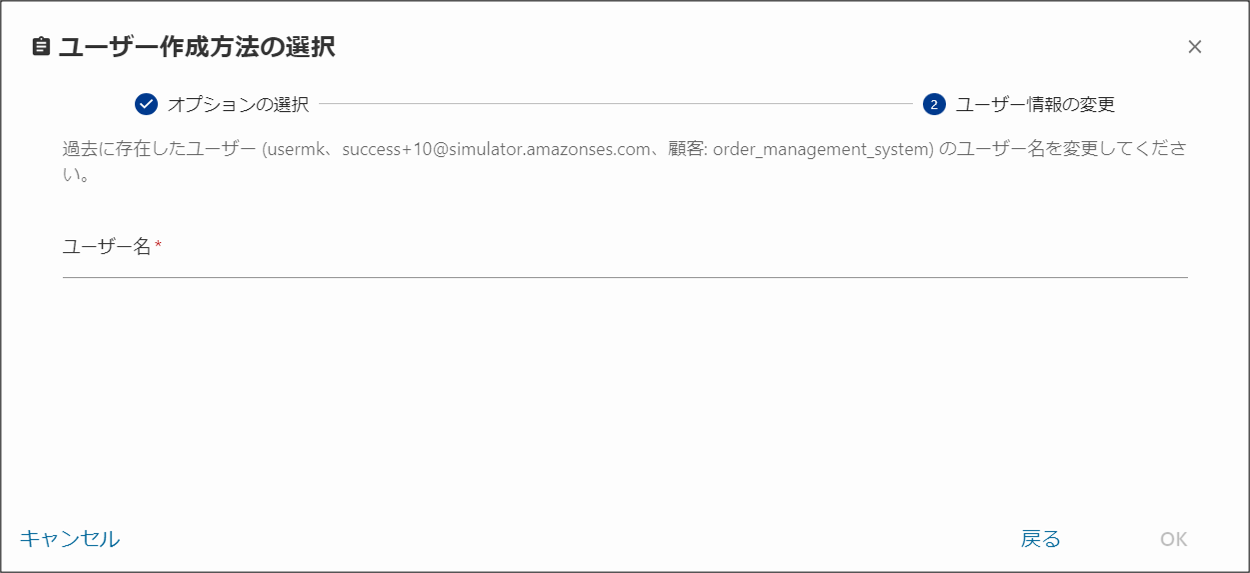
Change the user name of the deleted user. Enter the preferred user name and click “OK”.
(Figure) Window F: Change e-mail address
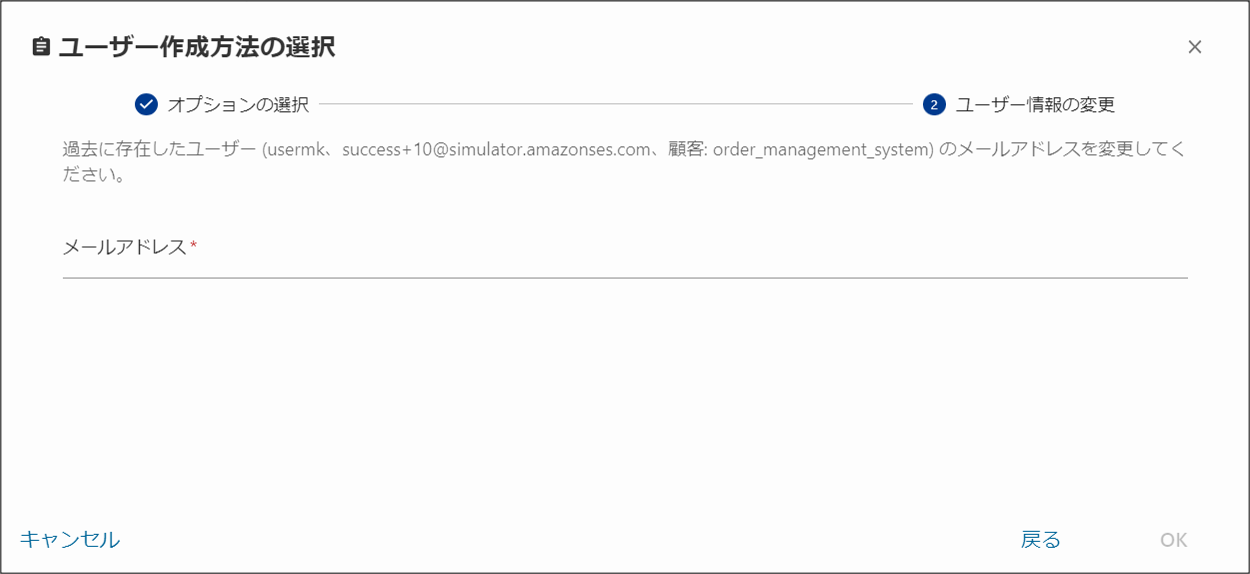
Change the deleted user’s e-mail address. Enter the preferred e-mail address and click “OK”.
(Figure) Window G: Change user name and e-mail address
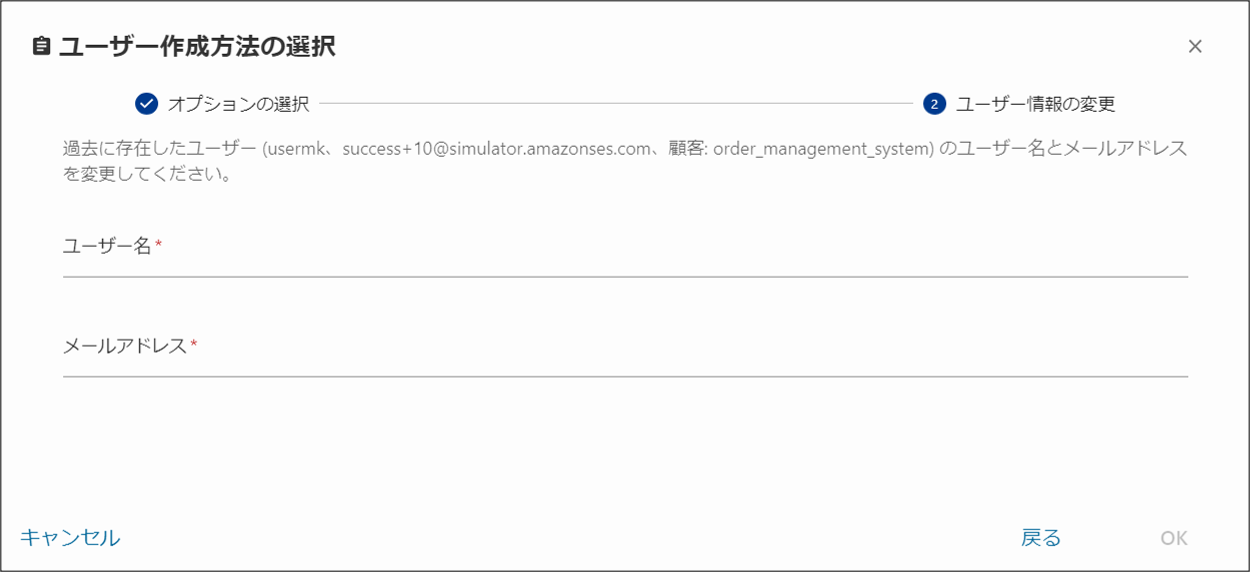
Changes the user name and e-mail address of a deleted user. Enter the preferred user name and e-mail address, and click “OK”.
(Figure) Window H: Change user name and e-mail address
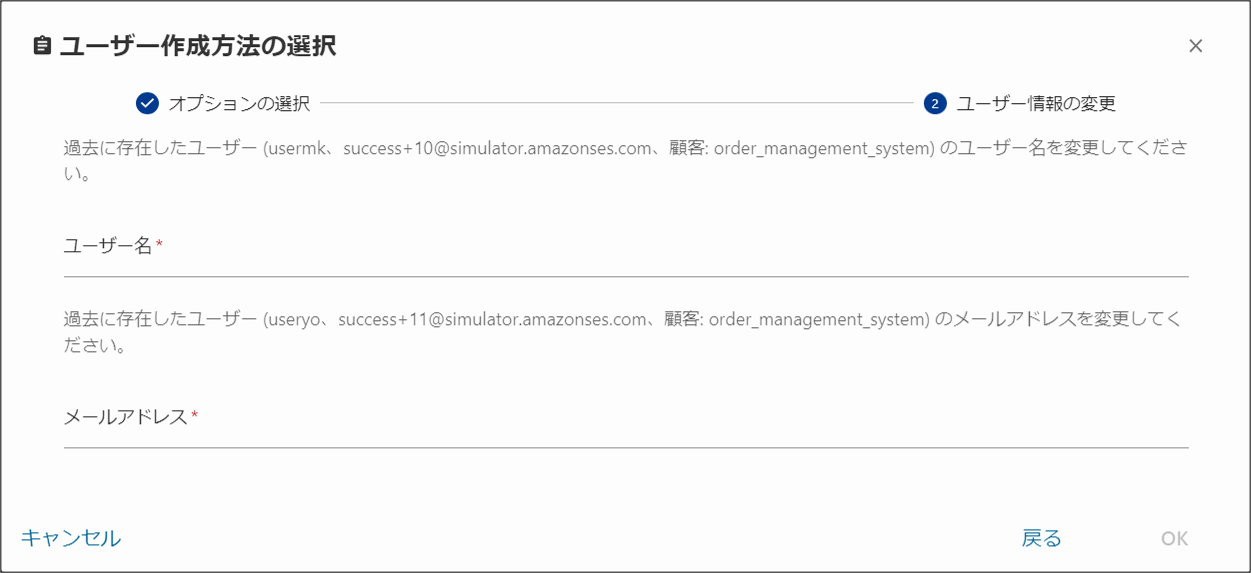
Changes the user name and e-mail address of a deleted user. Enter the preferred user name and e-mail address, and click “OK”.
Tips- For information on the characters that can be used in user names and e-mail addresses, and restrictions on the number of characters that can be used, see "Notes on characters that can be entered".
- Customer users deleted on Ops I or users who have accessed OTOBO will not be deleted on OTOBO and will become disabled users. As no e-mails will be sent to disabled user e-mail addresses, there are no restrictions on the e-mail addresses of deleted users after they have been changed, and it is acceptable to specify fake e-mail addresses as long as they are in the correct format.
- Even if the user name and e-mail address are fake, the information will be stored in OTOBO as a disabled user, so it will be eligible in cases where inheriting information is possible.
- If "Not inherit data" is selected in the window for selecting whether to inherit user information, and the deleted user name or e-mail address is specified, an error will occur and you will be taken back to the previous window.
Even when creating a user via IdP linking, if the user name or e-mail address of the deleted user is the same as that of a user of the IdP, the system will automatically determine whether to inherit the user information in accordance with the “User Data Reuse Policy” settings. For details, see “User data reuse policy”.