4.5.4 Customizing the workflow window
On the Workflow tab of the task and request applications, you can view a list of workflows. By default, the workflow list displays columns, such as [Context ID] and [Assignee] to show the details of each workflow.
In the Workflow list window, you can add columns, such as project name and due date. Column values can be edited in the Workflow details window and other windows.
Furthermore, in the Workflow list window, you can change label names (column display names), hide or show columns, and reorder them. This helps organize the information required for workflow management and is expected to improve the efficiency of administrative tasks.
To implement these customizations, edit the files in the “apps” repository. For details about the “apps” repository, see “Customizing the default YAML files”. For details about the Workflow list window, see “Workflow”.
(1) Adding columns to the workflow list
Additional columns are available for display but are disabled by default.
This section explains the columns you can add and the YAML files you need to edit.
(Table) Additional columns available for display
| Column name | Data format | Column display name* | Example | |
|---|---|---|---|---|
| Japanese | English | |||
| description | String varchar(256) |
Description | Description | Description of the purpose and application details |
| category | String varchar(256) |
Category | Category | Project name (e.g., Project A or Project B) |
| due_date | Date and time information timestamptz |
Due date | Due Date | 2025-10-27 11:21:09 +09:00 |
| note_1 | String varchar(4096) |
Remarks | Note | Work host name |
| note_2 | String varchar(4096) |
Remarks 2 | Note 2 | - |
| note_2 | String varchar(4096) |
Remarks 3 | Note 3 | - |
You can configure the columns to be added to the workflow lists for the task and request applications in the following YAML files, as shown in the table below.
(Table) YAML files to edit and where to change
| YAML file | Location | |
|---|---|---|
| Workflow list window of the request application | ||
apps/ui/workflow_list_request
|
Under "workflow_filter_table.columns" | |
| Workflow list window for the task application | ||
apps/ui/workflow_list_task
|
Under "workflow_filter_table.columns" | |
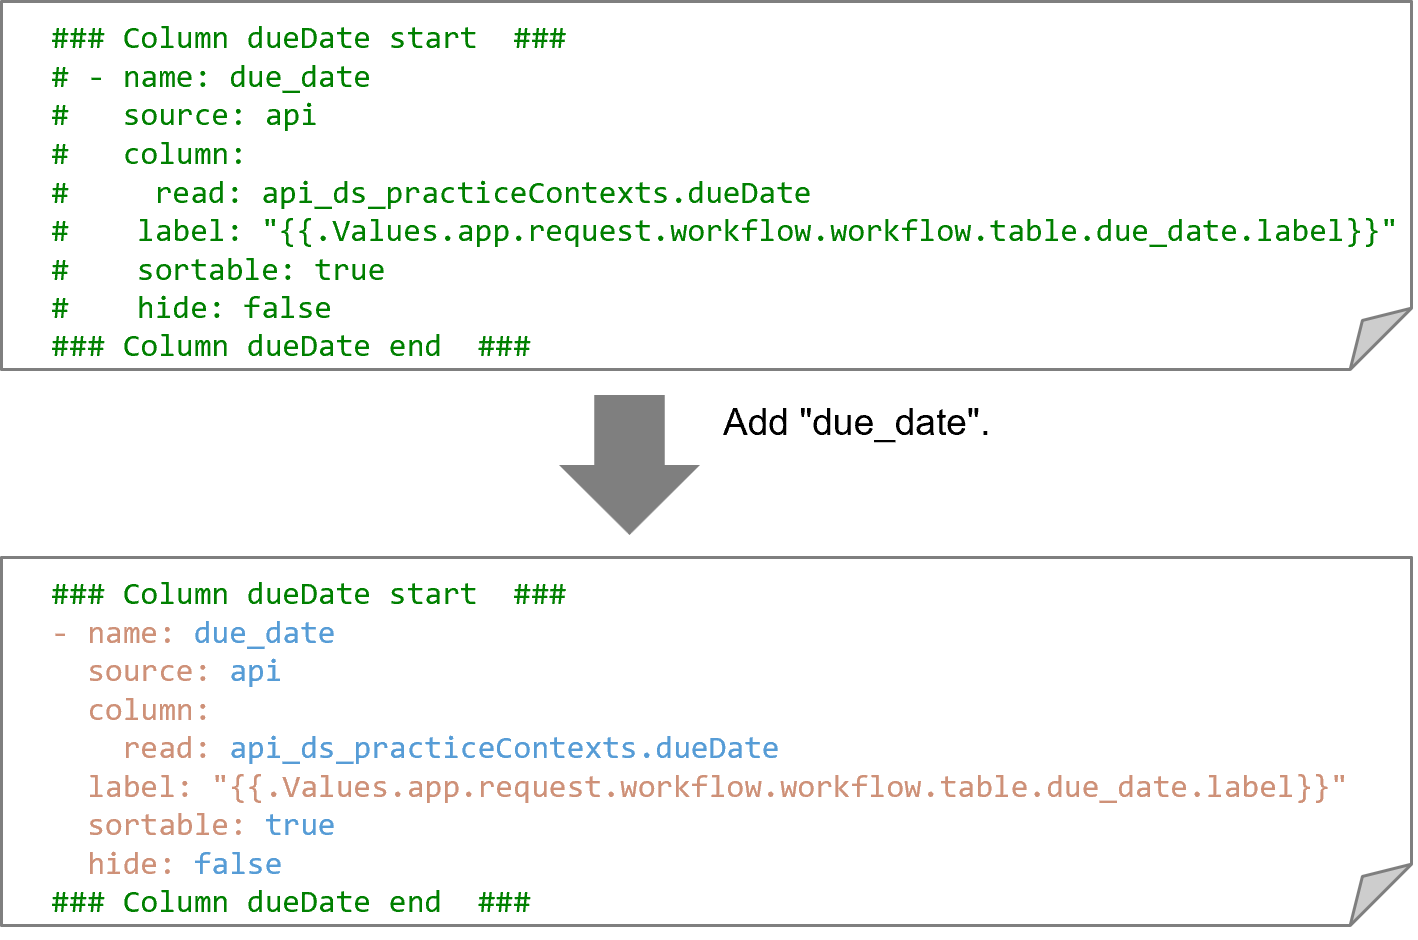
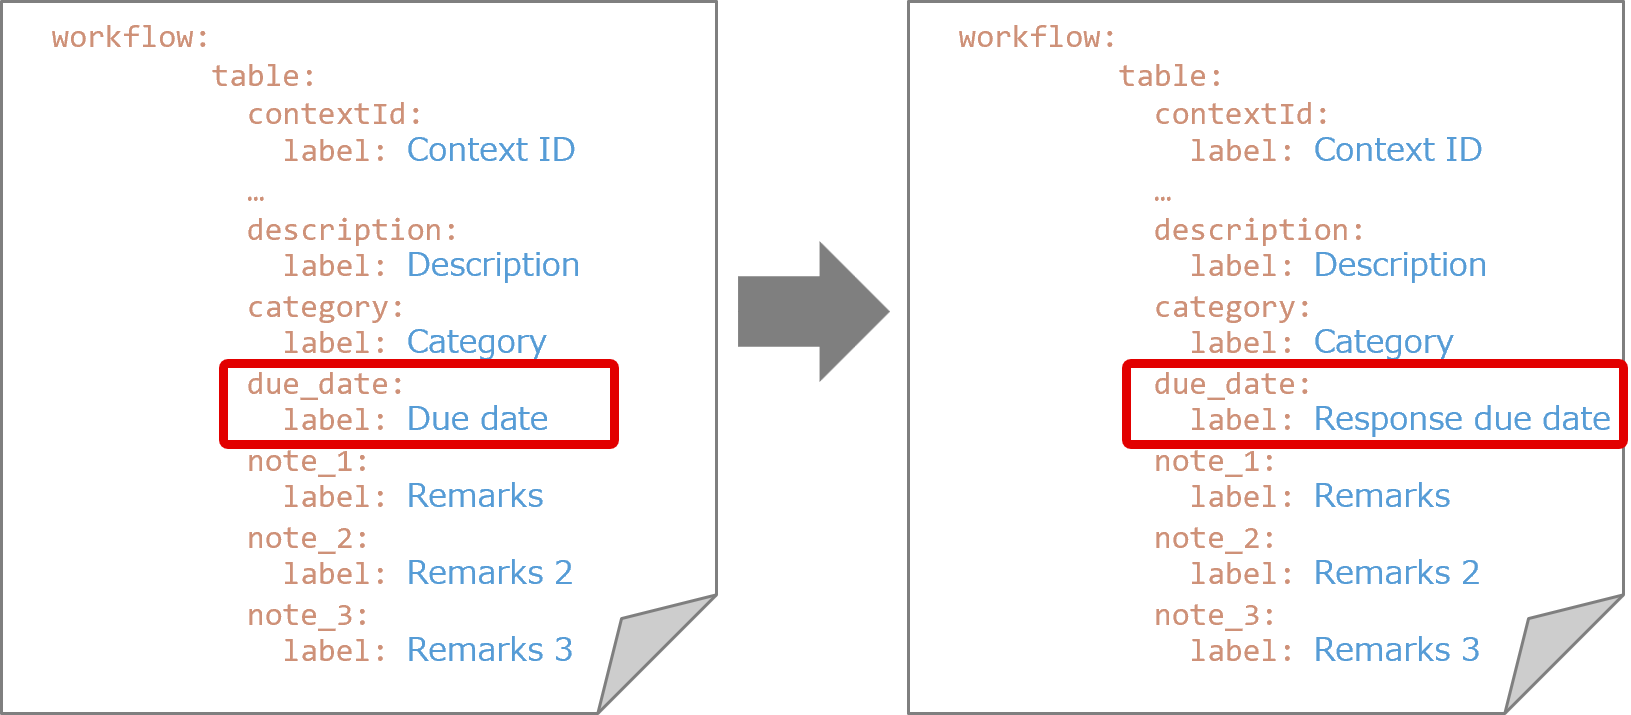
[Example of adding a column]
To add a column, enable the target column.
 Tips
Columns added to the Workflow list window can be sorted and filtered just like existing columns.
(2) Adding fields to the Workflow details window
After adding a column to the Workflow list window, add the corresponding form field to the Workflow details window. This allows you to edit values in the Workflow details window.
- Files to edit: The UI YAML files specified in each workflow's tasks
- Component to edit: Form
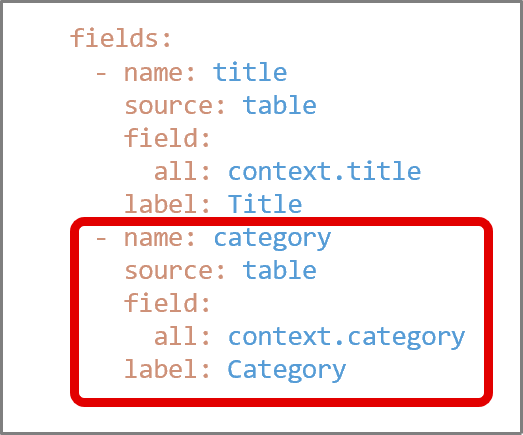
- Edits: Add a new element to the "fields" list of the form following the format shown in the table below.
(Table) Form’s fields list settings
Item Setting description name Optional source Specify "table". field.all Specify "context.column_name". label Optional (Figure) Example of adding the “Category” field
(3) Editing column values
There are three ways to edit column values:
- Editing from the Workflow details window
① Open the Workflow list window.② Click the [Context ID] of the workflow whose column values you want to edit.③ Edit the value of the column you want to modify.④ Click the [Save] or [Accept] button to save the value. - Editing from a custom script defined in an "action" label
① Use "OIForm.setFieldValue()" to enter the value for the column added in (2).② Click the [Save] or [Accept] button to save the value. - Executing the API from a custom script defined in the "action" label
Use "OIApi.call()" to execute the "PATCH /api/practice-contexts/{id} API" and apply the values.
For details about the API request body, see "dtos.PartialUpdatePracticeContextRequestDTO" under "Detailed API reference information > Standard API functions > Schemas" in the "JP1 Cloud Service/Operations Integration API Reference".
Tips
- If you want to change column values for each workflow step, do so by using a custom script.
- If you want to set the initial value for a field, do so by using a custom script.
[Setting field initial values when starting a workflow]
Using the API, you can start a workflow and set up initial values sequentially. The steps are outlined below:
(4) Changing columns in the workflow list
You can use the toggle buttons to show or hide the columns displayed in the Workflow list window. For details, see “Basic window structure”.
Additionally, in the Workflow list window, you can reorder the columns by dragging and dropping them. These settings are saved in your browser and will be retained the next time you view the window. For details, see “Saving a table display”.
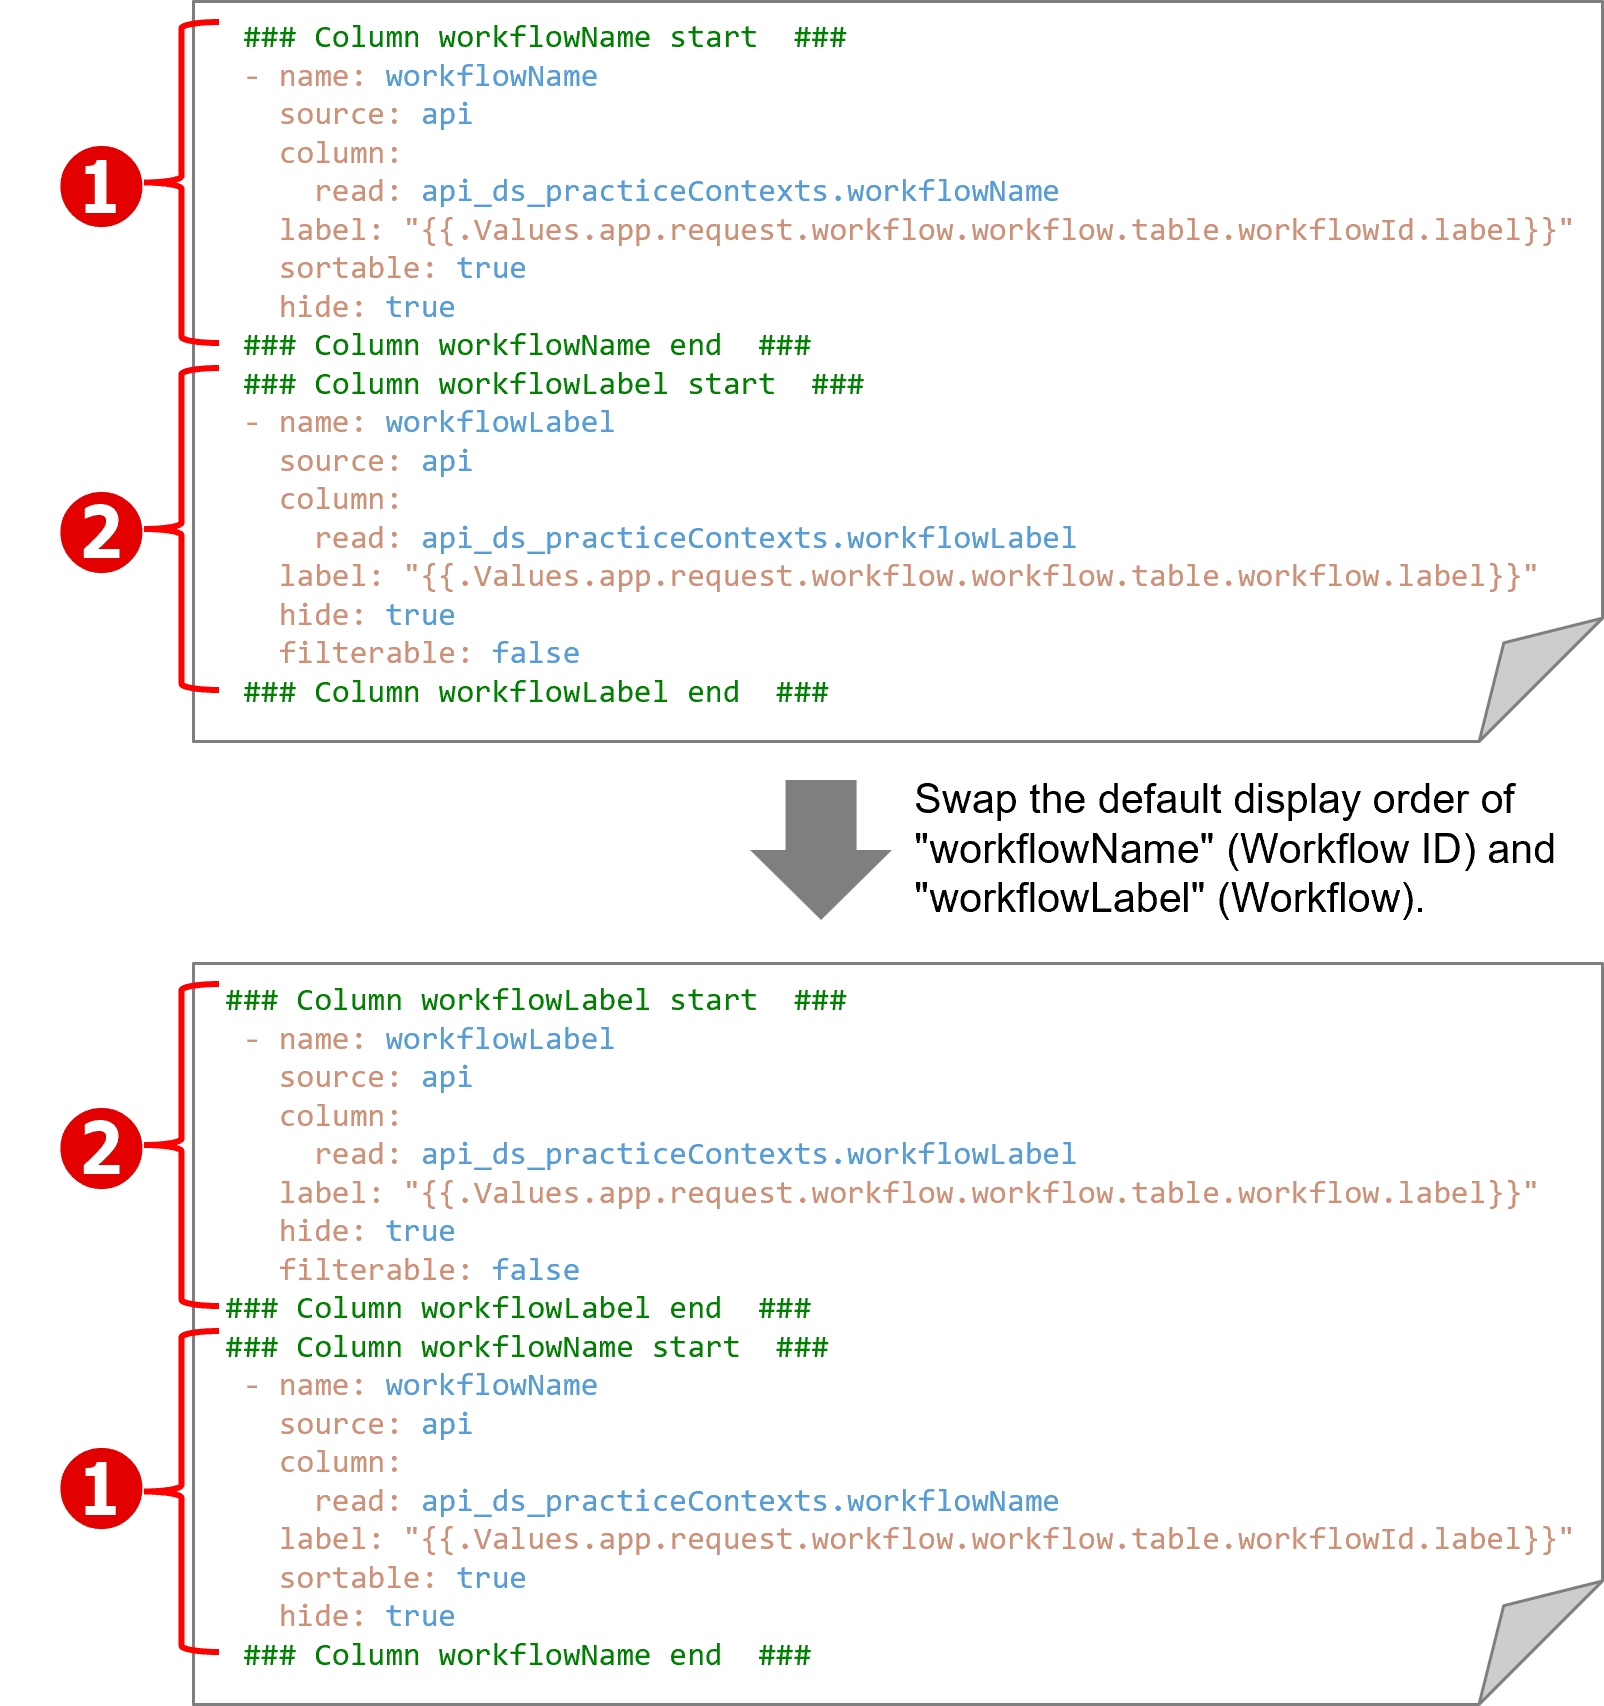
If you do not want a column to appear in the list options, or if you want to change the default display order of a column, edit the YAML file.
For details about the file to edit and the specific changes to make, see manifest.yaml in “(Table) YAML files to edit and where to change”.
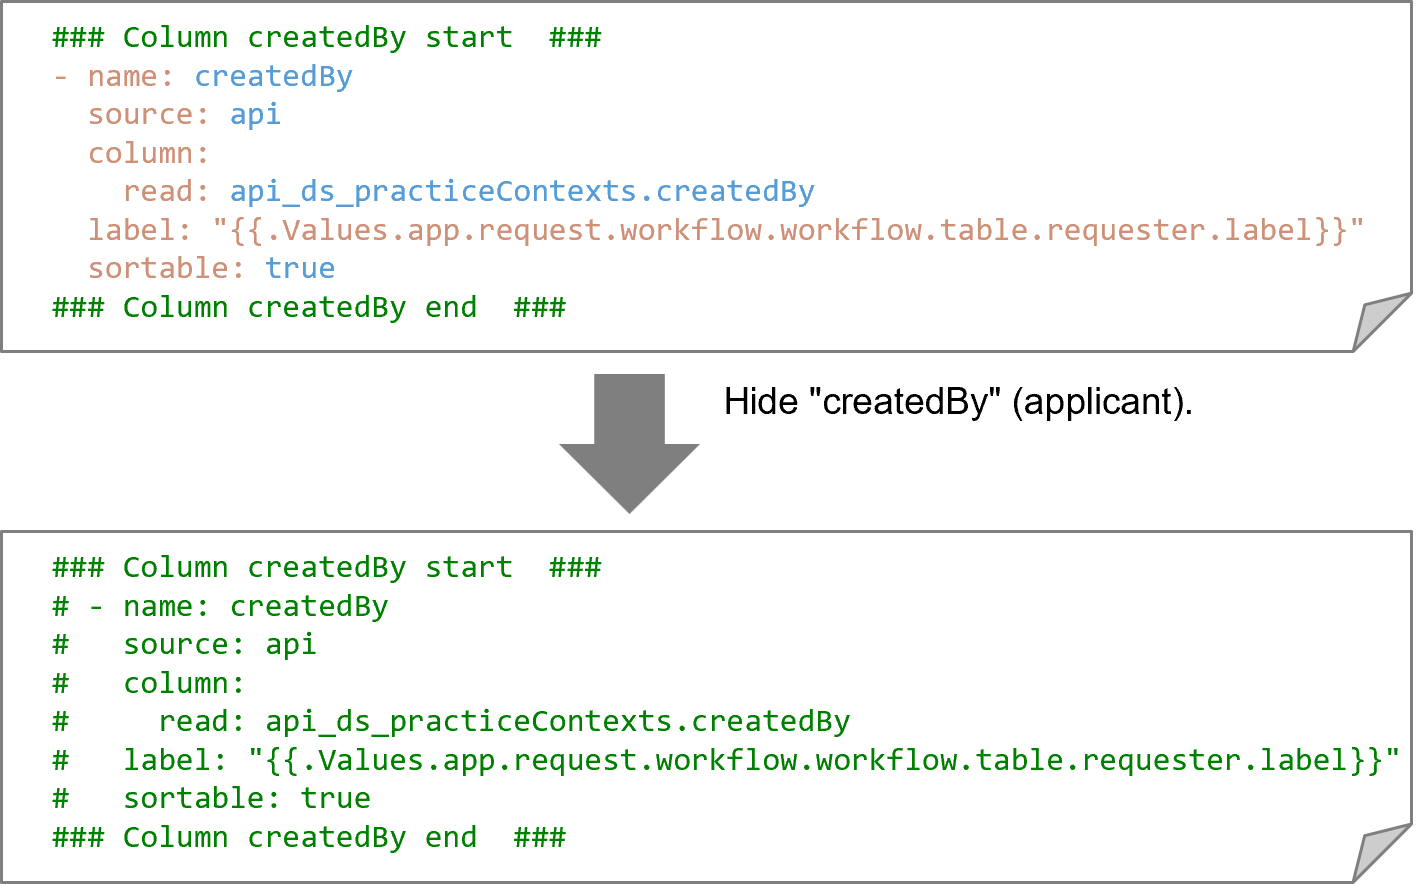
[When you do not want to display a column]
To hide a column, comment it out as shown below.
 Notes
Do not comment out the "Context ID" (the column where "properties.columns.name" is "id"). If you hide the "Context ID", you will not be able to navigate to the Workflow details window.
[When you want to change the default display order of columns]
In the YAML file, each column is defined as a single block within the range from “### Column column_display_name start ###” to “### Column column_display_name end ###”. To change the default display order of columns, cut out the block containing the column whose order you want to change and paste it at the desired position.
(Figure) Rearranging the default display order of columns
TipsYou can also customize the following settings by editing the YAML file.
- To make the columns available only as options in the Workflow list window and hide them by default, change the value of "hide" in the YAML file to "true".
- To change the display name of an existing column in the Workflow list window, modify the display name (label) in values.yaml, just as you would for a new column.