2.5 Setting a relay server
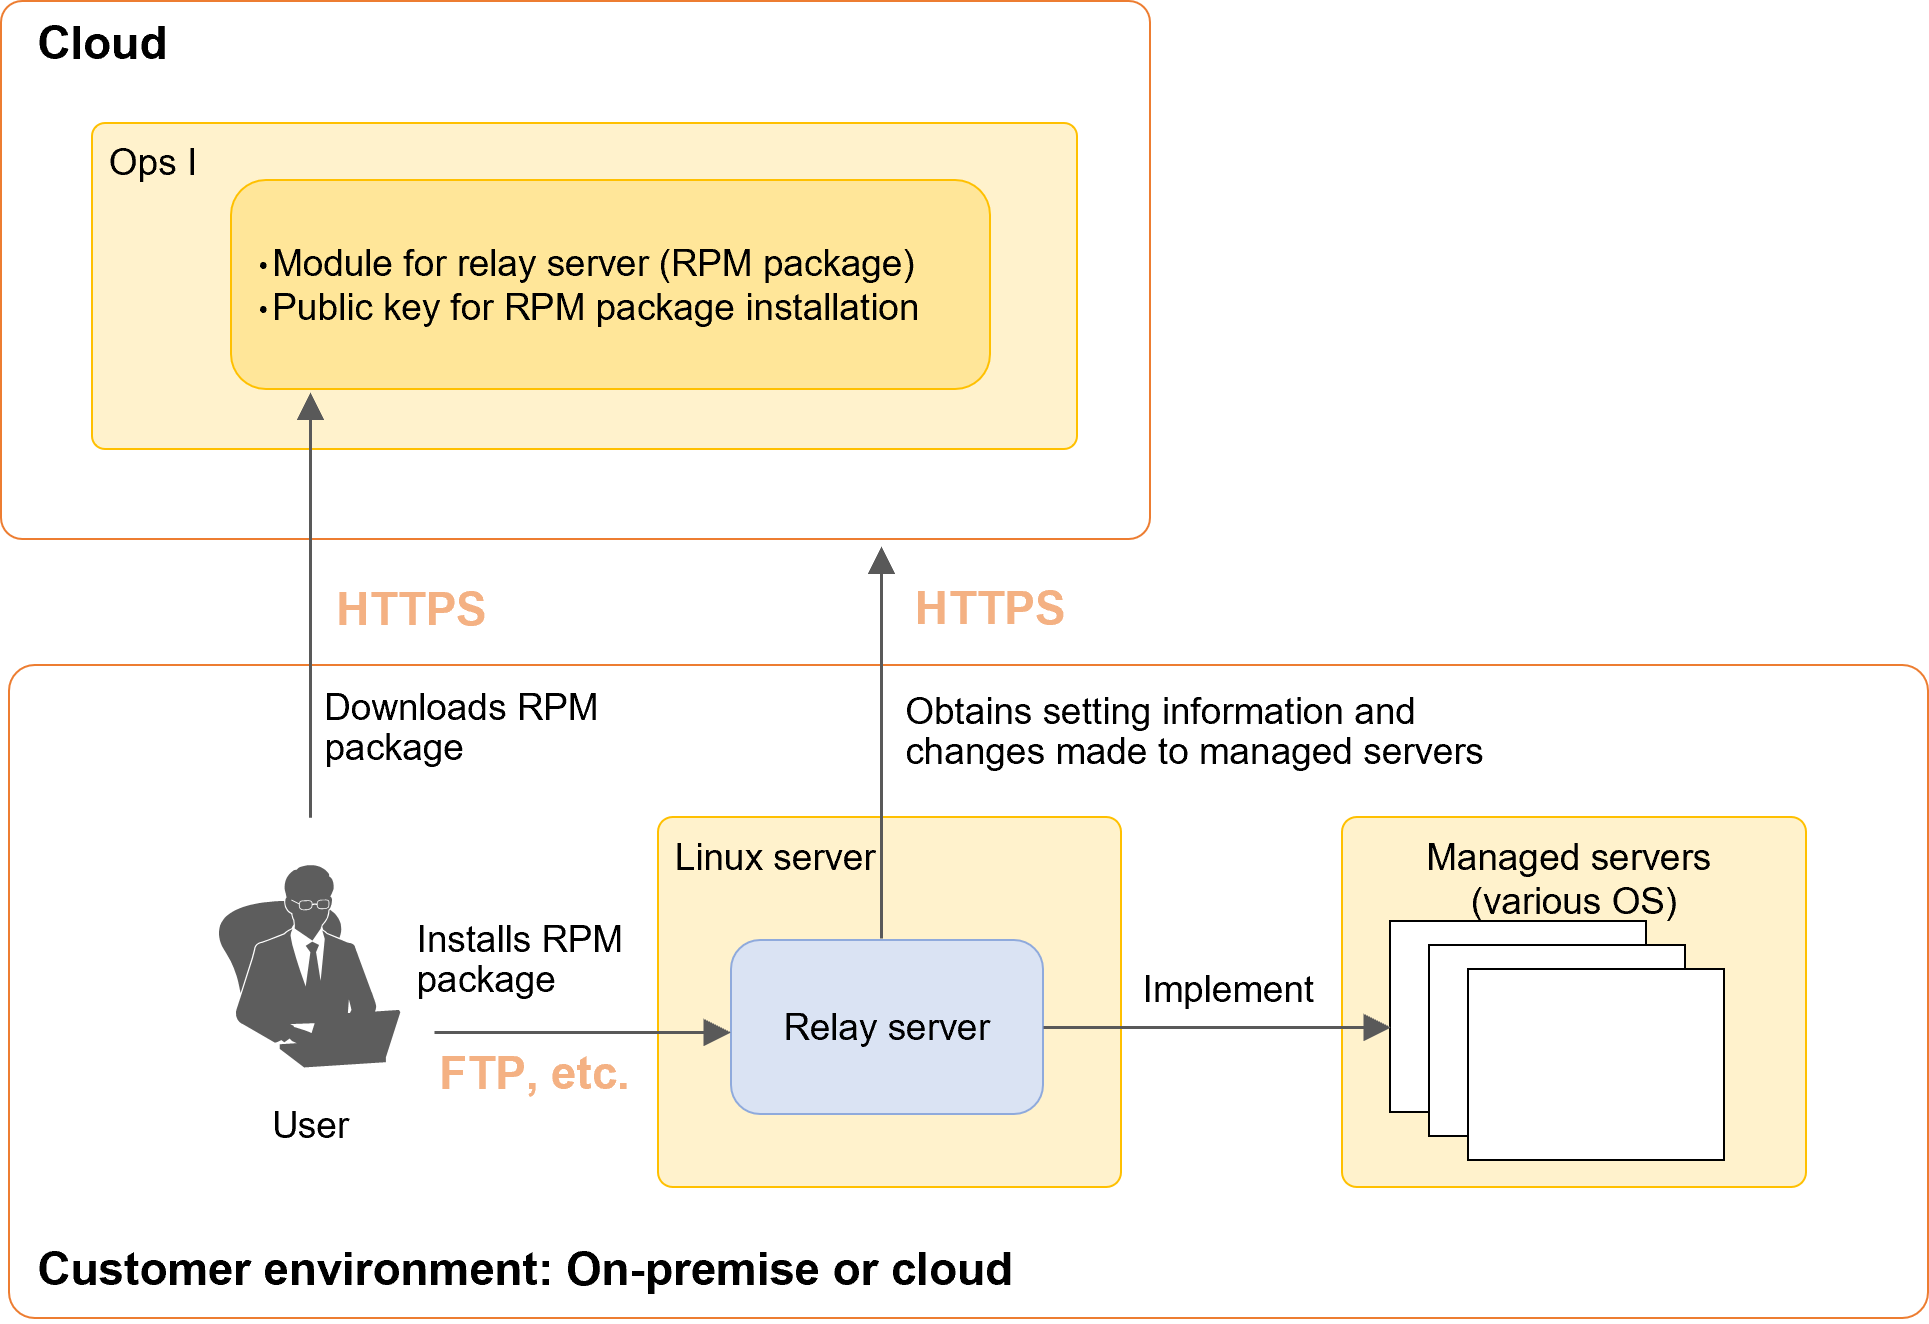
By using a relay server, Ops I operations can be performed in a hybrid cloud to leverage the advantages of cloud and on-premise environments. This section describes the procedure for setting a relay server.
Setting the relay server function “outpost” allows the automation application (AWX) jobs to be performed from an on-premise environment.
Communications between Ops I and relay servers are encrypted with TLS and SSH. In addition, communications between relay servers and managed servers are encrypted with TLS or SSH.
(Figure) System configuration of relay server
(1) Components of relay server function “outpost”
Outpost consists of the following components.
(Table) Configuration of outpost
| Component | Outline |
|---|---|
| Control plane |
|
| Agent |
|
| Node |
|
| Node group |
|
| IP block |
|
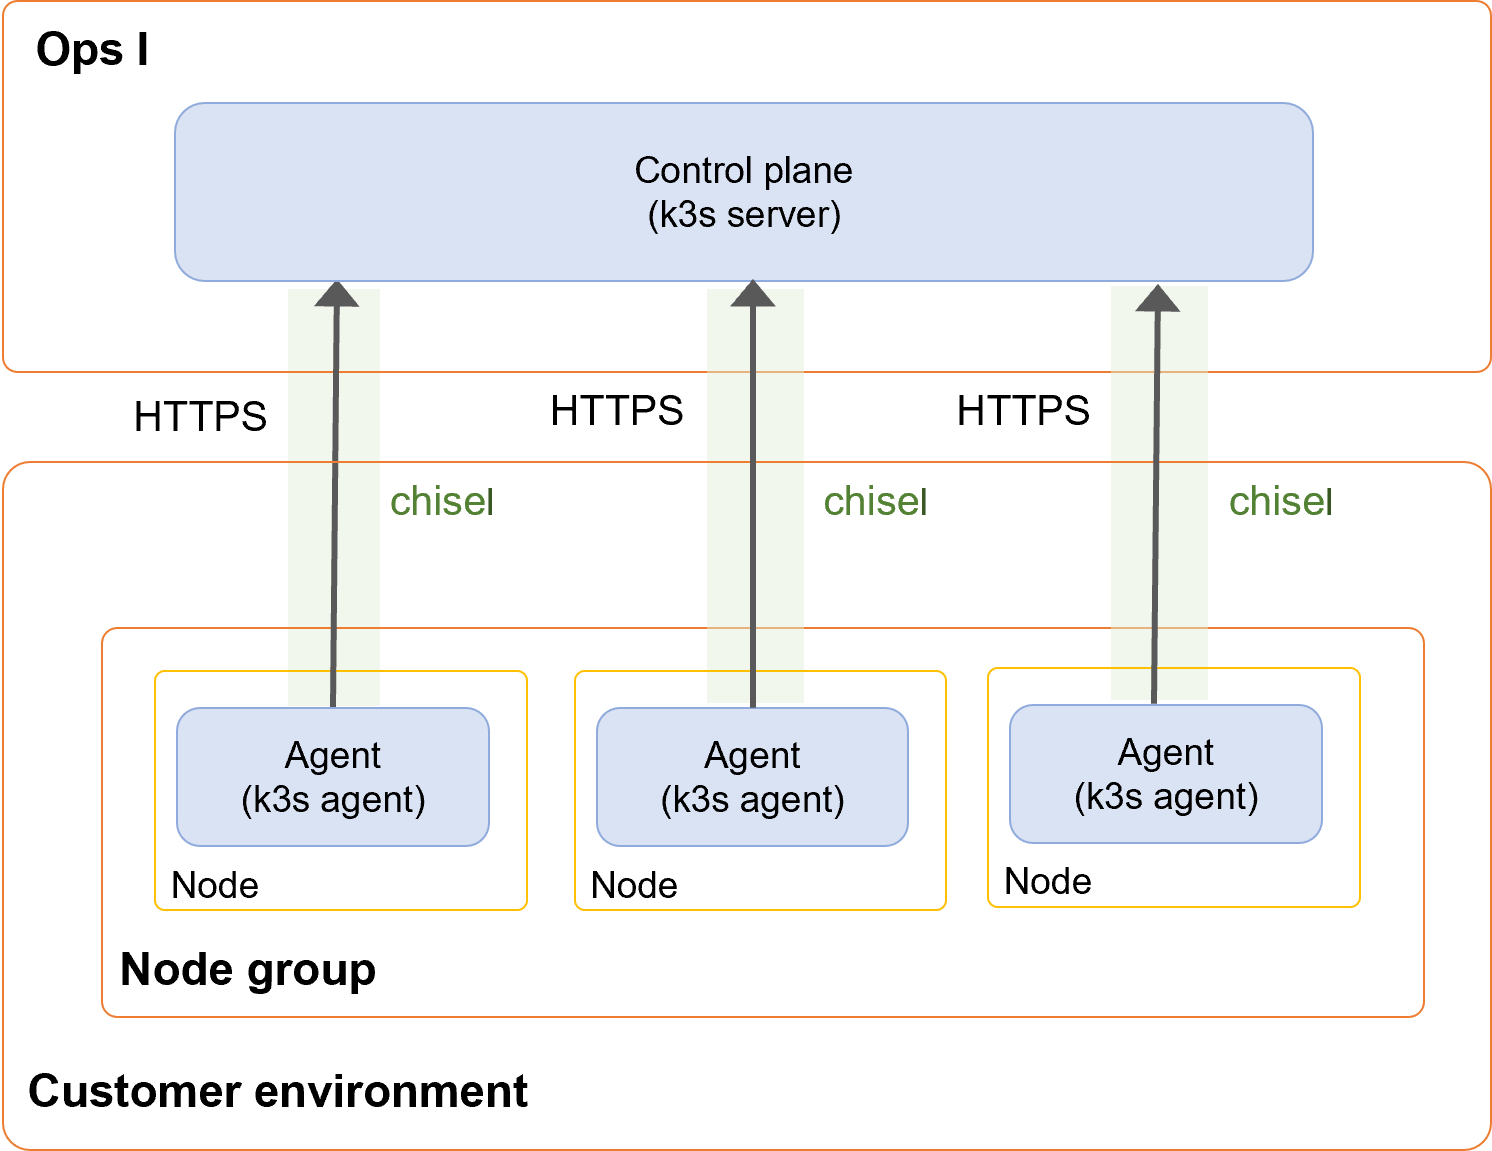
The following functions are used to connect Ops I (cloud) and relay servers (on-premises).
(Figure) Configuration of outpost
(2) Flow of configuring outpost
The flow consists of the following Steps ① to ⑦.
Steps ① to ④ are performed in Ops I and Steps ⑤ to ⑦ are performed in the relay server.
[Setting in Ops I]
① Setting up users and assigning roles
Use a user dedicated for the outpost configuration (recommended) or an existing user assigned the Pre-Installed role "Outpost".
The Primitive role "automation_manager" or "automation_auditor" must also be assigned to watch Ops I outpost management and download the RPM package.
For information on creating users, see "Users". For information on assigning roles, see "Roles".
② Obtaining Ops I tokens
The issued Ops I token will not be able to be viewed once you move to another window. Keep a note of the Ops I token.
For details, see "API reference overview" > "Prerequisite knowledge" > "Obtaining Ops I tokens" in "JP1 Cloud Service/Operations Integration API Reference".
③ Checking control plane information
④ Downloading RPM package
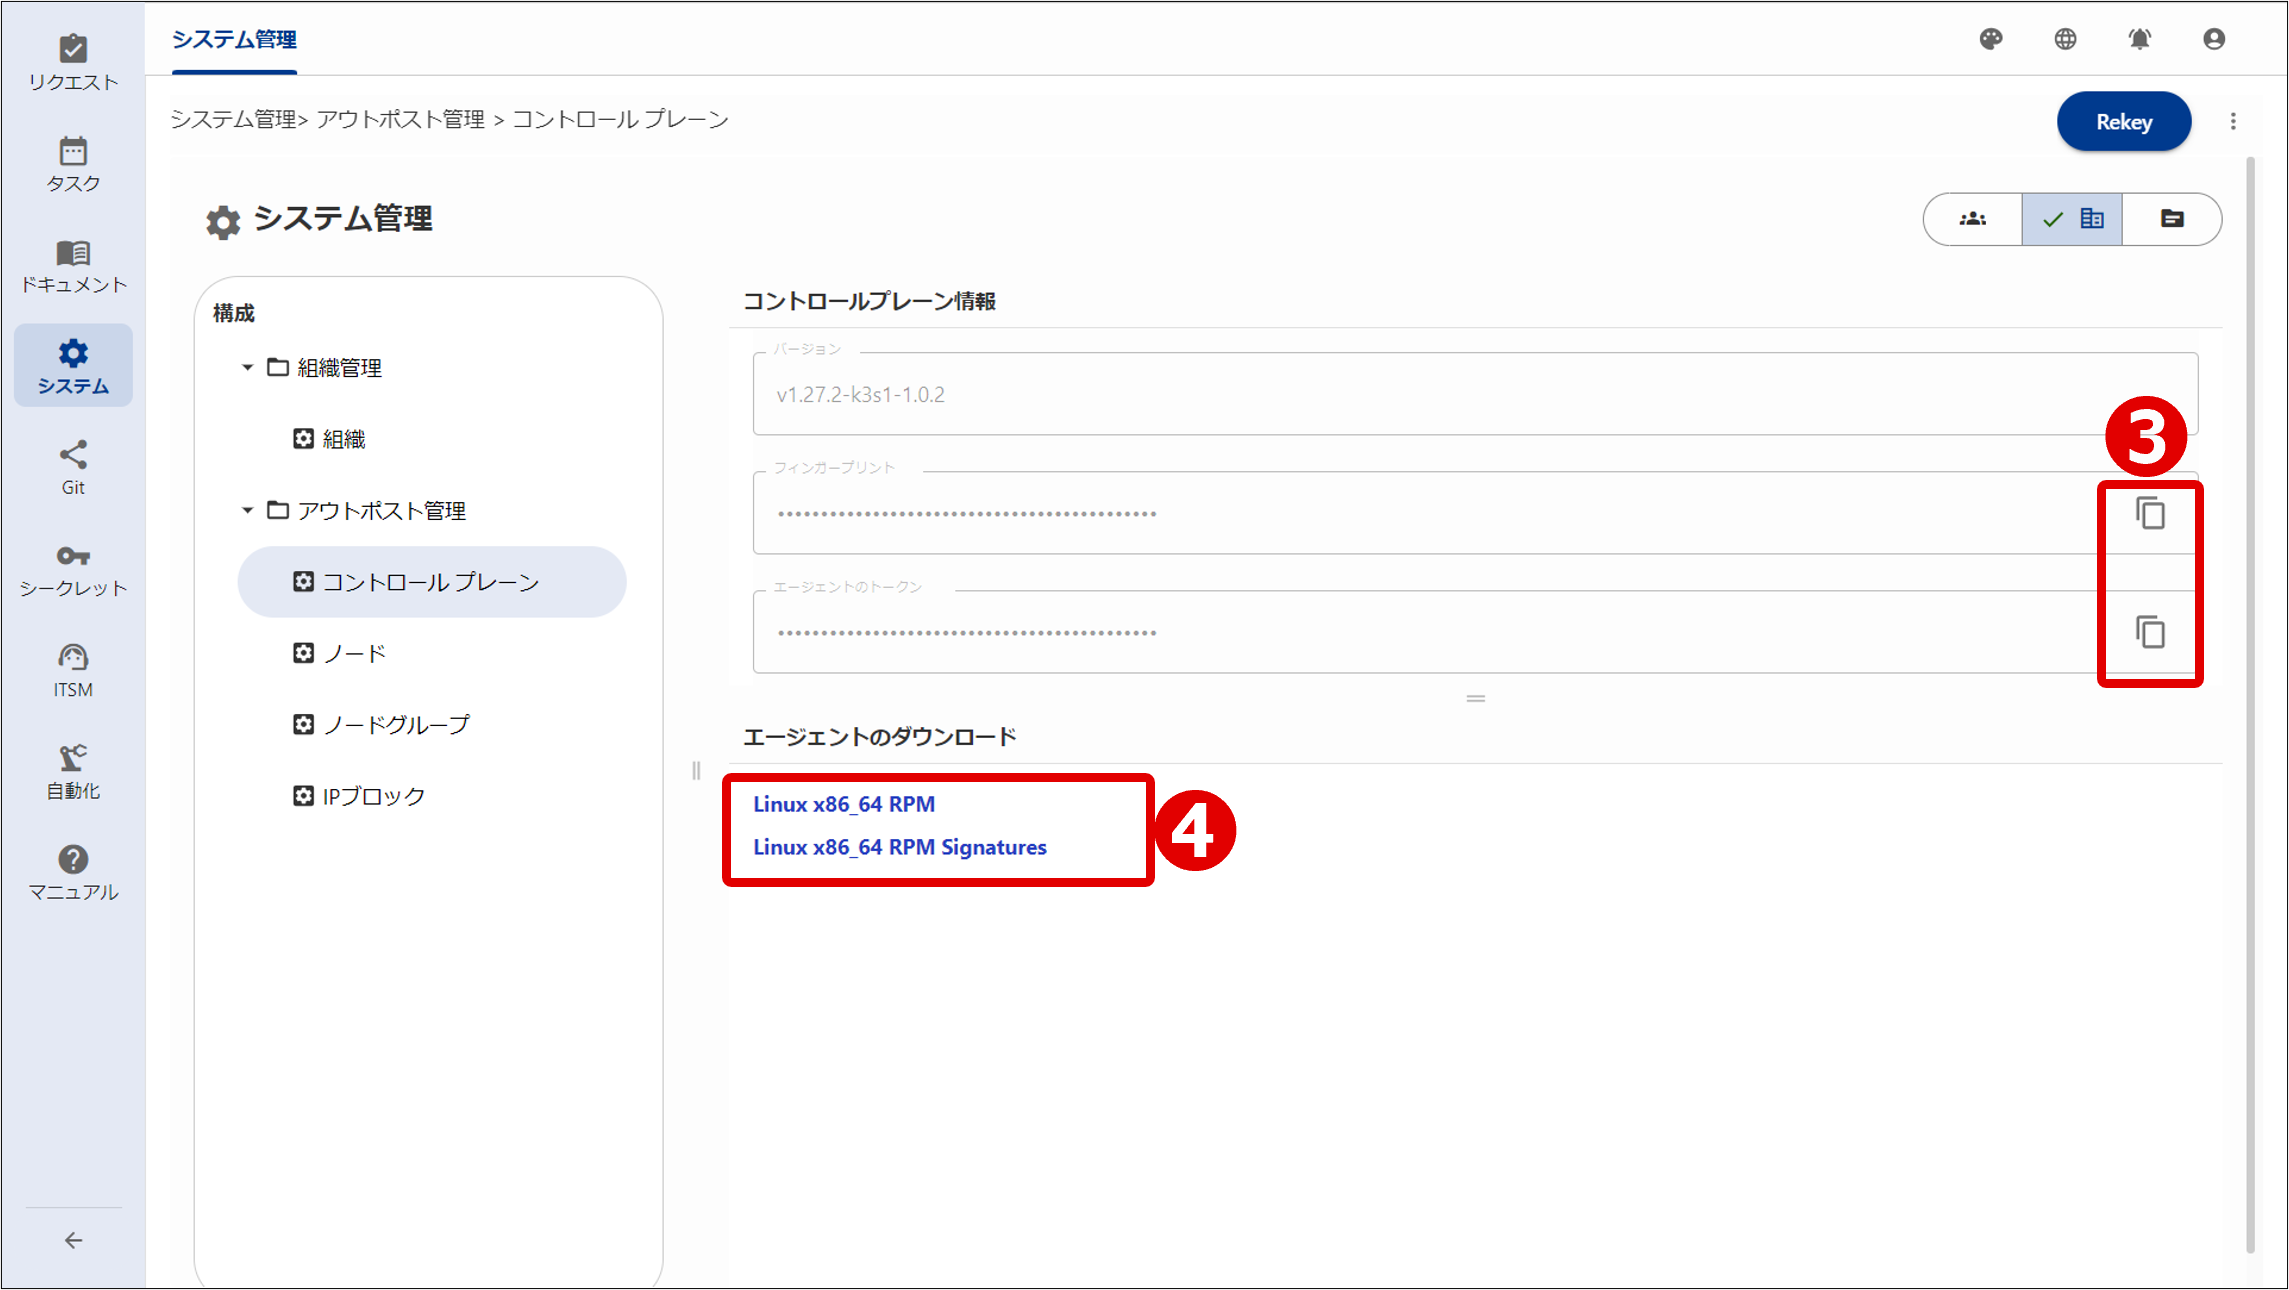
For information on the Control Plane window, see “Control plane management”.
[Setting in relay server]
⑤ Installing RPM package
# rpm -ivh opsi-outpost-RPM Package Version.x86_64.rpm
⑥ Editing user-configured file
For information on the contents of the installed RPM package, see "Contents of RPM package".
(Table) Setting items in user-configured file
| Item | Setting name*1 | What to set |
|---|---|---|
| Ops I domain name | OPSI_DOMAIN_NAME | - |
| HTTP proxy URL (optional)*2 | HTTP_PROXY | HTTP proxy server URL If the environment in which the agent is deployed is required to communicate with Ops I via a proxy server, specify the proxy server. |
| Control plane fingerprint | FINGERPRINT | Fingerprint obtained in Step ③ |
Control plane agent token*2
| AGENT_TOKEN |
Agent token obtained in Step ③ |
|
Ops I token*2
| OPSI_TOKEN |
Ops I token created in Step ② |
|
| Node name | NODE_NAME | Set an arbitrary name. However, use one-byte lowercase letters and do not set any name duplicated within the outpost configuration. The name that you set appears on the Node window of Ops I. |
| TCP port of the agent | REGISTRATION_PORT TUNNEL_PORT1 TUNNEL_PORT2 |
TCP port used by the agent to communicate with the control plane All three ports should be specified in the actual environment. TUNNEL_PORT2 should be commented out because it is not specified in the verification environment. [Default values] REGISTRATION_PORT:21400 TUNNEL_PORT1:21401 TUNNEL_PORT2:21402 |
The contents of the template file for the user-configured file are as follows.
######################################################
# Ops I Outpost Agent Configuration
#
# This file is a template of the Outpost Agent configuration.
# You must copy this file to /etc/opsi/outpost/outpost-config.env and
# edit it to change the parameters as appropriate for your environment.
######################################################
# The domain name of your Ops I tenant.
OPSI_DOMAIN_NAME=your-tenant.ops-integration.com
# (Optional) A URL of HTTP proxy server the Outpost Agent will use for
# connecting to the Ops I tenant.
# This parameter will be encrypted and replaced with HTTP_PROXY_ENC
# when the Outpost Agent starts for the first time.
# Uncomment the next line to enable this parameter.
# HTTP_PROXY=http://username:password@proxy.example.com:8080
# The fingerprint of the Outpost Control Plane.
FINGERPRINT=your_outpost_control_planes_fingerprint
# The agent token of the Outpost Control Plane.
# This parameter will be encrypted and replaced with AGENT_TOKEN_ENC
# when the Outpost Agent starts for the first time.
AGENT_TOKEN=your_outpost_control_planes_agent_token
# An Ops I token the Outpost Agent will use for accessing the Ops I tenant.
# This parameter will be encrypted and replaced with OPSI_TOKEN_ENC
# when the Outpost Agent starts for the first time.
OPSI_TOKEN=your_opsi_token
# A name of the Outpost Node on which the Outpost Agent will run.
# The name must follow the convention of DNS domain name and
# all alphabet letters in it must be lowercase.
NODE_NAME=outpost-node
# TCP ports the Outpost Agent will open on the Outpost Node.
REGISTRATION_PORT=21400
TUNNEL_PORT1=21401
TUNNEL_PORT2=21402
⑦ Starting outpost agent
# ./opsiopctl.sh start
Are you sure to proceed? (y/n)
y
Starting Outpost Agent.
Starting chisel.service.
Starting k3s.service.
Started Outpost Agent successfully
 Notes
Notes
When installing anti-virus software on a relay server registered as a node, exclude the following directories from the monitoring target.
- /etc/rancher/k3s
- /run/k3s
- /run/flannel
- /var/lib/rancher/k3s
- /var/lib/kubelet
- /run/netns/cni-
- /var/lib/cni/
- /etc/opsi
- /opt/opsi
- /var/opt/opsi
- /etc/opt/opsi
For information on the flow of job execution using a relay server, see “Using a relay server”.
(3) Deleting nodes
To delete nodes, follow the Steps ① to ⑥ below.
Steps ① to ⑤ are performed in the relay server and Step ⑥ is performed in Ops I.
① Stopping and initializing outpost
# /opt/opsi/outpost/bin/opsiopctl.sh stop -f
# reboot
② Deleting RPM package
# rpm -e opsi-outpost-RPM Package Version.x86_64
③ Deleting systemd-related files and reflecting changes
# rm -f /etc/systemd/system/k3s.service
# rm -f /etc/systemd/system/chisel.service
# systemctl daemon-reload
④ Deleting unnecessary directories
# rm -rf /etc/rancher/k3s
# rm -rf /run/k3s
# rm -rf /run/flannel
# rm -rf /var/lib/rancher/k3s
# rm -rf /var/lib/kubelet
# rm -rf "/run/netns/cni-"
# rm -rf /var/lib/cni/
# rm -rf /etc/opsi
# rm -rf /opt/opsi
# rm -rf /var/opt/opsi
# rm -rf /etc/opt/opsi
⑤ Reboot
# reboot
⑥ Deleting nodes in the Outpost Management window
Deleting a node in the Outpost Management window allows a node with the same name to be re-registered. An attempt to register a node without deleting another registered node with the same name will time out when performing Step ⑦ in "Flow of configuring outpost".
For details on the Node window, see "Node management".
(4) Upgrade outpost agent
Upgrade the outpost agent by following steps ① through ④ below.
Operations ① and ② are performed by Ops I, and operations ③ and ④ are performed by the relay server.
①Download new RPM package
② Confirm that there are no jobs running on the outpost node
- Do not run a workflow that executes a job that runs on an outpost node.
- In the AWX GUI, confirm that there are no jobs running on the outpost node. If yes, wait until the jobs are completed.
③Upgrade RPM package
# rpm -Uvh opsi-outpost-RPM package version.x86_64.rpm
④Restart outpost agent
- Stop the outpost agent.
# /opt/opsi/outpost/bin/opsiopctl.sh stop -f
- Start the outpost agent.
# /opt/opsi/outpost/bin/opsiopctl.sh start -f
Section structure