4.3.8.1 Ticket notification function
By using OTOBO to set up notifications, you can be notified by email or the Ops I GUI when an operation is performed on a ticket, such as creating or updating a ticket. This allows you to quickly address incidents and other critical issues as they arise.
(1) Ticket notification settings
To use the ticket notification function, use one of the following.
- Ops I notification function:
You can use the notification function of Ops I to send notifications via the Ops I GUI and e-mail. - If multiple notifications are generated for the same email address within 10 minutes, these notifications will be combined and sent in one email.
- Function using mail server:
Notifications can be sent via e-mail using the mail server prepared by the customer.
The characteristics of each notification function are as follows.
(Table) Notification function characteristics
| Item | Ops I notification function | Function using mail server |
|---|---|---|
| Notification method | Ops I GUI notification, e-mail notification
|
E-mail notification |
| Preparing a server | Not required
|
Required
|
| Preparing an e-mail account | Not required
|
Required
|
| Setting the notification method | Required in the following cases:
|
|
The following are key points to consider when designing e-mail notifications, as well as an example of the process flow.
(Table) Key notification design points and sample process flow
| Item | Key design points | Example of process flow |
|---|---|---|
| Ops I GUI notification/e-mail notification using the Ops I notification function | Organize notification timing and notification destination information in advance. |
1. Set up notification when a ticket is created in advance
2. OTOBO detects ticket creation when a new ticket is created in Ops I
3. Notifies via the Ops I GUI
4. Send with the Ops I notification function to the user's preconfigured e-mail address. E-mail notifications are sent in order of importance, so there may be a delay of about 10 minutes for Ops I GUI notifications.
 Tips TipsIf multiple notifications are generated for the same email address within 10 minutes, these notifications will be combined and sent in one email. |
| E-mail notification using mail server | Organize information on notification timing, notification recipients, and the mail server and authentication method to be used in advance. |
1. Set up e-mail notification when a ticket is created in advance.
2. OTOBO detects ticket creation when a new ticket is created in Ops I
3. Send ticket creation mail to the SMTP of the mail server prepared by the user
4. Send from the SMTP to the user's preconfigured e-mail address
|
For details on setting the notification function, see “Use Cases > Use cases for notifications and email-based ticket creation” in the “JP1 Cloud Service/Operations Integration User’s Guide (ITSM Operation Manual)”.
 Note
Note
By default, ticket notifications are sent to the creator, the owner, and the watcher of the ticket. However, if the person to be notified is not a customer user and is an operator who executed an event (for example, the creation of a ticket or the addition of an article) that caused the issuance of a notification, the user will not receive the notification.
If the email address of the operator is specified for "Additional recipient email addresses", though, the notification will be sent to the operator as well. For details on the settings, see [Admin] > "Manage ticket notifications" > "Create a ticket notification" in "JP1 Cloud Service Operations Integration User's Guide (ITSM Operation Manual)".
(2) Ticket watcher settings
In principle, notifications about ticket creation and changes are sent to the ticket creators and the agents assigned to the tickets. For details about exceptions, see the note in “Ticket notification settings”.
When you set up ticket watchers, you can add a watcher to the destination so that notifications will also be sent to the watcher. You can add, view and delete watcher are done from the Ticker watcher dialog box. Display the dialog box by clicking the [Watch] button on the Ops I Ticket zoom window. For details on adding, viewing and deleting watchers, see “Ticket zoom window”.
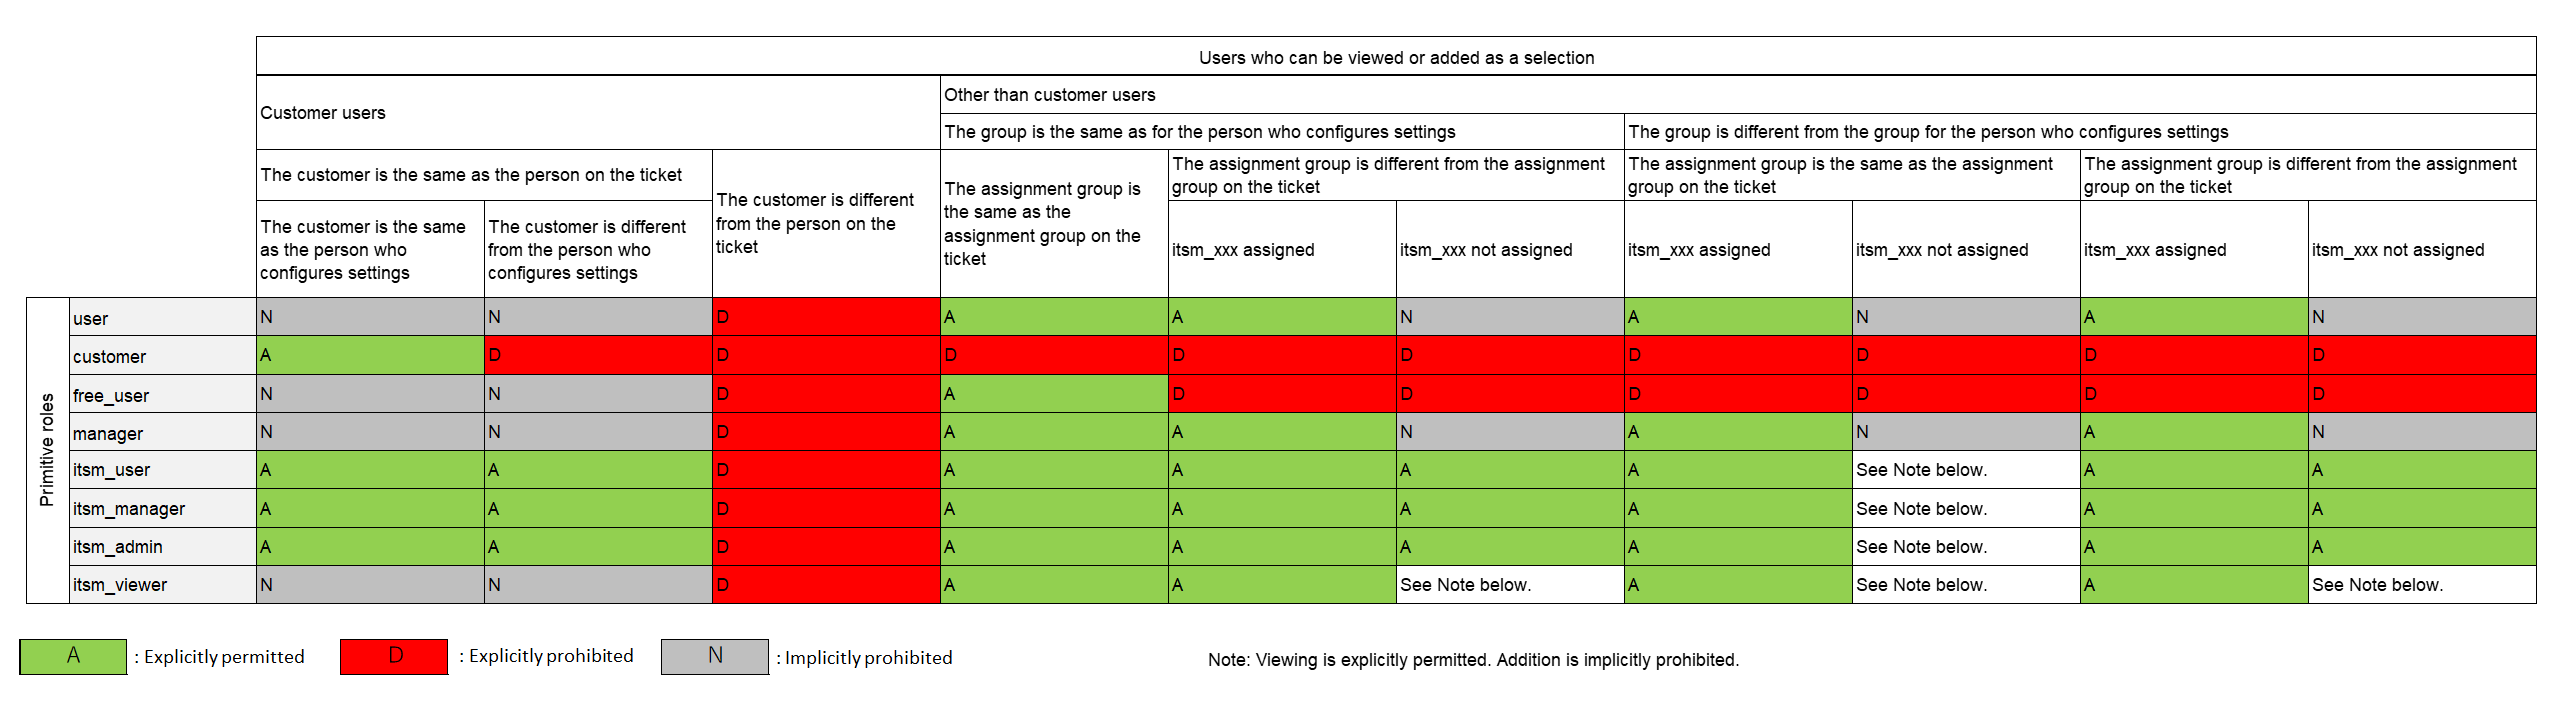
Also, when adding a watcher, the users displayed as watcher options will differ depending on the permissions of the user setting the watcher and the watcher candidates. The added watcher are displayed in the Watcher list and can be viewed and deleted.
The following shows the details of users that can be displayed and added as watcher candidates, and users who can view and delete them after they are added. In the table, the user who sets the watcher is referred to as the “setter”, and the Primitive roles itsm_admin, itsm_manager, itsm_user, and itsm_viewer are collectively referred to as “itsm_xxx”.
■ Adding watchers
The Primitive role assigned to the user who sets the watcher determines which users that can be viewed and added as candidates.
(Table) Users that can be viewed and added as watcher candidates
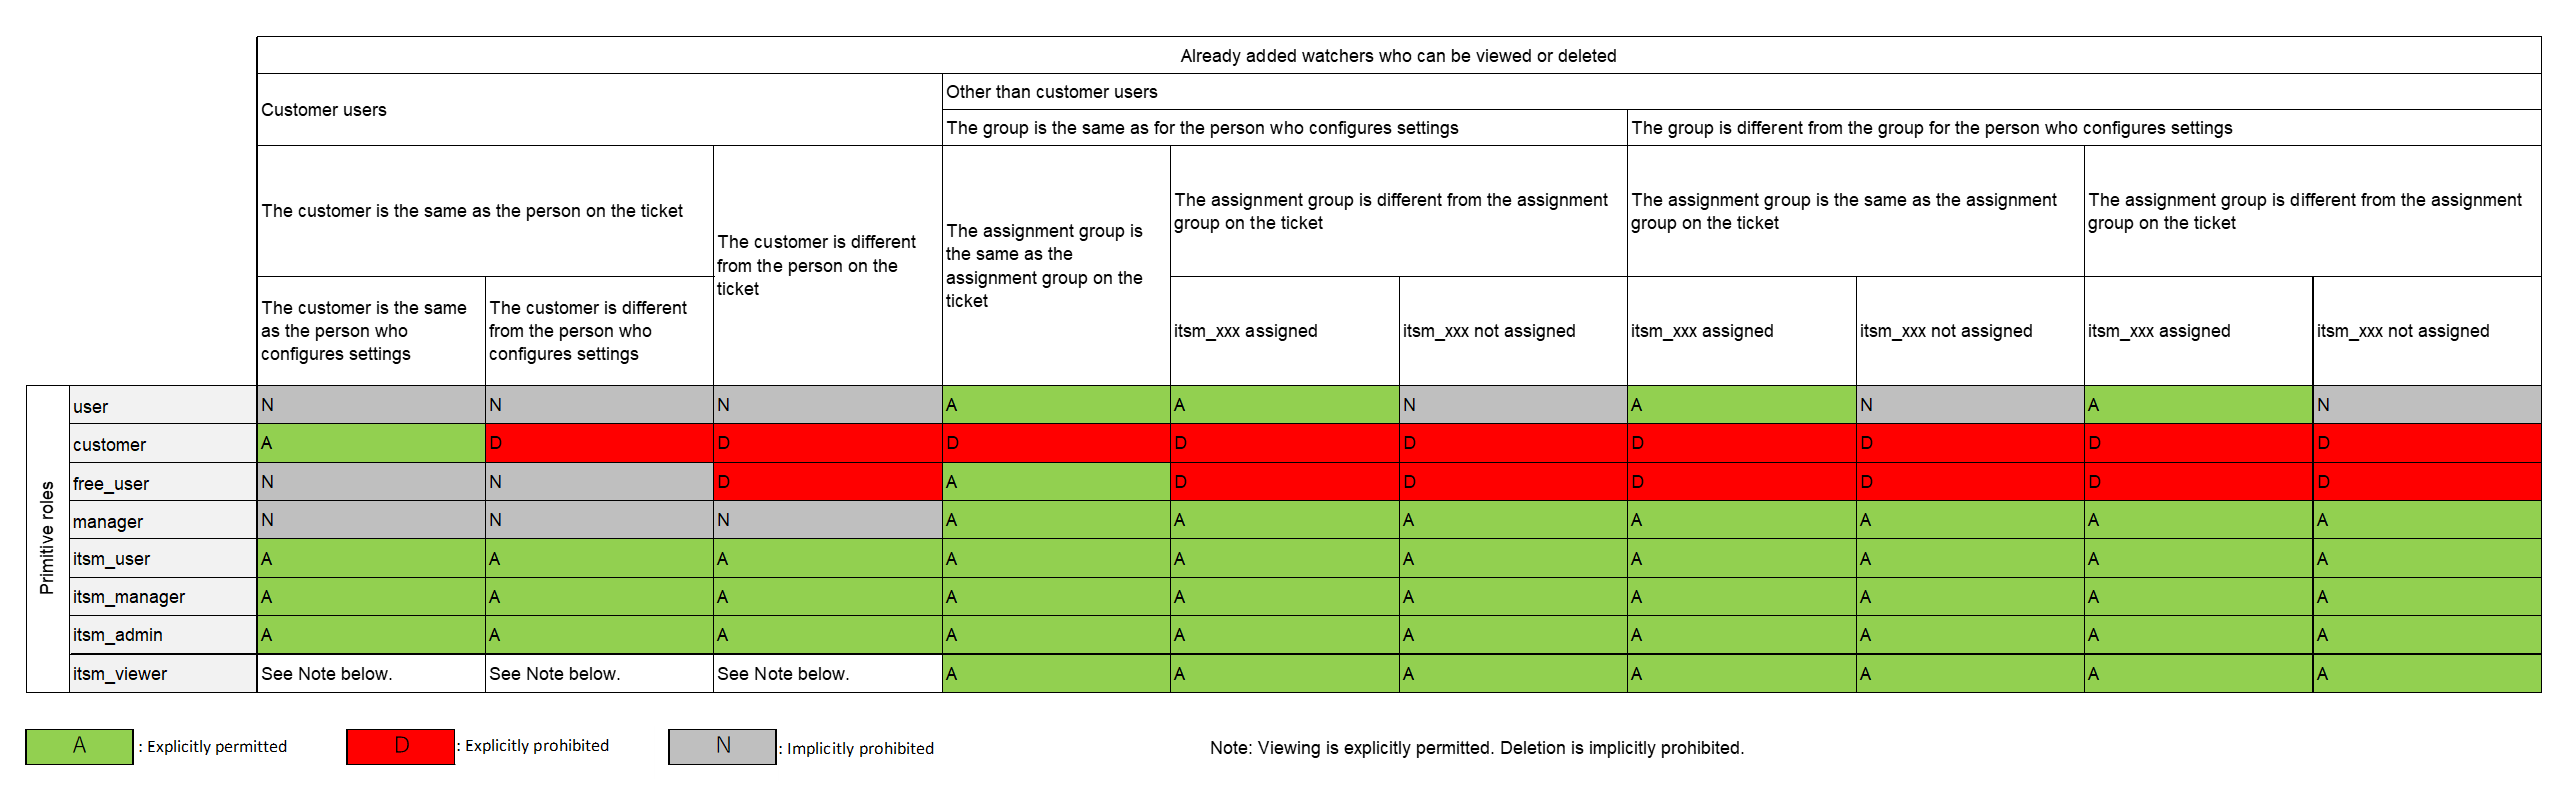
■ Viewing and deleting set watchers
The Primitive role assigned to the user who sets the watcher determines which watchers that can be viewed and deleted.
(Table) Watchers that can be viewed and deleted from the Watcher list
Notes
- When switching customer settings for users set as watchers, they must be set as watcher once more.
- When inheriting OTOBO information for deleted users, watcher settings will also be inherited.
- Notifications will also be sent to customer users designated as watchers when those customer users perform actions on tickets.