3.5 System
This section describes the System Configuration tab, GitOps Log tab, and Import tab in the system application.
(1) System configuration tab
The System Configuration tab is for managing users and organizations, and it is used for settings that are reflected throughout the entire system for the functions provided by Ops I.
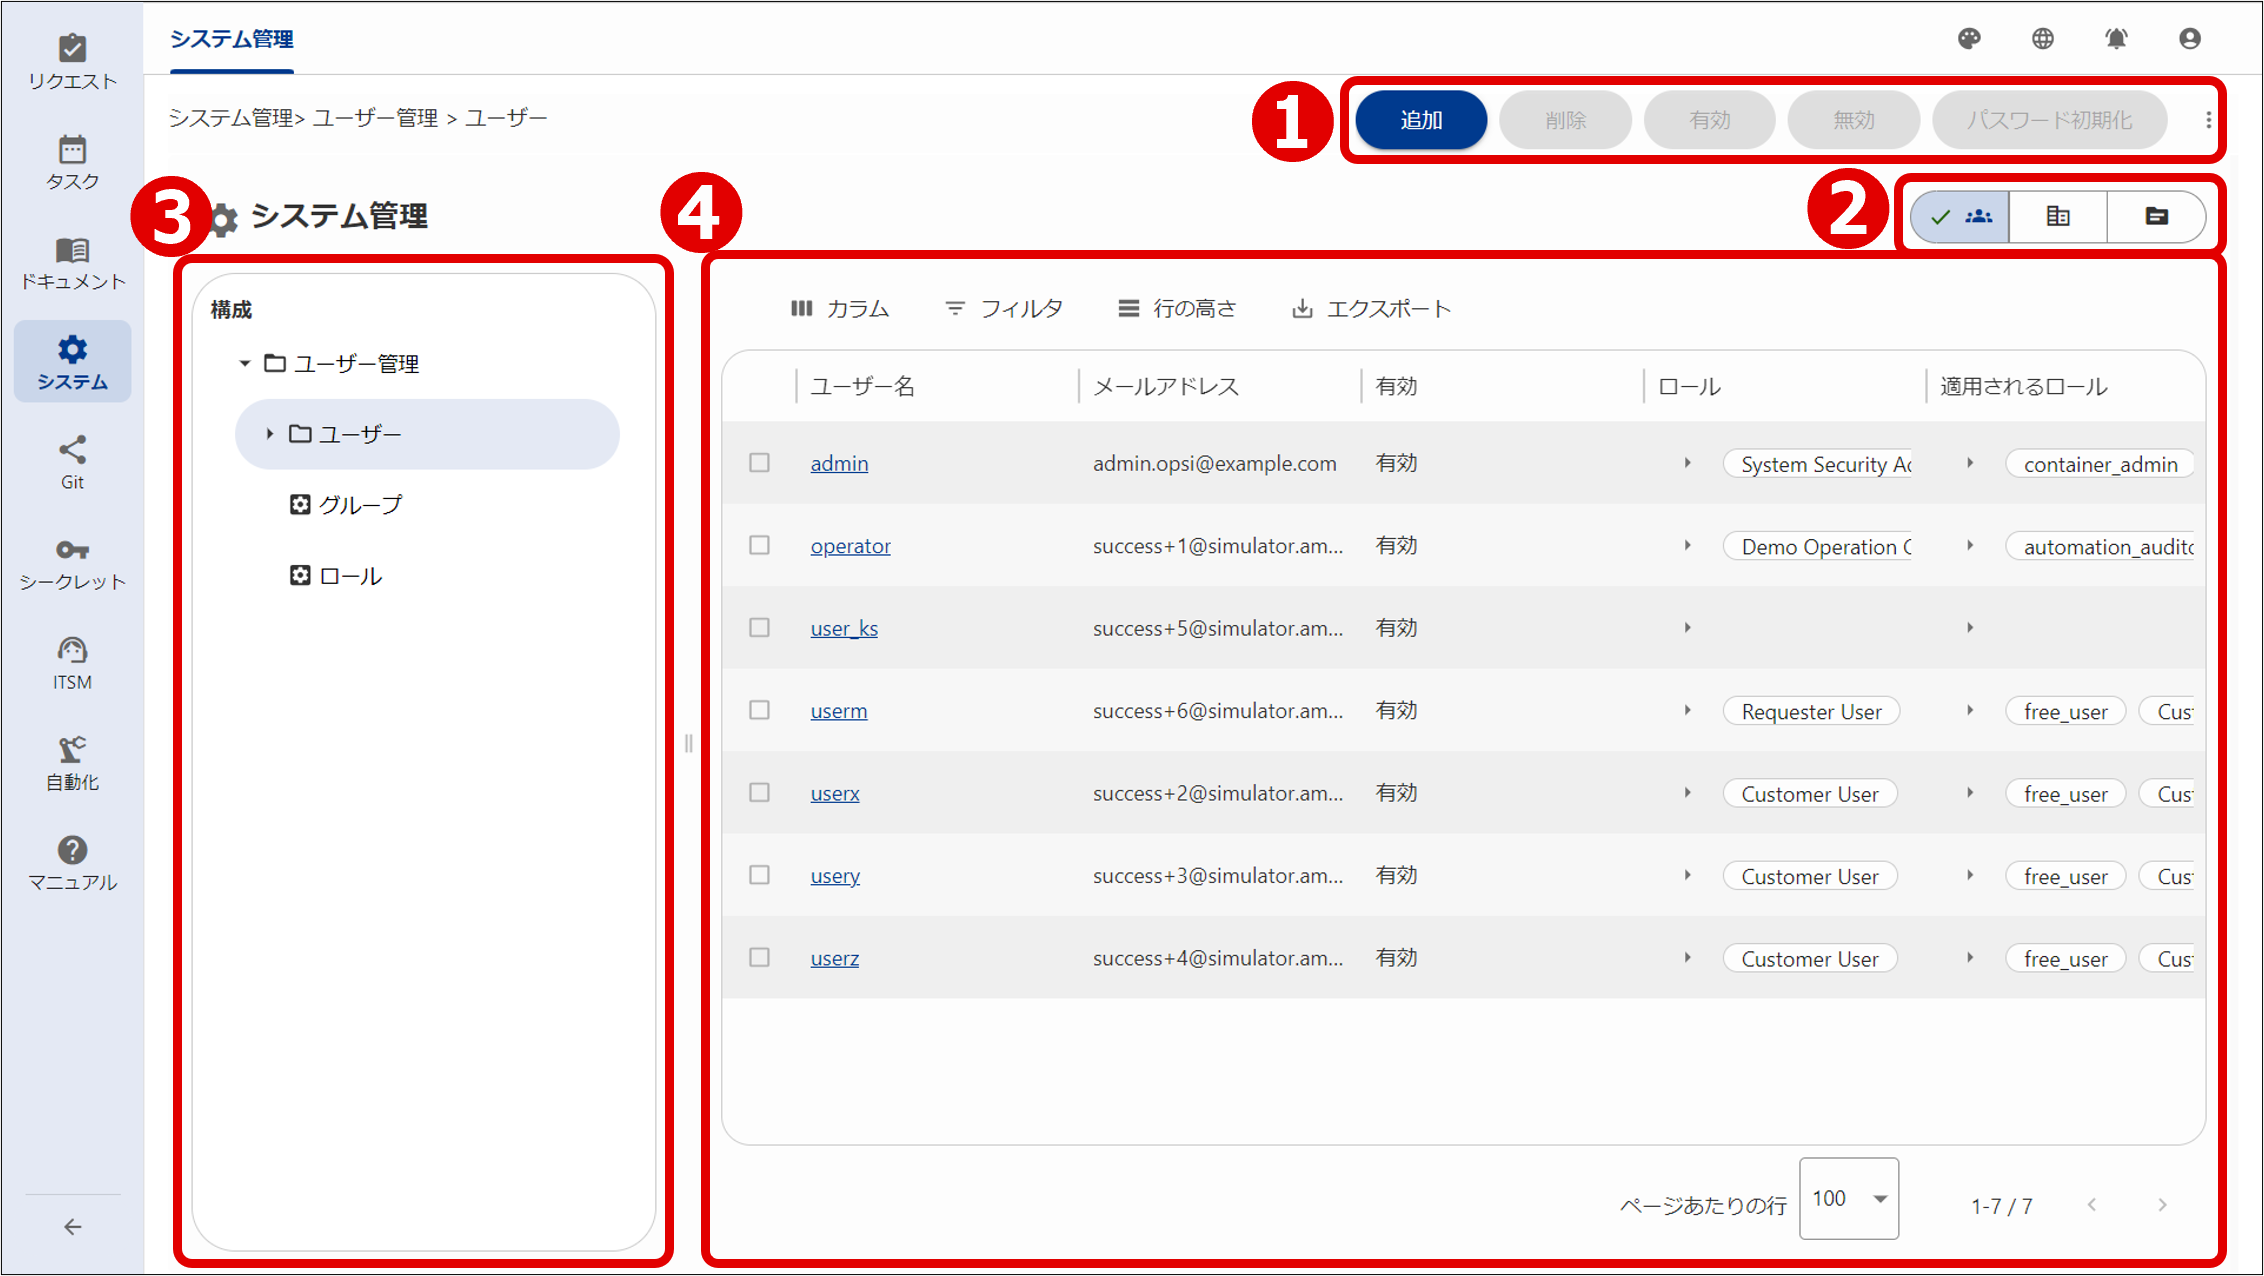
The System Configuration tab window consists of Operation buttons (①), Selection buttons (②), the navigation area (③) and the configuration area (④). Details are shown below.
(Figure) System Configuration tab window
(Table) System Configuration tab window configuration
| Components | Description | |
|---|---|---|
| ① | Operation buttons | The appropriate button will be shown according to the window displayed. The type of buttons displayed differs for each window. |
| ② | Selection buttons | The buttons are used to switch between the windows displayed in the navigation area and the configuration area.
|
| ③ | Navigation area | Displays a hierarchy of the display content selected with ②. |
| ④ | Configuration area | Displays the window for the selected content. |
(2) GitOps log tab
In the GitOps Log tab, you can verify the status of YAML file registration based on the API “gitops-logs”.
The “gitops-logs” API is automatically executed when the GitOps Log tab is accessed, and as a result, an operation log including the success/failure of the executed YAML file operation and the file errors (syntax/dependencies) that caused the failure is displayed.
Editing of the GitOps Log tab window is not supported. Details are shown below.
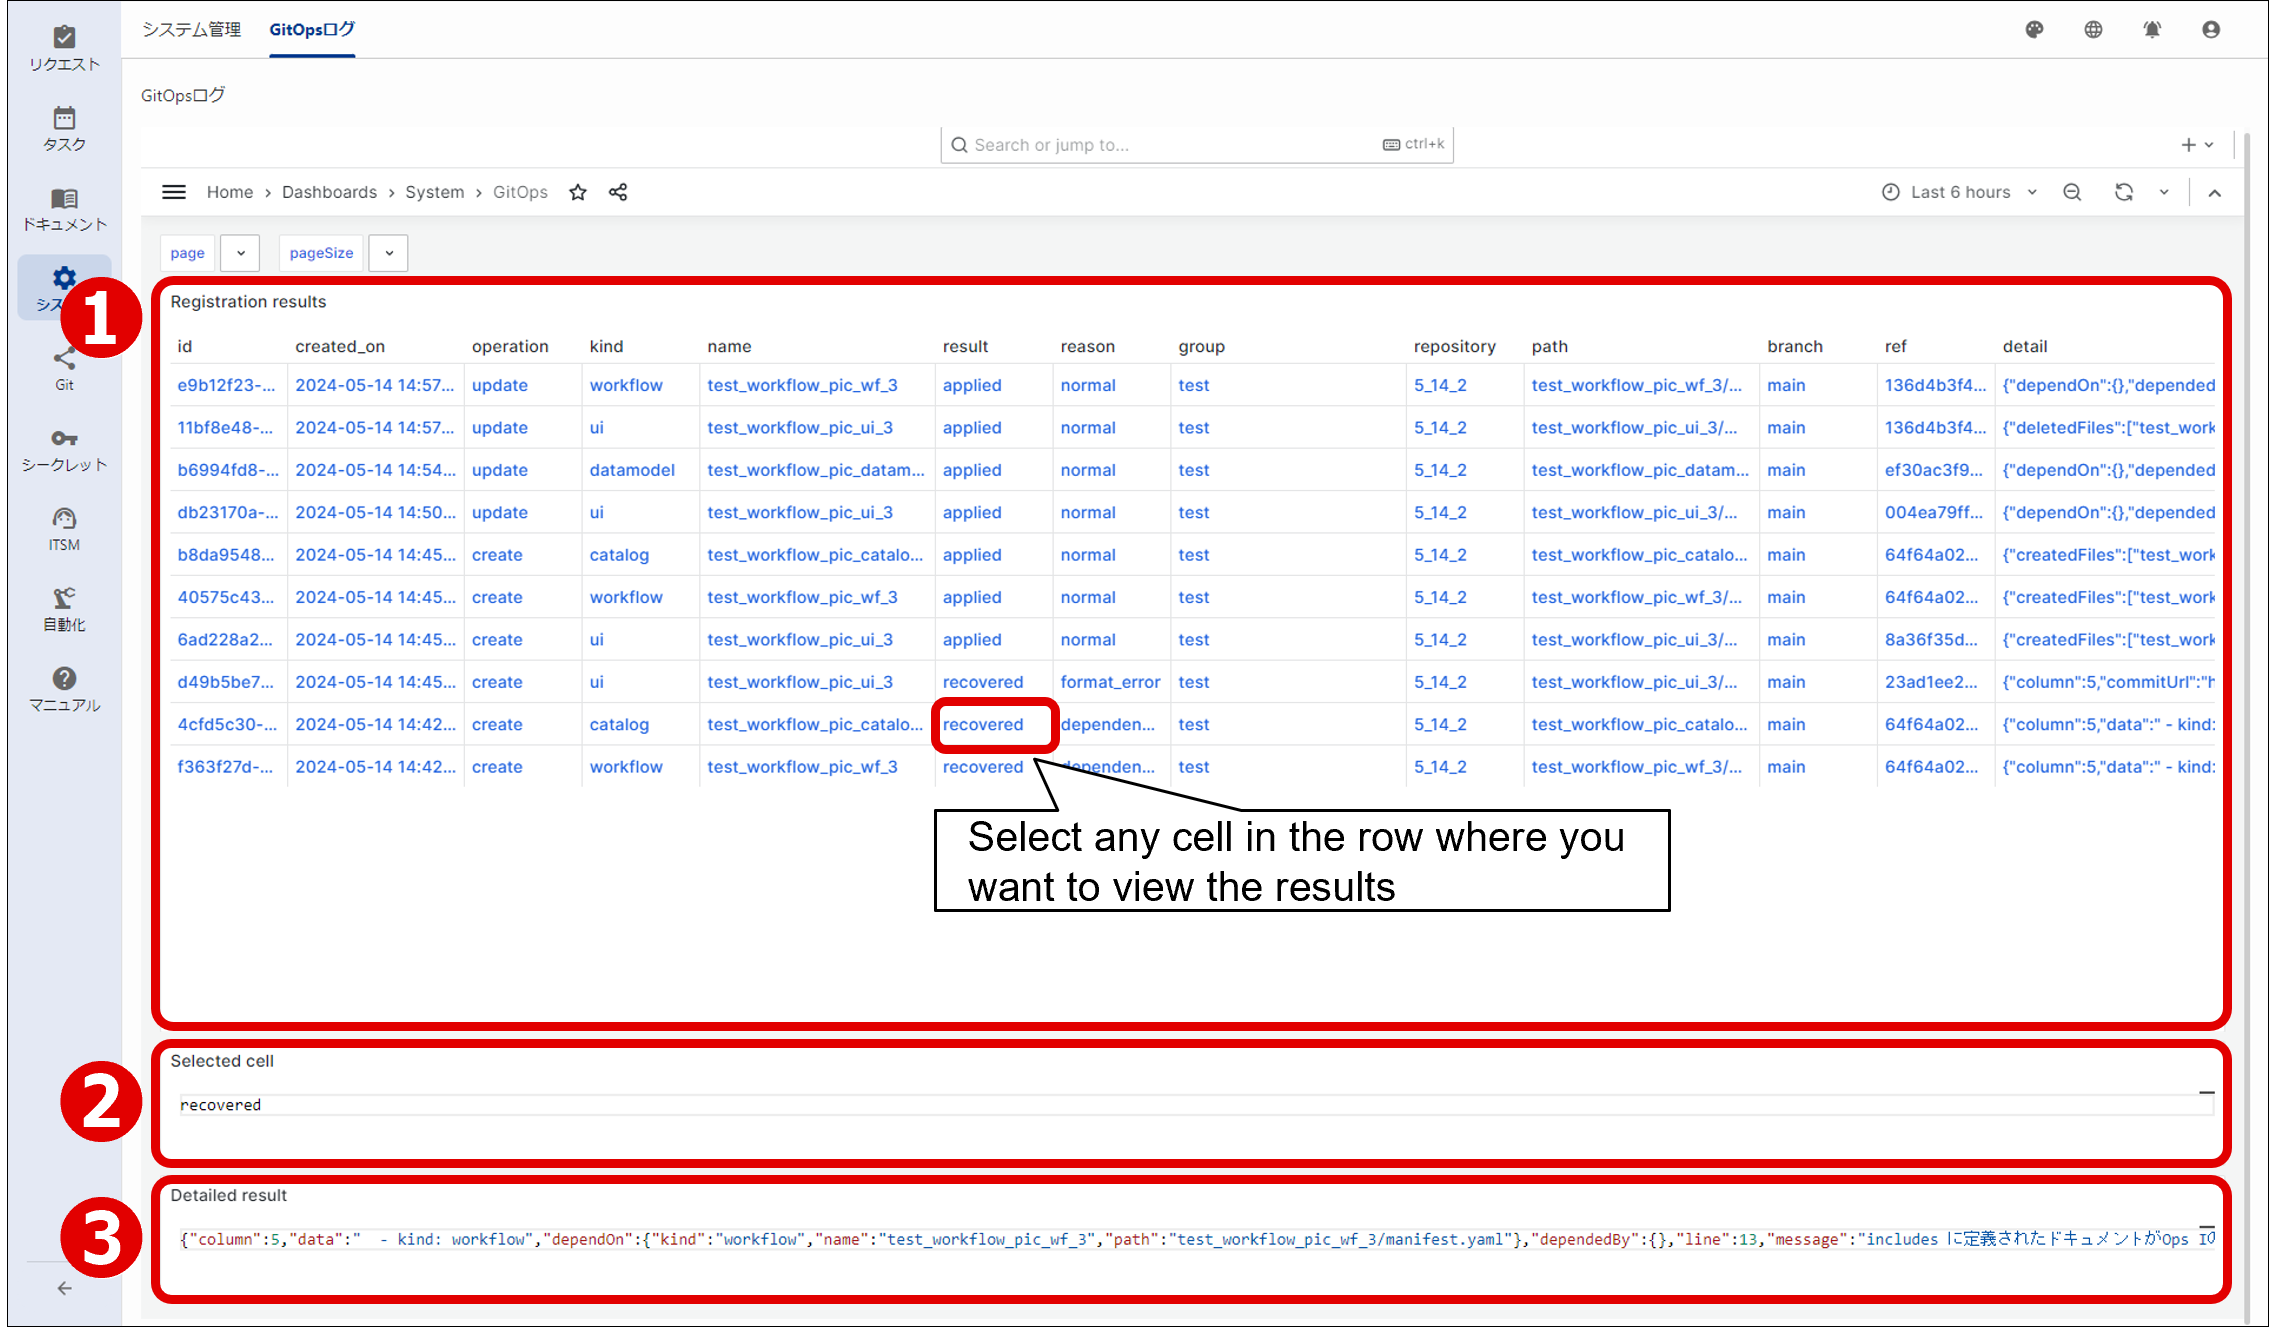
(Figure) “gitops-logs” operation log confirmation window
(Table) “gitops-logs” operation log confirmation window configuration
| Components | Description | |
|---|---|---|
| ① | Registration results | Displays the operation log for the "gitops-logs" API. Selecting any cell in the row you want to check the results will display the details in areas ② and ③. |
| ② | Selected cell | Displays the value of the cell selected in ①. |
| ③ | Detailed result | Displays the values in the detail column (registration result details) of the row containing the cell selected in ①. |
The display of the results can be changed at any time after accessing the GitOps Log tab. By displaying the log for the time period when the YAML file operation was executed, you can confirm the desired log.
The language of the error messages displayed in the Detailed result cannot be changed either in the language settings of Ops I or in the language settings of the browser.
(Table) GitOps log display change items
| Item | Description |
|---|---|
| Page | Specify page browse |
| PageSize | Number of logs to display on one page |
When these values are changed, the API is re-executed based on this information and the log is displayed.
For how to read the operation log, such as the operation success/failure, see “Checking registration status of YAML files”.
Also, for information such as on access permissions for the GitOps log tab, see “Checking registration status of YAML files (GUI)”.
 Notes
Notes
The following "failed" results may appear in the operation log, but this is not a problem.
name: conf
result: failed
reason: format_error
detail.message: "Validator for kind 'system', apiVersion '1.0' does not exists"
(3) Import tab
The Import tab enables you to import CSV files containing group information, role information, and customer information that was entered when, for example, Ops I was deployed, and create them in bulk.
You can verify the import status on the import job list window. If an error occurs, you can identify the row causing the error.
If you want to check registered groups and roles, you can use the [Group] window and the [Role] window to view and export them. For details, see “Basic window structure”. To check registered customers, select [Customers] > [Customer Administration] in the ITSM application.
Users who have the Primitive role “user_admin” assigned can use the Import tab.
The import job list window consists of the Import button (①) and the import job list (②). The details are as follows.
(Table) Components of the import job list window
| Component | Description | |
|---|---|---|
| ① | Import button | Clicking this button displays the import dialog box. For details, see "(Table) Components of the import dialog box". |
| ② | Import job list | Details on import jobs are displayed in a list. The following items are displayed:
|
Clicking the Import button displays the import dialog box. This dialog box enables you to upload a CSV file. You can start the import by selecting the resource type. The details are as follows.
(Table) Components of the import dialog box
| Component | Description | |
|---|---|---|
| ① | Resource type | Select the import target from "Group", "Role", and "Customer". |
| ② | Import file upload area | Upload the CSV file to be imported. When you click the "file" link in response to "Drop or upload a file to add", the file operation dialog box is displayed. To upload a CSV file, select it from the file operation dialog box or drag it to the dotted box. You cannot upload multiple CSV files simultaneously. You can upload a file that meets the following conditions:
|
| ③ | Start import | Clicking this imports the CSV file uploaded in the import file upload area. This is not activated when no file is uploaded in the import file upload area. |
| ④ | Cancel | Clicking this closes the import dialog box without uploading any CSV file. |
The CSV file format differs depending on the import target. The formats are explained in the tables shown below. Here, only the components of groups, roles, and customers that are subject to import are listed.
Components that are not subject to import (excluding the valid field for a customer) are not fields required for a group, role, or customer, so additional fields should be specified on an as-needed basis. The valid field for a customer is created in a valid state.
When entering components on the first line of the CSV file, you must separate those components by commas (,). On the second and subsequent lines, you must enter comma-separated values to be imported in the order the values are located on the first line.
When specifying multiple values for a component, you must separate those values by semicolons (;).
<Example>
dev,dev@example.com,DevelopmentTeam,role1;role2
| Component | Type | Required | Description |
|---|---|---|---|
| name | string | Yes | Group name |
| string | No | E-mail address of the group | |
| description | string | No | Group detail |
| assignedRoles | array | No | Roles associated with the group Only roles existing in Ops I can be specified. The roles to be specified must be created or imported beforehand. |
| Component | Type | Required | Description |
|---|---|---|---|
| name | string | Yes | Role name |
| description | string | No | Role detail |
| associatedRoles | array | No | Related roles Only roles existing in Ops I can be specified. The roles to be specified must be created or imported beforehand. CSV imports are performed in descending order of lines. Therefore, if you wish to import a role along with other roles specified in associatedRoles in the CSV file, the former role must be located on a line above the line specified by associatedRoles. |
(Table) CSV format for customers
| Component | Type | Required | Description |
|---|---|---|---|
| id | string | Yes | Customer ID |
| name | string | Yes | Customer username |
| street | string | No | Street |
| zip | string | No | Zip |
| city | string | No | City |
| country | string | No | Country |
| url | string | No | URL |
| comments | string | No | Comment |
Notes
- If an error occurs during import, you must correct the problem causing the error and redo the import.
- Do not edit any group, role, or customer while importing is in progress.
Section structure
3.5.1 User management
3.5.2 Identity provider
3.5.3 Organization management
3.5.4 Outpost management
3.5.5 Repository management